Showing posts with label drive. Show all posts

Wednesday, 3 April 2024

BMW Option: RHD to LHD switchable controls… available to UK in the 1980s. How have I never seen this before?!

Yes, this is not sci-fi, but an actual option available to UK BMW buyers in the 80s. Driving to Europe in your E30? No problem, just fold the glove box down to reveal a left-hand dashboard, swap the steering-wheel over and off you go, all ready for continental motoring!

Belive it or not this was a common idea manufacturers were toying with back then, quite a few other marques producing concept cars with the feature, but I am surprised BMW actually built it. I doubt this was a common option and am not aware of any surviving examples.


Sunday, 26 September 2021

E30 318i: Speedometer / Odometer faults + check list

If your E30 speedometer is broken, your odometer isn't turning or both, then here is a troubleshoot check list to find and fix the fault. Doing the work yourself is a bit fiddly, but totally doable if you are handy with a soldering-iron.

** A more detailed guide / thread all about E30 speedometer / odometer faults by 03IRM3 on r3vLimited.com is here - https://www.r3vlimited.com/board/forum/e30-technical-forums/general-technical/59019-e30-speedometer-repairs-failure-modes, which was a great help. **

NOTE: If your speedometer is not reading, before starting to diagnose the instrument the first thing to check should be if there is a pulse being generated by the speed-sensor in the differential, see E30Zone Wiki here.

Broken Odometer drive gear.
This is the most common problem when the odometer has stopped turning. The drive gear from the stepper motor that turns the larger cogs tends to split on higher mileage cars causing it to skip teeth and not turn the odometer gearing. Replacement gear sets can be bought from eBay for a few quid.


Burnt out resistor.
This is the main power resistor on the 12v + input to the PCB and it's never usually failure of this component that causes it to burn out. Instead, failure of a component further upstream is usually the culprit by drawing way too much current, causing the resistor to work double-time and overheat. This one was still working amazingly, given the heat it had been producing that charred everything around it, but I threw a new one in anyway. The value was about 150 ohms, so that's what I went with.


Blown capacitor.
Sudden failure of both speedo and odometer can often be down to the main power capacitor blowing. This is visible in the above pic to the right of (and next in sequence to) the burnt out resistor. It's a basic 220uF electrolytic capacitor and is very simple to replace with only two pins needing de-soldering, so should be the first step in troubleshooting a dead unit, even if the cap itself doesn't appear blown. Mine had been scorched by the overheating resistor, but seemed ok. I replaced it anyway, but it did not help with mine.


Snapped wire on Odometer stepper-motor coil.
This is rare, but does happen as 03IRM3 has seen one and mine had this too so I guess it does happen, where one of the single strands of copper coil for the stepper-motor snaps off its pin on the PCB. It’s possible that this happens due to time/age and vibration in the vehicle, but could likely be due to manhandling the unit while it is out for other repair work. Either way, it’s an easy fix to just solder it back in place and will be stronger than it was before at least.


UAF chip blown.
If none of the above fixes have worked and both speedo and odo are still not working, the likely culprit is that the UAF I/C chip has malfunctioned and is not processing inputs and outputs correctly, which leads to the resistor burning out, caps blowing and the odometer coil overheating. These UAF2115 chips are common, used in many speedo/odo units, taxi-meters, tachographs etc., so replacements can be found on eBay or electronic component sites for a few £/$, but this is probably the most advanced fix needed for these units and the question at this point is whether it's worthwhile. 03IRM3 has replaced chips as a last resort only to find the unit still won't work, so I decided that with all other fixes not working and my odometer still needing new drive gears that it was time to junk it and seek a replacement unit... [THIS POST].

Sunday, 21 July 2013

E39 530d: Air-Con Drive Belt Snapped - Fixed, now heatwave over...

With the recent heatwave I noticed my air-conditioning appeared to be struggling. It must have been over a year since I last stuck it on full snowflake mode and I know these things fade-off, but it had been working fine, so before I shelled out the £40 or so to get the system re-charged with gas, I figured I'd check the pipes and filters to make sure nothing was clogged up, as everything else had been round MOT time. Apart from a few errant sycamore seeds the system beneath the filters was like new, so a quick peer down the front of the engine showed the real culprit - the drive-belt had snapped and was wrapped like a snake, almost out of view, around a radiator hose.

I was surprised there is no warning-light on the dashboard or the climate-control unit for this, as there is with the alternator-belt, the air-con simply stops and the system functions like a normal blower/heater. With British summers being the way they've been, the belt may have been snapped a year or two ago and I've been totally unaware. It took our recent heatwave, and this is the first time it's been anywhere near 30 degrees for 5 or 6 years, to decide something was actually wrong. I think the most likely cause is all the time I spent running the car with the compressor turned fully off while the battery was in poor health, the constant resistance snapping the belt.

Naturally I would have gone straight to BMW for an OEM belt, but it was 2.30 on Saturday afternoon and they'd closed for the weekend, so I hit up Euro Car Parts, who had the right belt in stock at their new branch which is less than 2 miles from my house. It's an OEM quality part, made by Continental and came to £9.84, so I can't really complain!

PROCESS:

I fitted the belt in about 30 minutes, without raising the car, removing the fan or even moving it onto the drive, using a quick and dirty method, which is fine for the air-con belt, but wouldn't work for the main drive-belt covered in this post.

1. Remove the front-piece of the engine cover [the slim one covering the PAS-fluid filler] by undoing the two bolts on top and one down the left-hand side using an M4 allen-key.

2. Undo the six fastening lugs for the front engine-undertray using a crosshead screwdriver, bend the tray back, free the leading edge from the front-bumper and lower it out of the way.

3. Place the new drive-belt over the two main pulleys from above and wedge the belt over the tensioning-pulley so it doesn't slip off and can be accessed from beneath the car.

4. From below the engine, hold the belt in place at the tensioning pulley and use a 16mm ring-spanner to rotate the tensioning-pulley downwards on its spring-bracket. [An open-end spanner will slip off easily and there isn't quite room for a ratchet-handle without removing the fan.]

5. Push the belt over the tensioning-pulley so it forms a 'pair-of-glasses' shape, as shown on this page of RealOEM.com. Ensure the belt is still in place over the two main pulleys, it may take quite a bit of rotating the tensioner to achieve this, and release the tensioning-pulley.

6. Refit the engine-cover and undertray - you're done, cold air!

Monday, 26 September 2011

E39 530d: Drive-Belt Bracket snapped!!

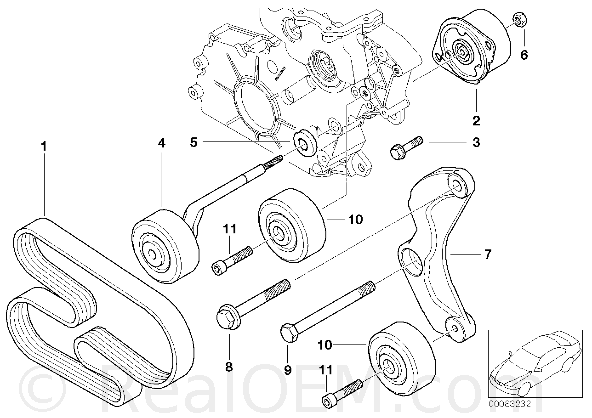
How very unfortunate - the bracket holding the guide-pulley for the auxiliary drive-belt has sheared clean in two and rendered the car undriveable!

As I started the car on Friday afternoon there was a crunch from the engine. It started up OK, but the battery warning-light came on and I lost power-steering. Assuming the drive-belt had snapped I ordered a new one and started to take the broken one out, which turned out to be involved in itself as you need to remove the fan-cowl for access, and the fan with it! Once I got to the belt I noticed it hadn't snapped after all, but it would not sit tight around the pulleys.

That's when I noticed a pulley was missing and sure enough there it was lying in the floorpan with the bolt still through it, attached to a torn piece of metal. Worrying that the chunk was part of the block itself I continued to dismantle the front of the engine until I found the culprit. Luckily its a metal dog-leg bracket that bolts on to the engine-block to hold the pulley in place and it unbolted easily enough. I guess the shock of another cold diesel startup made it give way, or the PAS-pump struggled to right the wheels on the gravel I was parked in and put too much strain on the belt.


Either way, it appears to be a common enough fault that new brackets aren't hard to come by - the cheapest and easiest place in this case is, surprisingly, the BMW dealerships themselves. I rang BMW WIlliams in Liverpool this morning, giving the part number (7 in the below diagram) and they said it would need ordering but will arrive this afternoon so fingers crossed as the car is off the road.

I'll get back with the results and a full How-To guide soon!


No.DescriptionSupplementQtyFrom Up To Part Number

01RIBBED V-BELT5 PK X 2063111287787369
02Belt tensioner111282354130
03Torx screw with collarM7X38211517789351
04Adjusting pulley with lever111282354131
05sealing111282247187
06Flange nutM6113537801713
07Bracket111282248561
08Hex bolt with washerM10X70 ZNS3107119903817
09Hex boltM10X125107119900630
10Roll pin211282247435
11Fillister-head screwM8X35 ZNS207119901027