Showing posts with label snapped. Show all posts

Sunday, 21 July 2024

F10 530d: New O/S / driver’s side rear spring.

Did both of the rear struts and springs a few years ago, but find the right side one has broken right at the top and will need doing for this years MOT test. As usual with 5 Series models when the spring snaps at the top or bottom, there was no tell-tale clunking or change in driving characteristics, so who knows how long it's been like that. At least it is not a big job.

*GUIDE: F10 Rear Shock / Spring Replacement*

*GUIDE: F10/F11 Front Shock / Spring Replacement*

The rear struts were replaced several years ago from a car with 80k miles. Their combined run in both cars has still added up to less than the mileage on the original ones!

Sunday, 28 July 2019

E46 318i - Broken Coolant Hose! [11537572158]

 After about 650 miles in the E46 Touring the radiator light came on. Just the amber warning, to let me know it was getting low, not the red warning when it is running out and I refilled about 1.25 litres of water / coolant to the engine. This seemed about right to me, as I feared it may be using a bit of water and there was plenty in when I bought the car so 1.25L in 650 miles isn't catastrophic and can be lived with.
About two weeks later the radiator light came on again and I dutifully refilled 1.25 litres, but the car had only covered 120 miles so I knew something was now amiss, only for the light to come on yet again after just five miles of my six mile round trip to work. Under the hood with the engine running I could see a huge pool of water in the under-tray and a drip, which after much tracing turned out to be coming from a slim rubber hose that connects to the left side of the cylinder-head [N42 engine]. It was a constant drip, but when I wiggled the hose-end the coolant began to spray round the engine-bay, so here was the culprit. Turns out the hose-connector into the head was completely sheared off, as you can see in the pic, and should extend about half an inch into the housing. The only thing holding any water into the upper engine at all was a single M6 thread screw.

The hose in question was BMW Part No. 11537572158, shown in the diagram connecting the thermostat to the cylinder-head. This is a common fault I am told on N42 and N43 engines, along with several other coolant hoses that have plastic end connectors, particularly in the US where kits can be purchased to convert the brittle plastic ends to aluminium ones. This seemed unnecessary for me, given the cost of a replacement part and the age of the car.

As there are so many coolant hose variants, finding the right used OEM one on eBay and the like can be difficult, but they do pop up. I was able to get a new spurious part through work for just £18, but I'm sure commercial motor factors will not be much more expensive as long as they have stock. Spurious hoses tend to come with a new rubber O-ring fitted. BMW dealerships will charge a premium, but at least fitment is guaranteed and they are revised parts, though these may not come with the rubber O-ring which will also need to be ordered.

Friday, 15 September 2017

F10: Clutch Pedal-Pin Repair / Replacement [E60, E90, E92, F01 etc.]

SYMPTOMS:
  • Clutch pedal appears to collapse / become loose / twist to one side suddenly when depressed.
  • Clutch pedal feels loose / collapsed and will not depress properly.
  • Engine will not start and dash displays 'Depress Clutch to Start Engine' message while clutch is depressed.
  • Gears will not engage or only partially engage while clutch pedal is depressed.
CAUSE:
Heavy clutch use / clutch-wear causes undue stress to the pedal-box [2 in diagram] and causes the plastic pedal-pin [8 in diagram] to snap / work its way loose. There are slim plastic clips at the end that stop the pin sliding out, but once these start to break off the constant motion makes the pin slide out very easily. When the pin is loose the clutch-pedal wont depress properly, which means the car cannot be put into gear or even press the clutch-switch to start the engine.


"GET YOU HOME" QUICK FIX:

1. Remove the trim-panel above the driver's footwell by undoing the T-20 Torx screws holding it in place. If you do not have tools to do this the trim can be forced off firmly and gently without breaking the plastic. The screw heads should pop out of the oblong holes in the panel, which can be bent back into place later and refitted.

2. Locate the end of the clutch pedal-pin where it has come out of the pedal-box, just to the right of the metal bar that attaches to the top end of the clutch-pedal.

3. Manoeuvre the clutch pedal back into position by hand, so the metal bar at the top of the clutch-pedal is straight with the eyelet either side of it in the pedal box and slide the pedal-pin to the left until it is fully into the far eyelet.

** This will get the car moving again to drive home, but the pedal-pin will soon slide back out. Reaching under the trim and locating the end of the pedal-pin will mean you can make sure it stays fully in place while stopped at traffic lights, so you technically run the car like this indefinitely. Still this is by no means a long-term solution. **


REPLACEMENT:

** You will need 'Clutch Pedal Pin' BMW Part no. 35306761029. **

1. Remove the trim panel above the driver's footwell that surrounds the pedals using a T-20 Torx socket.

2. Remove the coin-tray / stow-box to the right of the steering-wheel by undoing the two screws in the upper corners with a T-20 Torx socket and lifting it out top edge first.

3. Remove the single screw holding the electronics module to the right of the pedal-box using a T-25 Torx socket, remove the module from its housing and rest it somewhere out of the way.


4. Slide the pedal-pin to the right until it is out of the pedal-box.

5. Remove the push-circlip from the lower side of the clutch return-spring using a small flathead screwdriver [the one at the end of the stud that attaches the spring to the pedal itself], slide off the plastic spring-mount and fully remove both springs. [**DO NOT attempt to replace the plastic pedal-pin with the spring still in place as it will likely damage the plastic pin!**]

6. Grease the new pedal-pin.

7. Manoeuvre the clutch pedal back into position by hand, so the metal bar at the top of the clutch-pedal is straight with the eyelet either side of it in the pedal box and slide the new pedal-pin in from right to left until it is fully clipped into the far eyelet.


8. Hold the spring assembly in position against the upper spring-mount and compress it by hand until the lower mount can be pushed back over the stud on the pedal. Replace the circlip.

9. Reverse steps 1-3.


'DIY' PERMANENT FIX:
If you can't get hold of a new pedal-pin, or if the new one snaps too [which is likely to happen in the end as the pedal-box wears], then a long-term solution can be fettled with a long bolt.

CAUTION: The original pedal-pin is plastic and therefore designed to snap before the pedal-box does. Strengthening it with a metal bolt MAY cause further damage to the pedal-box over time, particularly if the eyelets are worn or the clutch-wear problem is not addressed.

1. Remove the plastic pedal-pin, as above.

2. Find a long M8 or M10 bolt and nyloc-nut. The bolt will need to be about 6 inches long. Any longer and it will foul things under the steering-column, but it needs to be long enough to reach through both sides of the pedal-box and get the nut on at least half a turn into the nylon. A 'shank' bolt [smooth down the shaft and only threaded at the end] is the best type to use. A flat washer on either side is also recommended, thin nylon washers being even better.

3. Take the plastic pedal-pin and drill the hole down the centre out: 8mm for M8 bolt, 10mm for M10.

4. Grease and re-insert the plastic pedal-pin to the pedal-box.

5. Grease the bolt and slide it in from the left side of the pedal-box, so the bolt is entering the far end of the pedal-pin, until the threaded end exits the right side of the pedal-pin.

6. Fit the nyloc-nut, ensuring the thread is into the nylon by at least a half-turn, as the constant pedal motion will work it loose otherwise. DO NOT over-tighten or put stress on the pedal-box!


Sunday, 10 August 2014

E60: Snapped Head-Bolts! No progress.

Well this has been the most fruitless weekend to date. First I discover the simple sump cannot be removed without lifting the engine and lowering the subframe. I am now the owner of a Clarke engine-crane, not cheap at £179.99, but it moved the job along. Next I find that to lower the subframe, almost everything must be unbolted from it - anti-roll bar, steering-rack etc. - and, once the mounts are unbolted, there is nothing stopping the engine from dropping straight onto you if something fails. I figured if I'm having the engine suspended freely above me while I work then it's best to get as much weight off it as possible, so began removing the head. The camshafts etc. came out in record time, but when I got to the head-bolts at about 12.30pm, the whole weekend's work ground to a halt.

Magnet to catch metal swarf from the drill.
Ok, it happens to us all from time to time, but I didn't expect snapped head-bolts as an added problem with the 530d rebuild. First my E14 torx-socket burst open, causing a trip to Halfords for two new ones, then 4 of the bolts snapped. Four! What a pointless setback. I did the correct removal sequence, so I must have over-tightened the head or they're just not ready to come back out after only 2 weeks, but as I got down to the last two head-bolts one of them snapped in the most awkward way imaginable - just the top of the head, leaving the giant collar and washer still incredibly tight against the head. All the other bolts did crack off slightly, the almighty creaking sound, but after that a further 3 of them stuck solid and the heads duly snapped off one by one, despite re-tightening the surrounding bolts. This hasn't half messed up the un-tightening sequence and has put the rebuild completely on hold.

Determined not to be drilled off, the head was finally
cracked off with a chisel and screwed out by hand.
I battled away until 3pm with the drill-bits I had available to me, before caving in and rushing to B&Q to buy a new 8 and 10mm titanium, again not cheap at nearly £17! I placed a large block-magnet in the head next to where I was drilling and held a smaller one to the other side in order to catch as much swarf as possible, but I will still have to give the cyl.-head and rockers a good blast in the parts-cleaner at work. The plan was to drill down the centre of the bolt head, boring it out gradually wider until the head broke away from the washer. Life is never so simple. The hole was slightly off-centre, so part of the shank was still attached even though I'd drilled well down it, so I began reaming the hole around the bolt head as much as possible. It was still stuck solid, so as a final shot in the dark I drilled a smaller hole in the rim of the bolt head and hit it with a chisel. To my amazement it cracked off and I was able to drift it round enough to become loose. I tried repeating the chisel process off the bat with the other 3 bolts, but they're having none of it, so I will have to bear out the drilling and reaming again. This is not going to be a quick thing, let alone getting that subframe down. Ah well, another week passes.

Problems to overcome:

  • Drilling out stuck head-bolts.
  • Getting the subframe down.
  • Identifying the correct piston type.
  • Clearing the head of any drilling debris.
  • Identifying main source of oil leak.


Sunday, 21 July 2013

E39 530d: Air-Con Drive Belt Snapped - Fixed, now heatwave over...

With the recent heatwave I noticed my air-conditioning appeared to be struggling. It must have been over a year since I last stuck it on full snowflake mode and I know these things fade-off, but it had been working fine, so before I shelled out the £40 or so to get the system re-charged with gas, I figured I'd check the pipes and filters to make sure nothing was clogged up, as everything else had been round MOT time. Apart from a few errant sycamore seeds the system beneath the filters was like new, so a quick peer down the front of the engine showed the real culprit - the drive-belt had snapped and was wrapped like a snake, almost out of view, around a radiator hose.

I was surprised there is no warning-light on the dashboard or the climate-control unit for this, as there is with the alternator-belt, the air-con simply stops and the system functions like a normal blower/heater. With British summers being the way they've been, the belt may have been snapped a year or two ago and I've been totally unaware. It took our recent heatwave, and this is the first time it's been anywhere near 30 degrees for 5 or 6 years, to decide something was actually wrong. I think the most likely cause is all the time I spent running the car with the compressor turned fully off while the battery was in poor health, the constant resistance snapping the belt.

Naturally I would have gone straight to BMW for an OEM belt, but it was 2.30 on Saturday afternoon and they'd closed for the weekend, so I hit up Euro Car Parts, who had the right belt in stock at their new branch which is less than 2 miles from my house. It's an OEM quality part, made by Continental and came to £9.84, so I can't really complain!

PROCESS:

I fitted the belt in about 30 minutes, without raising the car, removing the fan or even moving it onto the drive, using a quick and dirty method, which is fine for the air-con belt, but wouldn't work for the main drive-belt covered in this post.

1. Remove the front-piece of the engine cover [the slim one covering the PAS-fluid filler] by undoing the two bolts on top and one down the left-hand side using an M4 allen-key.

2. Undo the six fastening lugs for the front engine-undertray using a crosshead screwdriver, bend the tray back, free the leading edge from the front-bumper and lower it out of the way.

3. Place the new drive-belt over the two main pulleys from above and wedge the belt over the tensioning-pulley so it doesn't slip off and can be accessed from beneath the car.

4. From below the engine, hold the belt in place at the tensioning pulley and use a 16mm ring-spanner to rotate the tensioning-pulley downwards on its spring-bracket. [An open-end spanner will slip off easily and there isn't quite room for a ratchet-handle without removing the fan.]

5. Push the belt over the tensioning-pulley so it forms a 'pair-of-glasses' shape, as shown on this page of RealOEM.com. Ensure the belt is still in place over the two main pulleys, it may take quite a bit of rotating the tensioner to achieve this, and release the tensioning-pulley.

6. Refit the engine-cover and undertray - you're done, cold air!

Monday, 26 September 2011

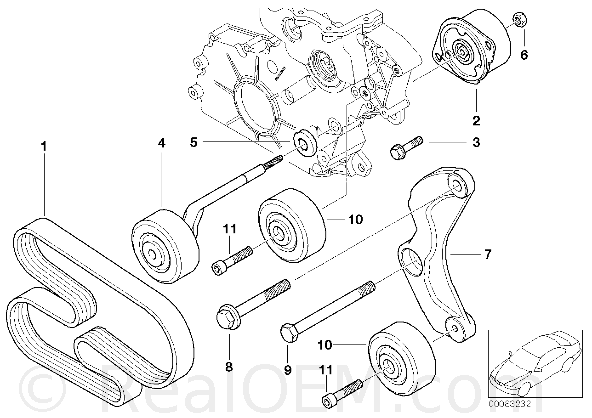
E39 530d: Drive-Belt Bracket snapped!!

How very unfortunate - the bracket holding the guide-pulley for the auxiliary drive-belt has sheared clean in two and rendered the car undriveable!

As I started the car on Friday afternoon there was a crunch from the engine. It started up OK, but the battery warning-light came on and I lost power-steering. Assuming the drive-belt had snapped I ordered a new one and started to take the broken one out, which turned out to be involved in itself as you need to remove the fan-cowl for access, and the fan with it! Once I got to the belt I noticed it hadn't snapped after all, but it would not sit tight around the pulleys.

That's when I noticed a pulley was missing and sure enough there it was lying in the floorpan with the bolt still through it, attached to a torn piece of metal. Worrying that the chunk was part of the block itself I continued to dismantle the front of the engine until I found the culprit. Luckily its a metal dog-leg bracket that bolts on to the engine-block to hold the pulley in place and it unbolted easily enough. I guess the shock of another cold diesel startup made it give way, or the PAS-pump struggled to right the wheels on the gravel I was parked in and put too much strain on the belt.


Either way, it appears to be a common enough fault that new brackets aren't hard to come by - the cheapest and easiest place in this case is, surprisingly, the BMW dealerships themselves. I rang BMW WIlliams in Liverpool this morning, giving the part number (7 in the below diagram) and they said it would need ordering but will arrive this afternoon so fingers crossed as the car is off the road.

I'll get back with the results and a full How-To guide soon!


No.DescriptionSupplementQtyFrom Up To Part Number

01RIBBED V-BELT5 PK X 2063111287787369
02Belt tensioner111282354130
03Torx screw with collarM7X38211517789351
04Adjusting pulley with lever111282354131
05sealing111282247187
06Flange nutM6113537801713
07Bracket111282248561
08Hex bolt with washerM10X70 ZNS3107119903817
09Hex boltM10X125107119900630
10Roll pin211282247435
11Fillister-head screwM8X35 ZNS207119901027