Showing posts with label spring. Show all posts

Sunday, 21 July 2024

F10 530d: New O/S / driver’s side rear spring.

Did both of the rear struts and springs a few years ago, but find the right side one has broken right at the top and will need doing for this years MOT test. As usual with 5 Series models when the spring snaps at the top or bottom, there was no tell-tale clunking or change in driving characteristics, so who knows how long it's been like that. At least it is not a big job.

*GUIDE: F10 Rear Shock / Spring Replacement*

*GUIDE: F10/F11 Front Shock / Spring Replacement*

The rear struts were replaced several years ago from a car with 80k miles. Their combined run in both cars has still added up to less than the mileage on the original ones!

Tuesday, 5 October 2021

E30/E28: Adjusting AFM (Air-Flow Meter) - change air/fuel rich/lean mixture

 ** ADJUST YOUR AFM SETTINGS AT YOUR OWN RISK **

This is for BOSCH AFM units, fitted to most E30 and other BMWs fitted with Bosch Motronic or Jetronic injection systems.

The AFM, or Air Flow Meter, is a metal flap that is drawn open by air entering the engine and the position of the flap tells the ECU how much air is coming in so it can inject the right amount of fuel. The stock parameters for the AFM are set at the factory and unique to each car and BMW recommend that these settings should NEVER be adjusted... so do it at your own risk!!

Why would the AFM need adjusting??

  • You have done a ‘gas-test’ and the results show your car is running rich (too much fuel for amount of air) or lean (too much air for the fuel being supplied) and wish to adjust for emissions / fine-tuning purposes.
  • You have an air leak after the AFM, so more air is getting in than the ECU is supplying fuel for and the engine won’t run, especially when cold.
  • You have an over-fuelling problem where too much fuel is being supplied for the amount of air and flooding the engine.

Adjusting the AFM in the second two instances is a quick and dirty way to get your car running well enough to drive it, but is not a long-term fix for an underlying problem, so bear this in mind before messing with the AFM.

Monday, 30 August 2021

E46 318i Touring: Handbrake / parking-brake repair + adjustment

The handbrake (e-brake) wasn't working properly on the left side of the E46 Touring, which I assumed would either just need adjusting or at worst the spring mechanism had failed. BMWs of this era have a drum-brake mounted inside the hub of the disc-brake that is used only for the parking-brake. It turned out that the sprung stud that holds the lower brake-shoe in place had come loose, worked its way round the drum and partially jammed the mechanism, as in top picture.


The slot that the stud locks in to is part of the backing plate for the disc and it had bent outward and rounded off over time, no longer giving enough metal for the stud to hold on to. I managed to build the slot back up using a cole-chisel and there is just about enough metal left to hold the stud firmly. If it happens again in the near future then a new backing plate may be required, but this is a hub off job and a whole load more work, so lets hope it doesn't. 


Annoyingly, I had to crack open a new £13 handbrake spring assembly kit just to use the one sprung retaining stud, guess I have some spares at least. With the left side now working correctly, I gave both sides of the handbrake a quick tighten up using the rotating adjuster inside the drum.

Thursday, 3 December 2020

F10: Rear Shock Absorber / Strut / Spring Replacement [GUIDE]


Time to do the rear struts and springs on the 530d F10 this week as one damper has been leaking and while doing my tyres last week I noticed the spring has now broken at the bottom so this is now an urgent job. I picked up a pair of used complete struts (spring, damper and top-mount) from eBay for just £100. They are from another 530d and claim to be from a low mileage car. Well, they look a lot lower mileage than the ones I'm taking off lets put it that way and appear to be in pretty good condition. I get a lot of stick for constantly using second-hand genuine parts, but I still prefer this to buying new spurious parts where I can and have never had an issue!

GUIDE:

* This is not a difficult or time-consuming job, but will require a bit of brute force. *

1. First the rear seats need to come out. Lift the seat squab up at the front and detach it from the push-studs, press the seat-belt receivers through the recesses and lift the squab out. Next lift the seat-back upwards until it is free of the hooks at the top and lift that out, being careful of the door-sill paintwork and sliding it through the seat-belts. [You could always unbolt the seat-belts at the base using a T45-Torx socket to make this easier, but it's not essential].

2. The parcel-shelf now needs to come down in order to access the strut-top mount bolts in the shock-turrets. Remove the C-pillar trims by prizing out the plastic caps labelled 'Airbag' from the trim and removing the screw using a T25-Torx socket. Now carefully pull away the C-pillar trims and put to one side. Remove the five push-pin clips from the front edge of the parcel-shelf by levering the button in the centre upwards and pulling the plastic pin out. The studs can now be levered out. The parcel-shelf is now free to pull forwards and can be rested where the seat-back would be. [Remove the wiring-connectors to the speakers, but these should pop out by themselves anyway].

3. Lift the car and remove the corresponding wheel. [There is no need to be getting under the car for this job, so a jack and axle-stand is fine].

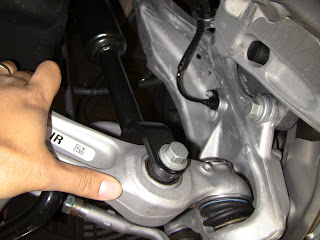
4a. The track-strut (pictured) needs to be moved out of the way to access the bottom strut bolt so first remove the plastic clips holding the E-brake wire-harness to the track-strut by levering them open at the bottom with a flathead-screwdriver and separating them from the strut. The wire-harness can be moved out of the way.

4b. Remove the bolt holding the inner end of the track-strut using an 18mm wrench. Pull the track-strut down and rotate it so it is pointing out of the wheel-arch. You now have plenty of room to get at the bottom strut bolt and lift the shock out.

5. Remove the bolt holding the bottom of the strut to the hub using a 21mm wrench.

6. Lift the triangle flap in the foam underneath where the parcel-shelf was to expose the studs to the strut-top mount and remove the three nuts using a 13mm wrench.

7. Wiggle the bottom of the strut free from the hub and the entire strut assembly is now free to be removed. It should be able to be lowered through the remaining suspension parts and to the rear of the car until it is free to be removed.

** IF YOU ARE CHANGING THE SPRING / TOP-MOUNT OR SWAPPING THESE ONTO A NEW STRUT THEN DO THIS NOW** [See this post for guide].

8. Make sure the new strut has the top-mount in line with the old one you removed by lying them next to each other and checking the bottom bolt-eyelet and triangle marking on the top-mount match up. [The triangle marking on the top-mount should face towards the back of the car with the bolt-eyelet facing the centre, or with the triangle marking facing you the bolt-eyelet should be pointing to the right for O/S (right-side) and left for N/S (left-side)].

9. Lift the new strut back up through the suspension and line it up into the strut-turret. [Triangle marking on top-mount facing rear of car] and screw the three 13mm nuts back on a few threads.

10. Lever the hub downwards until it meets the bolt-eyelet at the bottom of the strut meets its recess on the hub and screw the 21mm bolt back in about half-way.

11. Fully tighten the three 13mm nuts on the strut-top mount.

12. Fully tighten the 21mm bolt through the bottom of the strut.

13. Replace the track-strut / wheel as a reversal of steps 3 and 4.

14. If you are doing both sides then repeat steps 3 - 13 for the opposite side.

15. Replace the parcel-shelf, trim and rear seat as a reversal of steps 1 and 2.

Sunday, 29 November 2020

E81 120d M-Sport: New springs and dampers!

Sean at work has a 1er with nearly 200k miles on the clock, through you would never tell as most of the parts have been replaced since he got it for a mere £700. Yes, you can get a zippy M-Sport 120d for this price, but unless you are willing to get your hands dirty I wouldn't recommend it. Of course, you probably are willing to do that or you wouldn't be here in the first place, so go sick there are bargains out there!

This time it's having new rear springs and dampers as one has leaked all of its fluid and is jammed in position. The opposite side was constantly hitting the bump-stop. She rides good now.


Monday, 11 September 2017

F10 530d: Front Shock Strut / Spring / Top-mount Replacement [GUIDE]


My front shocks were certainly past their prime up front and over the last few months have really started to bottom out on certain speed bumps. I was also told one of the front top-mounts was starting to go on the last MOT and would probably be an issue next time round, so it was time to give the F10 a mini front-suspension overhaul.

I got hold of a pair of complete front struts taken from a 45k-mile car (I am told, but they are very clean) for just £240. All the parts new and spurious (including my through-work discount) would have been nigh on £400 and lots more from BMW. The used items are of course genuine, so quite a lot of money saved and the struts have turned out to be pretty good so it was a chance worth taking.


The guide I used is by hamanncheese on 5post.com and is pretty spot on, so props to him - I will reference his photos and try to elaborate a little on his instructions. [Original guide here: http://f10.5post.com/forums/showthread.php?t=628336].


REMOVE / REPLACE STRUT:

1. Lift the car and remove the corresponding wheel.

2. Remove the nut holding the top of the anti-roll bar link to the shock-strut using an 18mm wrench. [The nut should come off without twisting the ball-joint, but you may need to insert a T40-Torx socket into the end of the stop it turning with the nut.] [If the stud is difficult to remove from the shock-strut, then using a second jack to lift the hub and prying the anti-roll bar downwards will certainly help.]

Pic courtesy: hamanncheese
3. Remove the lower strut bolt using an 18mm (bolt-head) and 21mm (nut) wrench.
Pic courtesy: hamanncheese
4. Remove the 3 bolts holding the top-mount to the shock-turret using a 13mm wrench.

Pic courtesy: hamanncheese
5. Push the hub down and lift the shock-strut until it clears the bottom-arm and can be removed. [Lift it over the bottom-arm towards the rear of the car. There is plenty of room to manoeuvre it out of the wheel well.] [As hamanncheese says, this step is easier with a helping hand, but can be done solo without much difficulty.]

6. Insert the new strut using the same technique as Step 5.

7. Refit the lower strut bolt first and screw the nut on a few turns. [A screwdriver or other long tool may be necessary to align the strut to the lower-arm.]

8. Refit the 3 top-mount bolts and tighten.

9. Fully tighten the lower strut-bolt.

10. Refit the anti-roll bar link to the strut.


ALIGN TOP MOUNTS:

If the top-mount holes do not line up with the shock-turret, [i.e. if they have been removed / replaced and not fitted in the correct alignment], then they will need rotating to the correct position. Spring-compressors are required.

1. Place the strut on its side with the ring-bracket resting on the floor [as in pic]. This is so it can be lined up against the one it is replacing.


2. Compress the spring on both sides, being careful to mount the spring-compressors so they do not foul the strut resting on the ring-bracket [as in below pic].


3. Loosen off the top mount nut using a deep 18mm socket, leaving it on a few threads.

4. Rotate the lower spring-pan by tapping it round using the notches [in pic]. A hammer and blunt chisel or large flat-head screwdriver will do nicely.


5. Re-tighten the top mount nut and de-compress the spring.


REPLACE SPRING / TOP-MOUNT:

1. Compress the spring on both sides using spring-compressors.

2. Remove the top-mount nut using a deep 18mm socket. [Stand to the side when the nut is fully removed as, even with the springs compressed, the top-mount may still come off with some force.]

*If you are only replacing the top-mount then skip Step 3.*

3. If you are replacing the spring, remove the old one from the strut and remove the spring compressors. Compress the new spring, place it over the strut and seat it in the lower spring-pan.

4. Fit the new top-mount, ensuring the spring is located in the upper spring-pan, replace the 18mm top-nut and fully tighten.

5. Remove the spring-compressors.


Sunday, 21 February 2016

E60: Front 12V Socket spring mechanism assembly.

PROBLEM:

  • Mechanism has collapsed and 12V socket will not pop up out of housing.
  • Ash-tray has been removed during work on car and has fallen apart.
  • Coins or other objects have jammed in the mechanism and are stopping it from operating.
  • The 12V socket is jammed up and ash tray will not close.
As with everything on the E60, even the mechanism that pops the 12V socket up and moves the trim around in over-designed to death. There are two springs in the assembly. A main flat-coiled spring that lifts the 12V socket up when the ash-tray is slid open and a small one that operates a tiny trim-flap that fills the gap created as the socket rotates up. You know, so everything looks neat!

These come out really easily when the ash-tray is removed from the fascia, or when things get jammed and the ash-tray is forced shut, but it is quite confined under there and the springs should not get lost. Be careful not to push them under the foam-trim at either side while retrieving them.

The main spring is on a spindle running through the socket housing, with a screw at one end. The protruding arm faces forward and tenses against a lip in the plastic. The screw will need removing to get the spring back into place, so do not over-tighten it when refitting so the socket still rotates freely.

The smaller spring slides onto the plastic stud on one side of the front socket hinge and the two protruding arms should be in a V shape pointing upwards and sit in the grooves on the hinge and trim-flap, as pictured.

** For a guide on removing the dash and fascia trim required to get to the ash-tray see THIS POST. **


Saturday, 21 September 2013

E21 316: Burst shock-absorber woes...

SPAX adjustable - like hen's teeth.
Well, I've had a bit of a nightmare week. As I was replacing the front n/s shock-absorber with the new spring, ready for the MOT on Saturday, the strut-insert burst in my face. To get an extra couple of inches clearance at the top and get it under the wing I'd been pushing the damper down into the insert. I figured they sit quite far down with the short-springs anyway, but eventually, probably after doing it several times, I must have plunged it further than its full operating depth and it popped, sinking the insert completely into the strut.

You wouldn't think pushing it down would pop it, considering the forces on it under load, but once its down far enough the top seal just fails under the pressure of the oil. You can have SPAX, as with most adjustable-inserts, re-filled and the seal replaced if you can be bothered to send it back to the manufacturer and pay the cost, but with time of the essence I just bought a new one.

Larkspeed in Leeds were the cheapest, though the price had gone up from £90 to £112 [and £118 now for the shortened!] for a single insert, but they claimed to have the part in stock and would have it to me by Tuesday the latest. Today I rang them to say it'd been a full week since they rang to confirm the order and still no insert. After half an hour they rang me back to say the insert had been specially ordered from SPAX, who were now lacking correct parts and can't build them until the end of October. I wish they had told me that last week as I'm now waiting on a refund...

Bilstein - fixed damping-rate and pricey,
nothing but good reviews.
I rang DC Performance.co.uk, who also claimed to have the part in stock and it would take 2 or 3 days. Before parting with any money this time I asked if they could check the insert is definitely in stock, which they are not, so it's not looking hopeful for any existing stock anywhere. I will be contacting SPAX directly from now on.

Monroe Gas-Matic - strong, but ride too soft.
So what are the short-term options? There are no ride-adjustable inserts in stock and available now, so it looks like i'm now bound to non-adjustable inserts. Stiffened Bilstein inserts are £62 each, where OEM-replacement ones can be had for as little as £20. With the springs this low, I have no idea what would work best. The sportier, better-brand damper might last longer under the stress and be a better match for the adjustable SPAX on the other side. Alternatively, the cheap, softer damper might compress better under the load and a pair will only cost £40 should the o/s one need swapping too. Another option is to replace both with Monroe gas-filled dampers for £123. The blurb says they are a heavy-duty design for trucks and vans, but according to this thread they are just too soft and will cause me to bottom out. So, £60 for one Bilstein it is, or take a chance on a cheap KYB. Hmmm, stress.

Sunday, 15 September 2013

E21 316: Taller springs for MOT.

Well my MOT, the UK roadworthiness test, has come round and the E21 is just too low to get into my local testing station, let alone up onto the ramps. This is where height-adjustble coilovers would be worth their £650, as even if I can get the car onto the ramps, an attempt to raise the wheels off the ground will cause the short springs to become loose in the pans. The solution to this problem is still cheaper than coilovers - shortened strut-inserts from this post at ~£400, but I'll still have to find somewhere with ramps low enough to take her.

Seems to me the easiest and cheapest overall solution is to just swap longer springs in for the test and put the chopped ones back on later. Seems like quite a lot of effort just for a 30-minute inspection, but that's motoring in the UK, we're at the mercy of the MOT and it sees more cool cars off our overcrowded roads than insurance write-offs ever would.

Slight length difference. The red SPAX was a -40mm too.
A nice set of yellow APEX -40mm springs set me back just £80 from eBay. They are a lot longer than I remember though, which heralded me finally buying some spring-compressors, £17.99 and bringing the grand total of this years test to a ton before I've even had it inspected... not good.

Fitting the rear springs was a doddle, but the fronts threw up a few problems. Getting the cut spring off was easy enough, but even under compression the longer one was never going to fit in the space available. After damaging my newly filled wheel-arch and bursting one of my strut-inserts - nightmare - I started looking for a better guide on replacing springs and find out if it can ever be done with the strut and brake-line still attached, but one doesn't seem to exist - a good validation for this and other blogs! I did, however, find a Youtube video of some guys fitting H&R springs without removing the shock, which did give some clues from about 3min30 onwards:


PROCESS:

Rear Springs - 

1. Follow the steps in THIS POST to remove and re-fit the rear shock-absorbers, swapping the cut-spring for the new ones, obviously.

Front Springs [without removing strut, steering or brake-line] -

1. Raise the car and remove the corresponding front wheel. [It makes life easier to drop the front on axle-stands and remove both wheels, doing both springs together.]

2. Undo the top-nut from the shock-absorber, located on the suspension turret under the bonnet, using a 19mm wrench and 8mm open-end spanner at the top of the strut-insert to stop it from rotating.

3. Disconnect the brake-pad sensor wire by simply pulling it apart at the join behind the disc and sliding the rubber-mount free of the bracket.

4. Remove the earth-lead from the strut by undoing the bolt with a 10mm wrench.

5. Remove the bracket holding the brake-line to the strut using a 10mm wrench and open-end spanner. [This is essential to free the brake-line enough for it to tilt forward without having to remove the hose and drain the brakes. Without freeing the bracket, the brake-line will be stretched to breaking.]

** If the spring is still under compression without the weight of the car on it, use spring-compressors to hold it short enough to loosen the top spring-pan away from the turret.

*** The strut can be tilted out far easier with the track-rods unbolted, using a 17mm wrench and moved out of the way, but mine wasn't budging easily and there is enough room if you can push the steering-arm down enough.

6. Remove the four nuts holding the anti-roll bar brackets to the sub-frame using a 17mm wrench and open-end spanner. The anti-roll bar should drop down and remove tension from the two struts.

7. Tilt the shock-absorber strut out of the wheel-arch, remove the top spring-pan and spring.

8. Drop the new spring onto the bottom pan and reverse the above steps, using spring compressors if necessary.

Wheel-arch gap a little more prominent. Was it really that much before?!