After my disastrous few weeks I managed to get hold of a Bilstein strut-insert and get it onto the car along with the longer springs, meaning it was finally back on the road and in an state worthy of the MOT test. I cautiously rolled down to the test-station on Saturday and am glad to say the E21 passed with flying colours!
Bilstein damper is strong, but will be a pain with the short springs.
This was a relief considering the slightly dodgy seat-frames I made bolted through the floor-pan, which stuck out like a sore thumb when it was up on the ramps, along with the scuff marks where I've grounded the underside, but with the car at a more standard height off the ground this didn't see to bother them and there was no problem with the chassis at all.
Oddly, the guy told me that the split-pins were missing from the castle-nuts on my steering track-rod ends and this would actually be a fail under normal circumstances, but they could see I'd been working on it and decided to give me the benefit of the doubt. This was true, I'd had them off swapping the springs and hadn't bothered to replace the split-pins as they would be coming straight off again to put the short springs back. That was decent of them to let it go, as it would have been beyond frustrating to lose another week to something so trivial and shows just what a pain the UK MOT test is.
Folded up and with a 1/4 inch thick layer of pallet-wrap to send as a parcel.
Spending on the E21 has been a bit out of control since buying the E30 seats and it is still in desperate need of the wheel-arches finishing off. By this point, I'm past what I can recoup if I sell the car. I'm still using my E39 as my daily, the E21 has had no use for nearly a month with no MOT and finally, due to a planned move, it's looking like I will have to let her go anyway, unless I can find somewhere cheap enough to store it. I had hoped to have the arches skimmed off and painted by the guy who did the respray, but money is tight so I will be buying a rattle-can and doing the best I can with them.
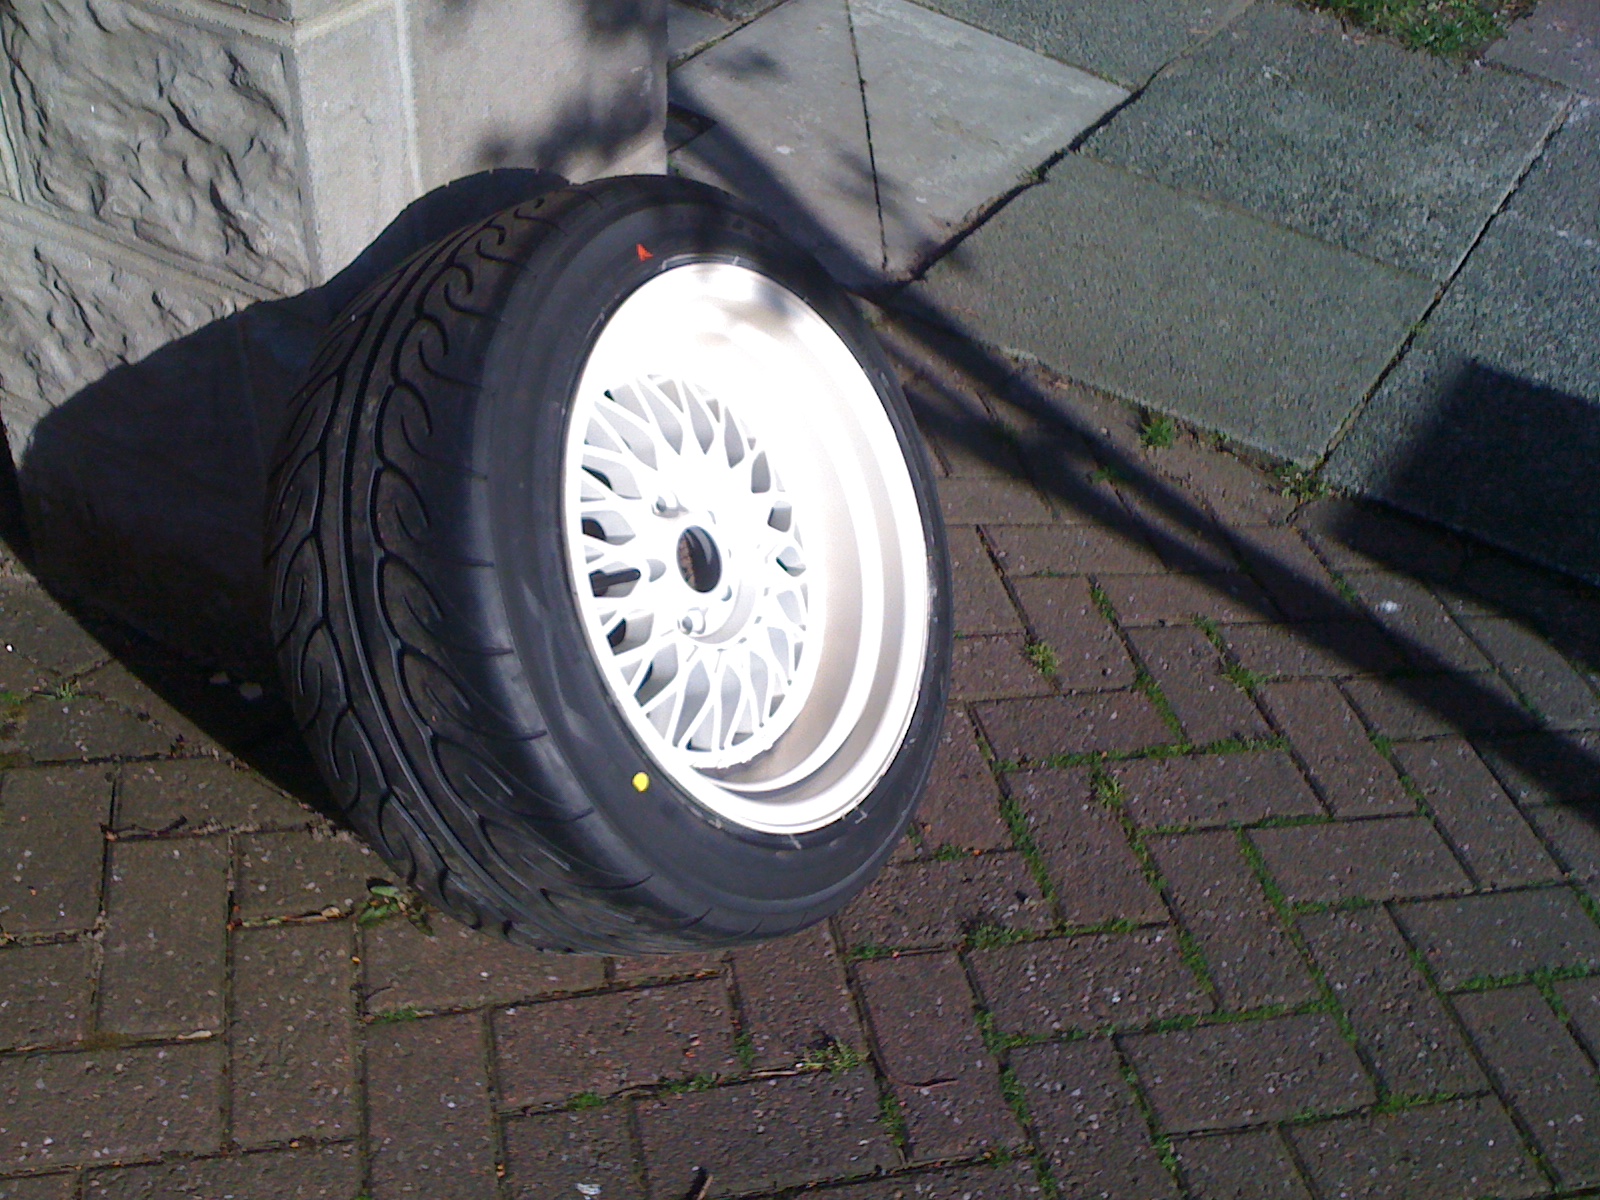
Thankfully, I've managed to generate a bit of extra cash to pay for the strut-debacle [this post], by selling some bits on eBay, like a battered old set of alloys, an E36 nose-cone and other bits I had lying around, as well as the original beige passenger seat from the E21 - I think I have enough seats for the car now. I hope the seat arrives to the buyer OK, as I had to practically shrink-wrap it to be able to send it Parcelforce [£27], pictured, as the original method of courier was just over £60!
A super-rare for the UK deep front-valance / bumper, I think from the 'Alpina' models and it's genuine BMW. Probably going to sell for way over the current £50 bid, but I think I will be having a cheeky bid myself if it doesn't go stratospheric.
Is your front corner-indicator not working, but the bulb and fuse are fine?
Mine wasn't and it turned out to be the metal live-clip that sits against the bottom of the bulb. Not the best of designs, connection is lost to the bulb if the clip is bent back slightly, causing the indicator to fail intermittently [denoted by faster clicking of the turning-signal]. The clip having a little corrosion or crud on it is also enough to stop the bulb getting a signal.
A quick clean up with emery-cloth and a slight bend forwards so it sits tight on the bulb was enough to get mine working solidly again. This could be a common problem, especially in the UK and Europe where grime gets pushed everywhere in an E21, so if your fuse and bulb appear fine, but the indicator won't work, you can bet it's the live-clip.
PROCESS:
1. Dis-connect the corner indicator wiring by sliding apart the plastic-clip located behind the headlamp under the bonnet and push it through the hole to the outside of the wing.
2. Remove the two crosshead screws holding the corner-indicator lens and lift the lens off.
3. Remove the two crosshead screws holding the indicator-housing to the wing. The housing should now slide forwards and clear the wing.
4. Use nose-pliers to remove the metal live-clip from where it sits in the plastic-housing.
5. Bend the prong [denoted by the arrow] in towards the other prong, bringing the flat-edge down.
6. Clean up the face of the prong and the metal-contact on the bulb with emery-cloth.
7. Replace the live-clip to the plastic-housing and reverse Steps 1-3 to re-fit.
Well, I've had a bit of a nightmare week. As I was replacing the front n/s shock-absorber with the new spring, ready for the MOT on Saturday, the strut-insert burst in my face. To get an extra couple of inches clearance at the top and get it under the wing I'd been pushing the damper down into the insert. I figured they sit quite far down with the short-springs anyway, but eventually, probably after doing it several times, I must have plunged it further than its full operating depth and it popped, sinking the insert completely into the strut.
You wouldn't think pushing it down would pop it, considering the forces on it under load, but once its down far enough the top seal just fails under the pressure of the oil. You can have SPAX, as with most adjustable-inserts, re-filled and the seal replaced if you can be bothered to send it back to the manufacturer and pay the cost, but with time of the essence I just bought a new one.
Larkspeed in Leeds were the cheapest, though the price had gone up from £90 to £112 [and £118 now for the shortened!] for a single insert, but they claimed to have the part in stock and would have it to me by Tuesday the latest. Today I rang them to say it'd been a full week since they rang to confirm the order and still no insert. After half an hour they rang me back to say the insert had been specially ordered from SPAX, who were now lacking correct parts and can't build them until the end of October. I wish they had told me that last week as I'm now waiting on a refund...
Bilstein - fixed damping-rate and pricey, nothing but good reviews.
I rang DC Performance.co.uk, who also claimed to have the part in stock and it would take 2 or 3 days. Before parting with any money this time I asked if they could check the insert is definitely in stock, which they are not, so it's not looking hopeful for any existing stock anywhere. I will be contacting SPAX directly from now on.
Monroe Gas-Matic - strong, but ride too soft.
So what are the short-term options? There are no ride-adjustable inserts in stock and available now, so it looks like i'm now bound to non-adjustable inserts. Stiffened Bilstein inserts are £62 each, where OEM-replacement ones can be had for as little as £20. With the springs this low, I have no idea what would work best. The sportier, better-brand damper might last longer under the stress and be a better match for the adjustable SPAX on the other side. Alternatively, the cheap, softer damper might compress better under the load and a pair will only cost £40 should the o/s one need swapping too. Another option is to replace both with Monroe gas-filled dampers for £123. The blurb says they are a heavy-duty design for trucks and vans, but according to this thread they are just too soft and will cause me to bottom out. So, £60 for one Bilstein it is, or take a chance on a cheap KYB. Hmmm, stress.
Well my MOT, the UK roadworthiness test, has come round and the E21 is just too low to get into my local testing station, let alone up onto the ramps. This is where height-adjustble coilovers would be worth their £650, as even if I can get the car onto the ramps, an attempt to raise the wheels off the ground will cause the short springs to become loose in the pans. The solution to this problem is still cheaper than coilovers - shortened strut-inserts from this post at ~£400, but I'll still have to find somewhere with ramps low enough to take her.
Seems to me the easiest and cheapest overall solution is to just swap longer springs in for the test and put the chopped ones back on later. Seems like quite a lot of effort just for a 30-minute inspection, but that's motoring in the UK, we're at the mercy of the MOT and it sees more cool cars off our overcrowded roads than insurance write-offs ever would.
Slight length difference. The red SPAX was a -40mm too.
A nice set of yellow APEX -40mm springs set me back just £80 from eBay. They are a lot longer than I remember though, which heralded me finally buying some spring-compressors, £17.99 and bringing the grand total of this years test to a ton before I've even had it inspected... not good.
Fitting the rear springs was a doddle, but the fronts threw up a few problems. Getting the cut spring off was easy enough, but even under compression the longer one was never going to fit in the space available. After damaging my newly filled wheel-arch and bursting one of my strut-inserts - nightmare - I started looking for a better guide on replacing springs and find out if it can ever be done with the strut and brake-line still attached, but one doesn't seem to exist - a good validation for this and other blogs! I did, however, find a Youtube video of some guys fitting H&R springs without removing the shock, which did give some clues from about 3min30 onwards:
PROCESS:
Rear Springs -
1. Follow the steps in THIS POST to remove and re-fit the rear shock-absorbers, swapping the cut-spring for the new ones, obviously.
Front Springs [without removing strut, steering or brake-line] -
1. Raise the car and remove the corresponding front wheel. [It makes life easier to drop the front on axle-stands and remove both wheels, doing both springs together.]
2. Undo the top-nut from the shock-absorber, located on the suspension turret under the bonnet, using a 19mm wrench and 8mm open-end spanner at the top of the strut-insert to stop it from rotating.
3. Disconnect the brake-pad sensor wire by simply pulling it apart at the join behind the disc and sliding the rubber-mount free of the bracket.
4. Remove the earth-lead from the strut by undoing the bolt with a 10mm wrench.
5. Remove the bracket holding the brake-line to the strut using a 10mm wrench and open-end spanner. [This is essential to free the brake-line enough for it to tilt forward without having to remove the hose and drain the brakes. Without freeing the bracket, the brake-line will be stretched to breaking.]
** If the spring is still under compression without the weight of the car on it, use spring-compressors to hold it short enough to loosen the top spring-pan away from the turret.
*** The strut can be tilted out far easier with the track-rods unbolted, using a 17mm wrench and moved out of the way, but mine wasn't budging easily and there is enough room if you can push the steering-arm down enough.
6. Remove the four nuts holding the anti-roll bar brackets to the sub-frame using a 17mm wrench and open-end spanner. The anti-roll bar should drop down and remove tension from the two struts.
7. Tilt the shock-absorber strut out of the wheel-arch, remove the top spring-pan and spring.
8. Drop the new spring onto the bottom pan and reverse the above steps, using spring compressors if necessary.
Wheel-arch gap a little more prominent. Was it really that much before?!
When the seats arrived the rear one had a noticeably big tear on the top of the back-rest. By the time I'd finished cleaning them however, there were now 3 tears along the same strip. I was being super-careful with the scrubbing brush, but after 25 years under the back-window the glue is coming away and the strands of twill fabric separate very easily indeed. An attempt to repair one of the splits only made it worse as the material is stretched by the glue and can't wait to rip.
I considered throwing the stock beige seats back in, but then had a moment of er, inspiration, and found a strip of spare material wedged into the frame behind. I cut it into patches and stuck them down with fabric spray-adhesive, £7.99 but it's strong stuff.
It's not the prettiest of repairs, despite matching the lines up, but looks better than threadbare, won't get any worse now and the interior of the car looks a lot fresher with them in I must say. If they're going to stay though, a permanent cover-up will be needed - probably in the form of a parcel-shelf re-trim. The beige carpet could do with a refresh, so I may extend the fabric past the shelf and have it cascade over the back-rest slightly. We will see.
As with the front seats I used HSVTurbos build [here] as a rough guide. His rear bench-seat is the all-sponge kind, whereas mine have the sponge base, but a sprung back-rest, possibly due to the folding arm-rest or model year difference. This means I have a metal frame to work with on the back-rest, so it can be pressed flat to greatly reduce the proud fit at either corner, but also means more needs to be cut away than just blobs of sponge. The E30 coupe's rear seat-pan, the body-tub and front doors are almost identical dimensions to the E21, so the rear seat-base just slots in. There are no brackets along the bottom-edge to clamp the squab down, but with it seated flat and wedged under the back-rest these may not be necessary, although fabbing some up might be worthwhile to stop the carpet sagging down in the footwells.
The general shape of the back-rest is more or less the same as the E21 and the hooks fit into the existing brackets, though the E30's parcel-shelf is curvier, causing the back-rest to stick out slightly at the top corners. The back-rest also sits slightly higher, leaving an inch gap at the bottom between it and the squab. If these gaps don't bother you then the seat works fine like this and will only need a little chopping off each upper corner to achieve a pretty good looking fit. If they do, then a little more work is required to seat the back-rest flush and minimise the corner gaps.
The main problem here are the seat-belt reels, which protrude from the bulkhead and fill up where the upper corners of the back-rest want to be. The back-rest bolsters are also slightly too broad, though the centre of the rear frame is more or less a perfect fit to the E21 bulkhead.
Modifying the Back-rest:
1. Bend up the small hooks holding the cover material in place over each side edge of the back-rest and pull the fabric clear of the metal frame.
2. Cut away the side-support on each side of the frame, leaving just the edge of the 'mattress' frame that holds the springs, as in the photo below. The brackets at each bottom corner should come away here too.
3. Cut in half the metal bar that runs between the centre and bolsters, the one attached to the top spring in each corner, and trim away the top spring as close to the frame as possible.
4. Cut the metal bar running along the top of the frame about 4" in from either top corner
5. Cut away the boar-hair matting along each side of the back-rest to reduce its depth by about half.
6. Cut a 2" square from each top corner of the boar-hair matting to give a recess where the seat-belt can run freely back into its reel.
7. Replace the fabric cover, hooking it to points on the mattress-frame and tucking it under the springs. At each top corner, I pierced a hole and ran a cable-tie through to hold the folded fabric clear of the seat-belt reel.
Fitting to the E21: To get the back-rest sitting flush to the seat-base the original mounting-brackets may have to be abandoned in favour of slotting the hooks on the bulkhead directly into the top of the back-rest frame. The original lower brackets are attached to the frame here and may need cutting off for a tight fit.
1. Hook the top lip of the back-rest frame over the metal hooks on the bulkhead. Press hard to make sure the metal bar gets over the hooks and not just the boar-hair and fabric. Give each side a good knock down onto the hooks. The top of the back-rest should be about 5mm lower than the parcel shelf.
2. Fit the centre arm-rest and lock the clips into place. The back-rest should sit a bit proud of the bulkhead and need pushing flat. Drill two holes through the back plate of the arm-rest and bulkhead. Fasten it together with two bolts or pop-rivets. Not only will this hold the seat in place, it will also stop it moving when the arm-rest is lowered.
MJNewbs from eBay got back in touch and we finally negotiated a low enough price for the seats. The fronts are in great nick, only a slight fray to the driver's back-rest, but the rear seat back-rest has a few tear that I'll address in a later post.
Thankfully, the E30 seat bases fit onto the inner stock mount, next to the trans. tunnel, on the E21 so they are already sited neatly in the centre and only require the outer mount to be lowered. Here's how I finally got them to an equal height.
The outer seat-mount was cut away about 1.5 inches height from the lowest point of the floor-pan and the top half completely removed from the sill. This leaves a large flat T-piece section onto which a length of '2by4' style wood-beam was placed that sits at the same height as the inner seat-mount, give or take 2mm.
To strengthen the edge of the wood where the seat sits a piece of 2mm-thick angle-steel was screwed in place, clamping the wood to the remaining edge of the cut seat-mount. The M10 seat bolts run through the wood and are bolted to the floor-pan, so the wood only acts as a riser, not an anchor and the angle-steel helps to distribute any downward force on the wood, or twisting motion as the seat is adjusted.
I chose to bolt my seats directly through the floor-pan for strength and this leaves a gap under the base of the wood at the inside corners, which I stacked out with a nut and large washers. This gives the added benefit of the seats being bolted first to the wood, then through the floor-pan with the same bolt. The downside is the sealed floor-pan nuts will need removing should the seat need to come out in future. The alternative method, used by HSVTurbo in his build here, is to bolt the seats to a thicker metal bracket, then bolt the bracket through the wood and floor-pan. This way the seat can be removed from inside the car leaving the wood fixed in place, but I just don't feel this setup will be strong enough, even with the thicker metal bracket.
I used M10 nyloc-nuts with a dab of stud-lock inside and large-diameter [40mm] 'bumper' washers. A good blob of silicone-sealant was put between the washer and body, then round the outside of the seated nut. Finally, I coated them in a thick layer of Finnegan's WAXOYL Underbody Sealant, for protection obviously, but also to blend the shiny nuts and washers into the car's underside.
I still have the rear-seats, including the folding arm-rest, along with the door-cards/handles and rear trim-panels, so we'll have to see how much will fit after the MOT.
Hacking out the inner wheel-arches at the back to make the 16x9s fit left them in a right state, with a big gap up inside the wing. Being where it is, the gap is wide open to dirt and water flinging up off the wheel ready to rot the body from the inside out, so as a temporary measure I covered the area in ally-tape. It worked well, but was never going to last long. I figured the inner-arch would be considered a structural part of the body and would need a steel fillet welding in, but it doesn't appear to be the case so fibre-glass will do.
The area is a bit big for filling in though, so I shot up to Halfords and bought a square-metre of fibre-glass matting, £4.29. You need resin to apply it, which is a bit dearer. A kit is available for £9.99 that includes a small bottle of resin and a small mat, otherwise resin starts at a fiver and hardener is extra. The recommended resin is polyester-based, so it stretches, but I figure that marine epoxy-resin, which can be used for fibre-glass, will do the job as it may not be as flexible, but sure is waterproof and rock hard. I also happen to have a litre of the stuff left over from some carbon-fibre projects a few years ago.
I weighed the fibre-glass mat up to the whee-arch and cut it into rough shapes. The instructions say to coat the mat in resin and then stick it, but I found it just as easy and a little less messy to brush a little resin onto the surface, then stick the pieces of mat on dry and brush in heaps of resin over the top. The epoxy is quite thick and stiffens quickly, so this may the only workaround method using this stuff. It's certainly done the trick, the fibre-glass is as solid as the metal and has stuck well even to the rough under-seal surface, lets just hope it doesn't flex too much and crack away. It should see me through the MOT next week and that's the main thing, but at least there's no mud being flung up into the wing anymore. A quick coat of red-primer and the tester may not even notice the difference...
Saw these absolutely divine Recaro sports-seats from an early E30 Baur cabriolet on eBay. They're all but identical to the Recaro/sports-seats from the E21, but have different subframes for the E30, not that it would make any difference now I've started cutting out the stock mounts and the inner side of the E30 base fits perfectly to the inner-mount anyway, so would be a bit neater/stronger than my all-custom base. Only snag is, the price is a little more than I'm willing to pay as the rear seat and door-cards are included. I've got them down a bit, but I'm sticking to my upper limit and they're having none of it.
It got me thinking, the shape isn't too different from the RS Turbo Recaros I have, it's just the colourful Ford fabric that doesn't suit, but there may be a way to create some ultra-cheap 'replicas'. I figure the stock E21 seats aren't worth much at all, so there may be enough decent fabric left on the two to re-cover the centre-sections of the Recaros in beige cloth. This leaves the bolsters/head-rest grey alcantara, which is where fabric spray-paint comes in, about a tenner a can off eBay, to make them dark-brown. I whipped the cover off one of my E21 seat to weigh it up and it does look possible. On the other hand it has the potential to mess up a great pair of Recaros that are worth quite a lot more still than I previously thought, as well as condemn a tatty but useable pair of E21 comfort-seats, which I could at the very least donate to someone. At the risk of the end product looking naff, I don't think it's worth the sacrifice.
** UPDATE - Another pair came up on eBay yesterday and guess what, the guy emailed back about the original set accepting my offer. The second pair are a bit dirtier and the back seat is wrecked, but the seller will come to about half the other offer, only thing is he wants collection and they're in Cardiff. It will cost me the difference to drive down there, plus a day spent sat in the car. To be worthwhile I'd have to get this second set for buttons, so I called up the original guy and bought the set above - they'll come Monday and I can use the rear bench. I'm glad this seat problem is finally put to bed as the MOT is a week on Saturday and I need perma-fixed seats!
This is the first wheel-arch I pulled to fit the 16s and it's the only one now still needing a tidy-up, to say the least. I cut too much of the lip off trying to wedge some balloon-like 45% profile tyres and left it in a right mess. The newer 40% profile tyres fit perfectly and only needed minor cutting to the other arches, leaving this one miles from the rim and totally out of shape. The bit I cut off is the line used to form the arch on the rest, so this one was missing an edge to build the filler up to and totally sculpting the new arch-line by hand with hanging bits of mesh and filler was never going to happen. The easiest method would be a plastic arch cover, hiding the cut area completely and easily smoothed into the wing, but all four would have to match and the Group 2 ones are just too big to consider. It seems my only options are -
B. Spot-weld the piece I cut off back into place and secure it with fibre-glass filler. Fill the lip to match the others and build up and re-shape the arch up to where it meets the wing almost.
No doubt B involves a lot less time and effort, but it's still going to be a lot of rubbing down.
The chewed up scrap of metal, good job I saved it. It didn't just slot back into position, there was quite a bit of grinding and filing.
I had wanted to tack-weld the metal on and fill the gaps with fibre-glass, but I couldn't get hold of one so masking-tape did the job. I caked on plenty of P40 fibre-glass filler in between the tape, waited for it to go off, removed the tape and filled in the gaps.
Well sealed behind with more P40. You can see the sliver of metal in position as the light shines through, showing just how much arch got cut off originally.
It was then ground down with a rotary-file on the drill, mainly inside so nothing rubs on the tyre, but a bit to give the lip some shape. All that's left now is the arduous task of filling all that arch.
Been enjoying the car and weather too much over summer to neaten up the pulled wheel-arches, but thought I'd take some time off to finish them before the rain and gloom sets back in.
I bent the lip with a pair of grips into the smoothest arch I could and filled it flush with P38 to where the original outer lip was. This took quite a bit of building up.
Normally I'd give it a coat of zinc-primer for now and rub it down again, but for aesthetic value I went straight to red-primer and it's already lifted the look of the car.
More of the rear arches had to be cut away than the front, so this meant a smaller and slightly easier area to fill. The only remaining arch is the dreaded N/S rear one, which I hacked to death trying to install tyres that were too big, but it's a mammoth job alone and will have to wait.
I'm all for keeping things so they can be converted back to stock later on, but fitting seats with the E21 base-mounts is a nightmare. Once you've overcome the different height on each side and the mounts being too far apart, the seat has to be set low enough to be able to drive the car. I've tried a couple of times and just can't deem a complex two-height setup safe enough to be permanent. The Planted adapters from this post are just too expensive - I don't have £300 to spend on brackets for seats I had lying around so, with regret, the outer [higher] mount has had to be cut out. Gleefully this has done the trick and the passenger seat is now mounted at the perfect height and slides back and forth like it's on ice, so with a nod to retaining originality, this is the first thing anyone wanting to fit sportier seats should do.
Ripping out both mounts gives a blank canvas to put any seat-frame in any position, but a bit more research taught me that the inner mounts by the trans. tunnel can be re-used when fitting upgraded BMW seats, - Recaros, E30 seats etc. - which is what I would fit in future ideally, so they stayed and the outer mount came out to reveal 5" strip of flat surface, the only bit in this area of the floor-pan. Given the choice I would use steel box-section here to raise the flat section up to the same height as the inner mount and do some welding, but I just cant find it anywhere locally in the right size. I got some immense inspiration off this thread on Bimmer-Forums - http://forums.bimmerforums.com/forum/showthread.php?1757170-E30-sport-seats-in-e21- in particular this guy, who used a block of wood - http://forums.bimmerforums.com/forum/showthread.php?1584670-HSVTurbo-quot-Mac-quot-Build-Thread. Would had been considered originally with the Recaro project, but not ruled solid enough. HSVturbo showed it can work here though and I guess as long as the bracket is bolted well through the floor, the would should be plenty solid as a riser and won't twist about.
It transpired there was a 2x4 type beam leant up in the shed that was pretty much the exact height of the inner seat mount, so I chopped off a 55cm piece of it, to match the full length of the inner mount - I can see the extra PVC-pipe thing works for HSVturbo, but one piece has got to be more secure. I then ran a length of angle-steel from left to right at each end of the inner-mount and bolted it through the existing holes. The angle-steel also sits flush against the front and rear face of the mount and wood-block. Lastly, the angle-steel is bolted through the wood to the floor-pan. Now I have two cross-bars to bolt practically any seat onto, good enough to rival the Planted adapter, well not quite, but it's an inch lower, solid and cost a whopping £6.99 to make. The carpet even fits snugly back over it, with a few slits for the cross-bars to go through.
To mount the Recaro on the cross-bars the base-mounts needed removing entirely. These are held to the sliders some of the strongest rivets I've seen and needed grinding and chiselling out, but thankfully not enough to mess up the holes, which I re-used to mount it with short M4 bolts. For the seatbelt-buckle anchor I just used a short piece of angle-steel, but it will need replacing soon with either a right-angle bracket at least 2.5mm thick, or better still some stalk type buckles from an E30. Some E30 Recaros would go nice with those too...
Had a go at fitting the passenger Recaro seat, this time using the Ford sub-frame and slider instead of the BMW one. The driver's seat I did last year has sunk into the BMW slider and won't adjust anymore, not to mention the seat is too high. OK, I've got used to it and it's holding for now, but bolting things on top of the E21 slider/base plain doesn't work, is ugly and will need improving before the MOT. Using box-section etc. that won't sag down is out too - my head would be pressed against the roof.
For this side I chopped the left side of the Ford subframe so it would fit on the floor against the original outer seat-mount. This mount is an over an inch higher than the inner mount next to the trans. tunnel and this just adds to the problem, as the mounts are too wide apart for most seats anyway, so simply raising one side is no good, you need cross-bars. Cutting the Ford sub-frame and bolting it through the floor-pan on the outer side is the only way I could see keeping this mount, so stock seats could be later refitted, and without it all being set too high. The inner mount is just the right height, so I reused the bolt-holes to mount a piece of angle-steel, which the seat then bolts on to about half an inch further out. To bolt on to the angle-steel, the base-mounts had to be ground and chiselled off to leave just the sliders on the right side, which was a right pain. The placement of the seat was now perfect, but the funny shape of the E21s belly-pan, bespoke Ford mounts and custom-made risers did not make for the strongest design. The seat felt solid to sit in, but once I'd moved it back and forth a few times I felt the left side mounts twist and the sliders jammed. You could now feel it moving around a bit, so without a safety pass this is another fail.
They're very nicely finished in 3/16" thick steel, bolt straight into the existing mounts and have a series of oblong holes to drop most types of sport seat onto, Sparco, Bride, MOMO, NRG, Recaro are menioned, though you don't get sliders. I've seen one with sliders made by Corbeau [http://www.harrisonmotorsports.com/corbeau-seat-brackets.html] available through Demon Tweeks, again £150 and will likely need adapting to fit non-Corbeau seats. I've been weighing up buying these for the best part of a year, so to weigh up the pros and cons they're an easy straight fit and let you keep the stock base-mounts, but with sliders on top the seat still sits too high and the crazy £300 cost for the pair is getting into E21 Recaros territory, so really I think it's worth having one last go at a custom adapter.
This is for a mate who's bought some 17" BBS reps (Calibre Vintage) for his Mk4 Golf. As with my tyres, the Demon Tweeks guys recommended 45 profile for his wheel size. Im guessing this is for comfort, safety etc., but not with the amount of stretch in mind. The first pic shows my 16x9J wheel with a Yokohama 205/45 tyre. In my opinion this is just too big looks wise and takes over the look of the wheel. The second pic shows my second set of tyres, Toyo 195/40 profile. The difference it makes to looks is staggering, showing the rim off instead of hiding it. In my case the bigger tyre was jammed against my wheel-arch and made me cut more than I needed to when I got the lower profile 40s.
Lower profiles are harder to find and the tyre sellers will probably say the 5% difference in tyre-wall won't make much difference in order to shift items they have in stock, but as you can see below the difference is actually huge.
225/45
215/40
May as well be 225, profile same but 5mm less pitch-angle on either side.
With the recent heatwave I noticed my air-conditioning appeared to be struggling. It must have been over a year since I last stuck it on full snowflake mode and I know these things fade-off, but it had been working fine, so before I shelled out the £40 or so to get the system re-charged with gas, I figured I'd check the pipes and filters to make sure nothing was clogged up, as everything else had been round MOT time. Apart from a few errant sycamore seeds the system beneath the filters was like new, so a quick peer down the front of the engine showed the real culprit - the drive-belt had snapped and was wrapped like a snake, almost out of view, around a radiator hose.
I was surprised there is no warning-light on the dashboard or the climate-control unit for this, as there is with the alternator-belt, the air-con simply stops and the system functions like a normal blower/heater. With British summers being the way they've been, the belt may have been snapped a year or two ago and I've been totally unaware. It took our recent heatwave, and this is the first time it's been anywhere near 30 degrees for 5 or 6 years, to decide something was actually wrong. I think the most likely cause is all the time I spent running the car with the compressor turned fully off while the battery was in poor health, the constant resistance snapping the belt.
Naturally I would have gone straight to BMW for an OEM belt, but it was 2.30 on Saturday afternoon and they'd closed for the weekend, so I hit up Euro Car Parts, who had the right belt in stock at their new branch which is less than 2 miles from my house. It's an OEM quality part, made by Continental and came to £9.84, so I can't really complain!
PROCESS:
I fitted the belt in about 30 minutes, without raising the car, removing the fan or even moving it onto the drive, using a quick and dirty method, which is fine for the air-con belt, but wouldn't work for the main drive-belt covered in this post.
1. Remove the front-piece of the engine cover [the slim one covering the PAS-fluid filler] by undoing the two bolts on top and one down the left-hand side using an M4 allen-key.
2. Undo the six fastening lugs for the front engine-undertray using a crosshead screwdriver, bend the tray back, free the leading edge from the front-bumper and lower it out of the way.
3. Place the new drive-belt over the two main pulleys from above and wedge the belt over the tensioning-pulley so it doesn't slip off and can be accessed from beneath the car.
4. From below the engine, hold the belt in place at the tensioning pulley and use a 16mm ring-spanner to rotate the tensioning-pulley downwards on its spring-bracket. [An open-end spanner will slip off easily and there isn't quite room for a ratchet-handle without removing the fan.]
5. Push the belt over the tensioning-pulley so it forms a 'pair-of-glasses' shape, as shown on this page of RealOEM.com. Ensure the belt is still in place over the two main pulleys, it may take quite a bit of rotating the tensioner to achieve this, and release the tensioning-pulley.
6. Refit the engine-cover and undertray - you're done, cold air!
This is my third MOT since buying the car and the first time it has even come up with an advisory item, let alone a fail, but I guess it had to happen eventually. I took it back to Walsh Autos in Birkenhead who know me and are usually very fair, but I think the problem was the 5-series hadn't been washed in about 12 months and was absolutely caked with bird muck and grime. It looked like it had been standing under a tree for that time and the fresh tax-disc didn't help, so I guess the tester thought I was dragging her out to sell and was a bit harsh on the checks. The moral of the story here would be to always give the car a wash prior to an MOT so the car appears cherished.
The fail items were:
Both N/S Tyres tread too low - I went for top-of-the-range Nexen nBlue through work with our trade discount, which worked out at £50 each for 225/55/16. This was still slightly cheaper than the low-range Pirelli and Continental and had a much better spec - extra-load, higher-speed, quieter and with an eco-rating, so I let my usual tyre-snobbey slip and plumped for good budget ones. If cash had been tighter though, lower-range Nexen and the worringly named Achilles budgets could be had for as little as £32. Still, £100 for 2 tyres is still good, considering the price for one entry-level Pirelli at Kwik Fit is £124.50!
O/S Anti-Roll Bar Drop-Link rubber boot perished - It was the original and had begun to let dirt in, so I figured the N/S one wouldn't be far behind and replaced both. The N/S one appeared to have been replace a few years ago and was in good nick, but when it's a matched pair of something - shocks or top-mounts - it's best to renew both at the same time. This is a problem that would have been avoided had the previous owner replaced both, but I guess this is easy to say when doing the work myself and not leaving it at BMW after the MOT. The drop-links were £9 each, again through work, but can be bought for a similar price on eBay.
O/S Parking-Brake efficiency little or no effort - I tightened up the handbrake last year, but it soon started to loosen off again. It's a heavy car, so the cables or inner brake-shoes will likely need replacing at some point. To get it through the test, I cranked the cables up a bit and adjusted the shoes as far as they would go, using the method in this older post - . That was a week ago,
O/S No. Plate Light not working - Turned out to be a 5W festoon type bulb, which I had a few of lying around, so didn't cost anything. Be careful when popping the lens out, it does not press in from the side with the recess, as that would be too obvious - it presses in from the opposite side!
The overall cost for the MOT repairs was £120, so not bad at all really. It was the tyres that cost the lion's share and without them this would have been very cheap indeed, but they had to come round eventually. Even so, the money I saved by doing the work at home speaks for itself - throwing the car into a dealership I estimate to have come to £400+
The car survived a trip with 3 people in and no scrubbing at all on the 16x9s, which I found very surprising, but still I figure the arches are good to finish off. I've neatened up the pulled lips and made a start to filling in and re-sculpting the shape of the wheel-arches, but progress has been slow and my intentions of selling the complete project this summer are looking unlikely. I spoke to the guy who did the re-spray for me originally and he said to get the arches as good as could be and pass it back over to him to smooth them off and repaint them without having to go over the whole car again. Great, though I can't keep hurling money at it, and with more to do over summer I've had less time to spend on the E21 and more time spent enjoying driving it on the new wheels for a few weekends in the sunshine like I intended, not just the odd trip to work. Oh and there is the matter of my daily driver needing MOT attention, but that's a different story.
Never the less, both the o/s arches have begun to take shape. Getting the lips off the bigger wheels and tyres was too extreme a job for my arch-rolling kit, so I had to pull them out with grips in the end. This meant a fair bit less grinding on the o/s rear wheel arch and none at all needed up front. The arch-lip needed to be low for as much tuck as possible, I don't like the cut-arch look, so I got the pulled out lip roughly in line with the slope of the arch and built it up flush with P38 filler. This is as close to the look of those European BBS'd E21s as I could figure, with a slight flare to the lip rather than the flat-edged look of the original arches. This is probably the easiest method of smoothing and saves on a bit of body-filler, enough of which is being used already.
I haven't touched the nearside arches yet, the main thing putting me off being the n/s rear one that was used to test fit those oversized Yokohama tyres and has suffered greatly from the spinning-disc. With the extra lip cut off the rigidity has been lost and the general shape of the arch has deformed, as well as more tyre being visible, about 10mm of tuck being lost. I guess my only options are to try and spot-weld the rough section of lip back on that was cut too far, which I still have, and rebuild the shape of the entire arch in filler, or buy a patterned-part wheel-arch off eBay for £25, cut out the current one, weld in the new one, smooth it off, pull the lip out and fill all that in. Well, there's no doubt the first method is cheaper and a lot less work, but this is a large area to be filling and smoothing and a wide margin for error, plus I don't even know if the bent arch will accept the bit I cut off without messing it up even further... watch this space!
They had to be ordered from Poland so took a couple of weeks to arrive, but it was worth it for the £105 delivered as they are very nicely machined and finished. They are an easy straight swap with the stock top-mounts, I've covered the process at the bottom, and I only encountered one snag where the silver steel bush, in the centre of the top-mount bearing, wouldn't quite fit over the top of the strut-insert. Using a bolt as a drift I managed to gently tap the bush down onto the strut-insert with a hammer. This mushroomed the top of the bush, so once it was very tightly fitted to the strut it would no longer fit into the bearing! A lot of reaming later using an old file and the bush would just about fit enough into the bearing to get the top-nut on and draw the bush up as it was tightened on. If it wasn't for that one snag, the plates would have been fitted in 20 minutes per side, so a good bit of advice would be to use a bit of oil or WD40 when fitting the bush to the strut-insert, or heat it first to get it on and allow it to cool again before slotting it into the bearing.
Now fitted, they're a doddle to adjust with the allen-head bolt setup, even with the wheel on and without lifting the car. As the new plates don't have a rubber shock-mounts like the stock items, I figured there would be a lot more road-noise with just metal on metal and there is, but not nearly as much as I expected. There's a bit of a knock going over big bumps, but I don't know if this is just a louder transmission to the body than the stock mounts, or if the giant spring-pan of my stock struts is hitting the body when it flexes enough. The big spring-pans mean I can't run the camber-plates fully over to the negative side and to get the amount I have now they are sitting awfully close to the body while the car is stationary, so I can imagine them contacting with enough rotation in the suspension. The only solution to this problem is smaller diameter spring-pans, i.e GAZ coilovers and another £700... watch this space, probably for some time.
Silver Project are an independent engineering company in Poland and make these along with a lot of other cool bits for different cars, check them out on Facebook [] or their store on eBay [http://myworld.ebay.co.uk/silver-project-pl/].
Quick video of the plates in action and showing the amount of tilt:
FITTING PROCESS:
1. Lift the front of the car, remove the corresponding wheel.
2. Grip the strut-insert to stop it from turning and remove the top-nut using a 19mm deep-socket.
3. Push the wheel-hub down using your foot so the top of the strut-insert drops out of the top-mount and can be moved to one side.
4. Support the top-mount from below, undo the three nuts holding it in place using a 13mm wrench and lower the top-mount out of the wheel-arch.
5. Fit the camber-adjustable top-mount from below and replace the 13mm nuts and washers.
6. Undo the four allen-head bolts on the adjusting-slider of the top-mount so it moves freely from side to side, using an M4 allen-key/socket.
7. Apply grease or a little oil to the smooth part of the strut-insert just below the top-thread so it can be easily drawn into the bearing.
8. Pressing the hub down with your foot again to allow the strut to be moved around, locate the top of the strut-insert into the silver bush of the top-mount.
9. Once the strut-insert is about 1mm into the bush, there should be enough of the threaded part poking out of the top to get the top-nut on and draw the strut up into the bush as the nut is tightened with a 19mm deep-socket. [The strut-insert will likely need gripping further down to stop the whole thing turning with the wrench.]
10. With the wheel either on or off, slide the camber-adjuster to gauge the angle and make sure the spring-pans on the shock aren't contacting the body-turret, then tighten up the four allen-head bolts with an M4 allen-key/socket to hold it in the desired position. [There is not a lot of headroom in these smaller BMWs, especially if you're using larger stock struts.
11. Replace the wheel, drop the car and enjoy your new crazy-cambered or nicely straightened-up front wheels! There are a few steps to this one, but provided you don't hit any fitment snags, it's a quick and easy job if you know the suspension setup.