Showing posts with label repair. Show all posts

Saturday, 30 April 2022

E90 318d: New rear caliper! [Reconditioned exchange part]

Rear O/S calliper was sticking on this 2005 E90. A re-conditioned genuine unit was sourced for just £45 with the old one being returned in exchange.

Not a bad hours work... remember to prime the new calliper with fluid and it hardly needs bleeding.

Sunday, 6 February 2022

E30 318i: Replacing Clutch Slave-Cylinder - Quick + dirty guide!

Clutch reservoir suddenly low on fluid? Gearbox housing covered in it? Sounds like a popped slave-cylinder. Not to worry, this has to be one of the easiest to replace ever made!

* This guide covers the M40 engine and 5-speed gearbox, but process is the same for most models. *

1. Lift the left side of the car.

2. Remove the 13mm nut from the outer side of the slave-cylinder. This one is easy to access and can be got with a ring-spanner or socket, but the ratchet is quite snug to the gearbox.

3. Remove the 13mm nut from the inner side of the slave-cylinder. This is quite difficult to get to as it is inhibited by the clutch-hose as well as limited access in the trans.-tunnel. I managed it with a socket and a 4" extension bar to get past the hose/pipe. 

* I have seen someone getting that difficult to reach nut using a longer extension bar and the ratchet further back behind the gearbox, but this was not possible on my E30, so I'm guessing this may be for 4-speed boxes or older M10/M20 engines. If yours cannot be got with the details in step 3, then try this. *

4. Remove the slave-cylinder fr the gearbox and allow to hang down on the hose.
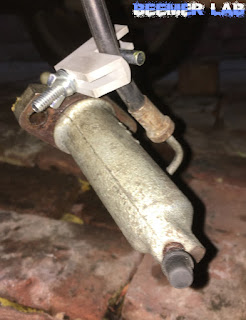
5. Clamp the hose (optional, but saves time when bleeding system later).

6. Remove the hose end from the slave-cylinder using an 11mm wrench so the old unit can be discarded. [It is much easier to grip the slave-cyl. by hand while it is removed from the gearbox and get a turn on the pipe-collar, as well as minimising leaks from the hose.]

7. Prime the new slave-cylinder by removing the bleed-nipple and carefully pouring DOT4 brake/clutch fluid into the hole at the top for the hose/pipe until the air is displaced and the fluid run out of the lower hole. It won't need much. Refit and tighten the bleed-nipple. 

8. Refit the hose-end to the slave-cylinder and remove the hose-clamp if you're using one.

9. Refit the slave-cylinder to the gearbox and tighten the two 13mm nuts.

10. Top up the clutch reservoir with DOT4 brake/clutch fluid and bleed the system of air. [Which bleeding technique you use is up to you, but for all BMW clutches I would recommend using a one-way valve attached to the bleed nipple as detailed in THIS POST, which saves time and headaches.]

E30 316i / 318i Electrical Troubleshooting Manual [1984 onwards] - PDF 8.9MB

VIEW/DOWNLOAD


CONTENTS:
  1. Index
  2. How to Use this Manual
  3. Symbols
  4. Wire Size Conversion Chart
  5. Systematic Troubleshooting
  6. Diagnostic Connector
  7. Power Distribution Box
  8. Fuse Data
  9. Schematic Diagrams
  10. Component Charts and Figures


Sunday, 24 October 2021

E30/E28: Faulty AFM (Air Flow Meter) repairs, worn carbon-track quick fix

** FOR ADJUSTING AFM AIR/FUEL RATIO SEE THIS POST **

The AFM or Air Flow Meter uses a metal flap that is opened air entering the engine to move a brass arm up and down a carbon-track. The position of the arm along the carbon track alters the electrical resistance through the circuit and this lets the ECU know how much air is coming in, so it can deliver the right amount of fuel to the injectors. The E30 uses a BOSCH AFM unit, also used in many other BMWs with Motronic or Jetronic injection systems.

The analog electrics in the BOSCH AFMs rarely ever fail, but there are two areas that are failure prone after higher mileage - a worn carbon track and a faulty air-temperature sensor.

Saturday, 23 October 2021

E46 318i Touring: New front drop-link for MOT

The 318i Touring was up for MOT this week and failed only on the O/S front anti roll-bar link. Normally I would replace these as a pair, which would have been more cost effective as you can get a set of two from eBay for under £15. Time was an issue and I wanted to get it back for a re-test so had to buy one from Euro Car Parts for the same price, around £15. Annoyingly, the eBay pair were Lemforder and the single piece from ECP is Starline, but needs must.

The car has only just passed 104k miles, so this could well have been the original anti-roll bar linkage and boy was it seized on. I only got a couple of turns on the top nut before the 5mm Allen-key in the stud stripped and rounded, so had to cut the rubber boot off to get a 17mm spanner on to the flats at the back. Even so, progress was painstakingly slow. Couldn’t even get a grinder in there as things are surprisingly tightly packed on E46. This made an otherwise quick and easy job last a bit longer, but it is nearly 20 years old.

Tuesday, 5 October 2021

E30/E28: Adjusting AFM (Air-Flow Meter) - change air/fuel rich/lean mixture

 ** ADJUST YOUR AFM SETTINGS AT YOUR OWN RISK **

This is for BOSCH AFM units, fitted to most E30 and other BMWs fitted with Bosch Motronic or Jetronic injection systems.

The AFM, or Air Flow Meter, is a metal flap that is drawn open by air entering the engine and the position of the flap tells the ECU how much air is coming in so it can inject the right amount of fuel. The stock parameters for the AFM are set at the factory and unique to each car and BMW recommend that these settings should NEVER be adjusted... so do it at your own risk!!

Why would the AFM need adjusting??

  • You have done a ‘gas-test’ and the results show your car is running rich (too much fuel for amount of air) or lean (too much air for the fuel being supplied) and wish to adjust for emissions / fine-tuning purposes.
  • You have an air leak after the AFM, so more air is getting in than the ECU is supplying fuel for and the engine won’t run, especially when cold.
  • You have an over-fuelling problem where too much fuel is being supplied for the amount of air and flooding the engine.

Adjusting the AFM in the second two instances is a quick and dirty way to get your car running well enough to drive it, but is not a long-term fix for an underlying problem, so bear this in mind before messing with the AFM.

Sunday, 26 September 2021

E30 318i: Replacement Speedometer/ Odometer

Had to bite the bullet and buy a replacement speedo / odometer for project E30 this week as after many different attempts to fix the original one [THIS POST], I had to declare it totally junked. These are not cheap and sit around the £65-70 region, but I got a deal on one for £59... still an unwanted cost but at least I no longer have to tape an old iPhone to the dash with a speedo app!

Now the question is, do I swap in the number row from my old odometer or leave the ones in from this one, some 100k miles less.... Hmmm.

As per the pics, the areas of concern on my old speedo are not problem on the replacement, with resistors, capacitors and other components all looking mint. There is also no charring to the back of the PCB, so no sign of this unit overheating in the past and the odometer gearing is perfect. This unit has still covered 154k miles over the last 35 years, but has clearly had an easier life than the one from my E30!

Showing the healthy resistor on the newer speedo on the left and the burnt out one to the right.

E30 318i: Speedometer / Odometer faults + check list

If your E30 speedometer is broken, your odometer isn't turning or both, then here is a troubleshoot check list to find and fix the fault. Doing the work yourself is a bit fiddly, but totally doable if you are handy with a soldering-iron.

** A more detailed guide / thread all about E30 speedometer / odometer faults by 03IRM3 on r3vLimited.com is here - https://www.r3vlimited.com/board/forum/e30-technical-forums/general-technical/59019-e30-speedometer-repairs-failure-modes, which was a great help. **

NOTE: If your speedometer is not reading, before starting to diagnose the instrument the first thing to check should be if there is a pulse being generated by the speed-sensor in the differential, see E30Zone Wiki here.

Broken Odometer drive gear.
This is the most common problem when the odometer has stopped turning. The drive gear from the stepper motor that turns the larger cogs tends to split on higher mileage cars causing it to skip teeth and not turn the odometer gearing. Replacement gear sets can be bought from eBay for a few quid.


Burnt out resistor.
This is the main power resistor on the 12v + input to the PCB and it's never usually failure of this component that causes it to burn out. Instead, failure of a component further upstream is usually the culprit by drawing way too much current, causing the resistor to work double-time and overheat. This one was still working amazingly, given the heat it had been producing that charred everything around it, but I threw a new one in anyway. The value was about 150 ohms, so that's what I went with.


Blown capacitor.
Sudden failure of both speedo and odometer can often be down to the main power capacitor blowing. This is visible in the above pic to the right of (and next in sequence to) the burnt out resistor. It's a basic 220uF electrolytic capacitor and is very simple to replace with only two pins needing de-soldering, so should be the first step in troubleshooting a dead unit, even if the cap itself doesn't appear blown. Mine had been scorched by the overheating resistor, but seemed ok. I replaced it anyway, but it did not help with mine.


Snapped wire on Odometer stepper-motor coil.
This is rare, but does happen as 03IRM3 has seen one and mine had this too so I guess it does happen, where one of the single strands of copper coil for the stepper-motor snaps off its pin on the PCB. It’s possible that this happens due to time/age and vibration in the vehicle, but could likely be due to manhandling the unit while it is out for other repair work. Either way, it’s an easy fix to just solder it back in place and will be stronger than it was before at least.


UAF chip blown.
If none of the above fixes have worked and both speedo and odo are still not working, the likely culprit is that the UAF I/C chip has malfunctioned and is not processing inputs and outputs correctly, which leads to the resistor burning out, caps blowing and the odometer coil overheating. These UAF2115 chips are common, used in many speedo/odo units, taxi-meters, tachographs etc., so replacements can be found on eBay or electronic component sites for a few £/$, but this is probably the most advanced fix needed for these units and the question at this point is whether it's worthwhile. 03IRM3 has replaced chips as a last resort only to find the unit still won't work, so I decided that with all other fixes not working and my odometer still needing new drive gears that it was time to junk it and seek a replacement unit... [THIS POST].

Wednesday, 15 September 2021

E30 318i: Replaced AFM (Air-Flow Meter)

I’d been messing with my AFM in order to get the car running ok when cold and when I finally fixed the massive air leak on the inlet manifold I then struggled to reset the AFM back to standard. 
In order to get the M40 to idle ok while the engine was cold I adjusted the mixture setting to run richer. Obviously this was providing enough fuel to stop the engine cutting out while the plenum was filling with as much air as the cylinders could gulp through the gap in the manifold gasket. It runs and drives ok in this setting, but idles quite high (about 1100rpm) and you can smell the stink of neat petrol out of the exhaust. Ok for short trips shunting the project car around but will need addressing to enjoy it before summer ends!
The real problem began when I had repaired the gasket, got the engine running smoothly and then tried to reset the AFM back to a stock, or near stock value. To begin with I had been putting marks and taking photos to recall where the settings were before I started messing, but you know how it is, once you get immersed into a several day long tweaking session (take that as you will!) the tendency is to get lost along the way.
I gave up trying in the end and decided the only way to dial this engine in and be sure I was not fighting with a dodgy AFM was to buy one that had not been messed with. This is in my interests anyway, as I got one from a car with far lower miles on it so the carbon-track is less worn and I know the air-temp sensor is OK too, which was a doubt with the original one.

Sunday, 5 September 2021

E46 318i Touring: Replacing leaky Oil Cooler gasket [N42]

After fixing the major oil leak from the rocker-cover gasket [THIS POST], I noticed there was still some oil pooling on the under-tray and a fews spots dripping onto the road. I traced the source up the right side of the engine (looking from the front) and could see oil filling up some cavities in the cylinder-head to the left of the oil-cooler / filter housing, so determined this to be the culprit... yes, another common one, especially if the filter-housing has been removed for previous engine work.

A replacement gasket was just £6.59 from eBay and comes as a two piece set including the main gasket that sits between the housing and the cylinder-head, as well as a smaller gasket that sits between the oil-filter housing and the coolant fed heat-exchanger. This latter one hardly ever leaks, as it's very rare to find a filter-housing that has been split apart during engine work, but it's nice to have one anyway and you may find it worth the time to replace this one while the housing is removed, though I could not see any signs of leakage so didn't bother.


GUIDE:

1. Remove the lid to the air-con ducting that sits atop the firewall at the back of the engine by undoing the clips a quarter-turn, take out the pollen-filter and remove the weather-strip seal from the firewall.

2. Remove the air-con ducting itself by undoing the four screws using a T30-Torx socket and lifting it out.

3. Remove the rear right-side engine cover by undoing the two stud-nuts using a 10mm wrench.\

** Make sure you have a cloth / plenty of tissue to catch any oil that runs from the housing. **

4. Remove the three screws holding the oil-filter / cooler housing to the cylinder-head using a 10mm socket with a long extension bar. One is clearly visible in front of the housing, the other two being hidden down the back.

5. Lift the oil-filter / cooler housing upwards out of the head, catching any wayward oil and lift the housing clear, rotating it so as not to put too much strain on the coolant-hoses. The hoses do not need removing or any coolant draining for this job.

6. Remove the old gasket and clean both mating surfaces with a cloth and I find it always worth scraping any crud off with a razor-blade.

7. Insert the new gasket to the housing. A lug on one side sits in a notch in the housing so the gasket can only fit in one way. [If it's an older engine or the housing has been removed a few times before, it might be worth taking a belts-and-braces approach by applying some gasket sealant to the mating surface on the head, as I did with some white Corteco.]

8. Carefully place the filter/cooler housing back onto the cylinder-head, trying to spill as little oil as possible on the mating surface and reverse steps 4-1 to refit.

Monday, 30 August 2021

E46 318i Touring: Handbrake / parking-brake repair + adjustment

The handbrake (e-brake) wasn't working properly on the left side of the E46 Touring, which I assumed would either just need adjusting or at worst the spring mechanism had failed. BMWs of this era have a drum-brake mounted inside the hub of the disc-brake that is used only for the parking-brake. It turned out that the sprung stud that holds the lower brake-shoe in place had come loose, worked its way round the drum and partially jammed the mechanism, as in top picture.


The slot that the stud locks in to is part of the backing plate for the disc and it had bent outward and rounded off over time, no longer giving enough metal for the stud to hold on to. I managed to build the slot back up using a cole-chisel and there is just about enough metal left to hold the stud firmly. If it happens again in the near future then a new backing plate may be required, but this is a hub off job and a whole load more work, so lets hope it doesn't. 


Annoyingly, I had to crack open a new £13 handbrake spring assembly kit just to use the one sprung retaining stud, guess I have some spares at least. With the left side now working correctly, I gave both sides of the handbrake a quick tighten up using the rotating adjuster inside the drum.

Wednesday, 9 June 2021

E30 318i M40: GUIDE - Replacing lower inlet-manifold gasket - rough idle and stalling fixed!

After all the diagnosis and testing from THIS POST, I found the cause of my rough idle and stalling out when cold was a damaged paper gasket on the lower inlet-manifold allowing unmetered air to be drawn in to the plenum at will and confusing the AFM and DME over how much fuel to deliver. 

The engine just about ticked over when warm, albeit with a slight misfire. On cold startups however, the misfire was a lot more severe and at low revs the engine just couldn’t hold on, stalling out due to a way over-lean mixture. It would drive though, but there was no throttle response until about halfway up the rev range and power would arrive with a bang. It is amazing how sensitive these older engines with analog electronics are to unmetered air leaks!

IF YOU HAVE THESE SYMPTOMS, CHECK HERE!

I ordered a new gasket from eBay, it was a snip at £6.88. Be careful when ordering, older M10 engine gaskets are far more plentiful, so ensure yours is the right one for the M40... they have a funny shape which is quite distinctive. Choice was limited, in fact I could find one more gasket for sale of the right type and that came with a full £30 set including a head gasket, so be sure to check out carpartsinmotion, they have rare-fit stuff.

GUIDE:

1. Undo the jubilee-clip and disconnect the large rubber duct from the throttle-body using a flat screwdriver or 7mm socket.

2. Unclip the throttle-cable from the throttle-linkage and remove the two 10mm screws holding the metal plate to the throttle-body so the cable assembly can be moved clear.

3. Remove the wiring connectors from the throttle position sensor [TPS] and idle control valve [ICV].

4. Remove the rubber hose from the bottom of the ICV.

5. Remove the vacuum air hose from the front side of the throttle-body by undoing the jubilee-clip and teasing it off carefully with a flat screwdriver.

6. Remove the two coolant hoses from either side of the throttle-body by undoing the jubilee clips and teasing them off with a flat screwdriver. 

7. Remove the six nuts from the upper inlet-manifold using an 11mm wrench [9 in diagram] and two locating studs in the centre with a 10mm wrench [13 in diagram]. 

8. The upper inlet-manifold can now be lifted out of the engine bay.

9. Remove the wiring connector from the fuel-rail / injectors. 

10. Remove the metal fuel send and return pipes from each end of the fuel-rail by undoing the jubilee clips. (This is where it gets messy, you may wish to plug or clamp the ends of these hoses). The send pipe is attached to the fuel pressure regulator [FPR] at the front of the fuel-rail and the return pipe is at the back of the rail.

11. Remove the five nuts holding the ports of the lower inlet-manifold to the head using an 11mm socket [4 in diagram].

12. Remove the two bracing bolts from the lower inlet-manifold using a 13mm socket. (They point towards the right side of the car) [11 in diagram].

13. The lower inlet manifold is now free to be removed. This can be a bit tricky as the rigid fuel pipes are routed through one of the gaps in the manifold ports. Also make a note of how the hoses to the throttle-body are routed through around the lower manifold, as it can be confusing once the upper manifold is bolted back in.

14. Clean off the mating surfaces of the cylinder head and the inlet manifold.

15. Carefully fit the new gasket to the studs on the head. It only fits one way round.

16. To refit reverse the above steps.

Sunday, 6 June 2021

1988 E30 318i Project - Check List:

 I will update this and cross things off as progress is made:

  • Straighten steering wheel.
  • Speedometer / Odometer inop.
  • Temperature gauge inop. [THIS POST]
  • Washer-jets / pump.
  • No hot air from heater-blower. [THIS POST]
  • Central locking malfunction.
  • Instrument lights flicker / dimmer function inop.
  • Clock inop. [THIS POST]
ENGINE:
  • Rough idle / stalling when cold. [THIS POST]
  • Exhaust too loud. [THIS POST]
  • Clutch slave-cylinder leaking.
BODYWORK:
  • Paint NSF wing.
  • Repair rear valance.
  • Touch up valance corners.
  • Panel above rear lights.
  • OSR wheel arch.

Saturday, 5 June 2021

E30 318i: Correct Temperature Sensor fitted (Brown Plug) + wiring/loom issue

The temperature gauge in the dash has not worked since I bought the E30, which was a little worrying on my 250 mile drive home, but the car does not overheat. Oh, it has some issues with the cooling-system, like the heater-matrix pipes fitted incorrectly and an air-lock at the back of the head, but hey it doesn't overheat. Still though, I thought it best to get the bottom of the faulty temp. gauge for peace of mind, particularly with summer coming / just about here.

The M40 has two separate temperature sensors that are independent from one another. The temperature gauge works from the 'Brown plug' sensor to the rear of the head [right in pic]. The forward sensor is the 'Blue plug' [left in pic] and that connects only the DME (ECU) to tell the car if the engine is cool or warm to help with cold-start procedures. A single sensor cannot be used for both purposes on these older engines as the resistance value ranges required for each function differ, the DME being a digital circuit and the temp. gauge still working in analog. [You can read more about this on the E30 Zone Wiki HERE].

MULTIMETER TESTING:

The temp. sensors can be easily tested with a multimeter set to 20k ohms resistance. 

The Blue plug is a two-pin sensor, so test across both terminals with the multimeter and you are looking for a reading of 4-4.5k ohms for a working sensor. This sensor and plug can be accessed easily without removing any parts from the engine.

The Brown plug though will require removal of the lower inlet-manifold to access the sensor for testing or replacing. This is a single pin sensor, so place one probe of the meter to the terminal and the other to a ground-point in the engine bay or against the block/head. Expect a reading of between 1k and 1.5k ohms for a working sensor. To test the Brown plug sensor without removing any parts from the engine, you can apply the multimeter to Pin 4 of the C101 connector (main wiring loom plug in engine bay) which is easy enough to get at, or at Pin 26 of the blue connector to the right side of the instrument binnacle, though the binnacle will need removing to do this.

WRONG SENSOR / CONFUSING WIRING LOOM:

All M40 engine wiring looms use a single pin temp. sensor on the brown plug that earths through the engine block and have only a single wire in use leading to it. Some looms, using components destined for other BMW models, are known to have a second wire leading to the Brown plug temp. sensor which is redundant on the M40 motor, though this is rare and seen more often on 6-cyl. M20 looms. My car has one such loom, however and I realise that this is what has caused confusion in the past and led to the wrong sensor in fact being fitted...

Upon inspection, the rear temp. sensor fitted to my E30 is black, not brown and has two terminals. The second pin means that the sensor body earths back to the loom and not through the block so, if the redundant earth wire in my loom is not connected to a ground-point then the sensor was open circuit. I guessed that someone had ordered a second Blue plug sensor by mistake and fitted that, but it turns out the part number doesn't match and the sensor is for a completely different model engine entirely. The reading from the multimeter was over 11k ohms, something like 7.5 times what it should be! That sensor was never going to work with the E30 temp. gauge circuit whether it was earthed or not.

I ordered the correct single-pin sensor with the brown base from mr-wiper on eBay, who also supplied my Bosch spark-plugs. It was only £7.69 delivered. My temp. gauge now works, but this may also be due in part to removal of an air-lock at the back of the head due to a heater-matrix problem so coolant is now flowing properly round the area of the sensor. 

A BIT MORE ON WIRING LOOMS:

Brown / Violet, brown being the main colour, denotes that the power source provided from the temp. gauge circuit is earthing through this wire and does not need to be a closed circuit back to the gauge. The other wire is either not wired in to the loom or goes to a body-earth anyway, so earthing the sensor through the block will make no difference. This colour coding is the same for all wires in all BMW looms, I would imagine most cars are the same.

Monday, 31 May 2021

BMW E30: Digital Clock quick LED upgrade

The bulb had blown in my E30’s digital clock, so I decided to repair it with a quick and easy LED upgrade. It’s another bulb load of power taken off my 35 year old dash wiring so can’t hurt. 

The bulb-holder is integral to the working of the lamp, with the metal clips that hold it in place also acting as live/earth contacts. LEDs built into such a holder can be purchased specifically for replacing bulbs like this if you want to go that route, but if you have a bunch of cheap LEDs lying round and don’t want to spend any money then read on.

Simply remove the plastic holder and cut the old bulb away from the two pieces of metal. Solder a cheap yellow or red LED onto the metal contacts in the place where the bulb was attached and bend the LED stalks back on themselves so the diode is pointing the right way, as in pic. A pure-white LED would probably be better, but they use more wattage, will probably require a spend and cheaper dome LEDs work fine anyway.

The bulb for the clock has a resistor built in anyway, so the LED will run fine and not pop without modification, but if you find it is too dim or bright to you can ‘piggy-back’ another resistor across the stock one to raise or lower resistance to suit. A calculator to help work out what resistance you need are easily available online, but trial and error is best if you have a bunch of LEDs / resistors lying round.

You may want to cover the recess at the back of the clock with electrical tape to stop light spilling out.

Monday, 24 May 2021

E30 318i: New Bosch spark plugs + correct coil fitted

With the car still misfiring a bit, I turned my attention to the plugs and HT leads. All appear fine. The coil works because there is a spark. I inspected the plugs, a set of NGK R that don't look particularly ancient, expecting one or more to be wet with unburnt fuel from a combination of misfiring and running an over-rich mixture from tweaking the air-flow meter [AFM]. I noticed that the plugs were in fact all dry and totally black with soot at the tips from over-fuelling, but their condition seemed fine. This matched the points in the distributor-cap, which were also blackened.

The spark plugs were working, but they didn't seem to fully igniting the mixture and performing weakly, so I turned my attention back to the coil. A previous owner had fitted a universal 'Sports coil' and judging by the shiny casing it doesn't look too old, so I couldn't see how it could be at fault. Thats when I noticed the terminal connecting it to the HT lead. It's about 10mm wide and has a metal inner lining. There is a screw at the bottom holding it in. This is obviously designed for a different type of HT lead than fitted to BMW, as the lead has a rubber plug where

it contacts the copper casing of the terminal in the coil. The metal terminal in the HT lead is designed to fit over a stud inside the coil-terminal, which is what I've always seen before, not just in BMW. This means the only contact being made by the main HT lead was its very tip touching the screw at the bottom of the coil-terminal.

I swiftly ordered a used OEM Bosch coil unit from eBay for £15. A 'Sports coil' type with the correct end was about £35, but I figured it was best to go original, at least for the time being while I iron out the M40 engine's running problems. While I was at it, I bought some OEM Bosch spark plugs for £13, which is cheap and I thought I may as well rule out plug condition as a factor with not knowing how long the incorrect coil has been fitted to the E30. 


Thursday, 1 April 2021

F10 530d: Water in Battery well / Bootwell / Trunkwell - where is it leaking?

I lifted the boot/trunk floor to jump-start a friends car and noticed that my battery well / spare-wheel well is full of dirty water.... oh dear. I’ve got a leak... but where? Boot seal? Bottom of the rear windscreen? There was a second aerial / antenna fitted in the roof that I removed, so figured it might be leaking through there and running down the C-pillar into the boot, but no water marks in the headlining or signs of ingress... Think I will have a proper look this weekend and try get to the bottom of it!


Friday, 19 March 2021

BMW MOST Bus - Troubleshooting Guide [Vlad on MCA]

 Great guide to the BMW MOST Bus (Media Oriented Systems Transport), used in all BMWs with fibre-optic connectivity. It covers what it is and what it does, as well as troubleshooting a lot of associated problems with these complex systems. It is from Vlad at MCA.org and can be found here: 

https://mca.electricmura.ro/en/blog-bmw-most-troubleshoot/


Thursday, 3 December 2020

F10: Rear Shock Absorber / Strut / Spring Replacement [GUIDE]


Time to do the rear struts and springs on the 530d F10 this week as one damper has been leaking and while doing my tyres last week I noticed the spring has now broken at the bottom so this is now an urgent job. I picked up a pair of used complete struts (spring, damper and top-mount) from eBay for just £100. They are from another 530d and claim to be from a low mileage car. Well, they look a lot lower mileage than the ones I'm taking off lets put it that way and appear to be in pretty good condition. I get a lot of stick for constantly using second-hand genuine parts, but I still prefer this to buying new spurious parts where I can and have never had an issue!

GUIDE:

* This is not a difficult or time-consuming job, but will require a bit of brute force. *

1. First the rear seats need to come out. Lift the seat squab up at the front and detach it from the push-studs, press the seat-belt receivers through the recesses and lift the squab out. Next lift the seat-back upwards until it is free of the hooks at the top and lift that out, being careful of the door-sill paintwork and sliding it through the seat-belts. [You could always unbolt the seat-belts at the base using a T45-Torx socket to make this easier, but it's not essential].

2. The parcel-shelf now needs to come down in order to access the strut-top mount bolts in the shock-turrets. Remove the C-pillar trims by prizing out the plastic caps labelled 'Airbag' from the trim and removing the screw using a T25-Torx socket. Now carefully pull away the C-pillar trims and put to one side. Remove the five push-pin clips from the front edge of the parcel-shelf by levering the button in the centre upwards and pulling the plastic pin out. The studs can now be levered out. The parcel-shelf is now free to pull forwards and can be rested where the seat-back would be. [Remove the wiring-connectors to the speakers, but these should pop out by themselves anyway].

3. Lift the car and remove the corresponding wheel. [There is no need to be getting under the car for this job, so a jack and axle-stand is fine].

4a. The track-strut (pictured) needs to be moved out of the way to access the bottom strut bolt so first remove the plastic clips holding the E-brake wire-harness to the track-strut by levering them open at the bottom with a flathead-screwdriver and separating them from the strut. The wire-harness can be moved out of the way.

4b. Remove the bolt holding the inner end of the track-strut using an 18mm wrench. Pull the track-strut down and rotate it so it is pointing out of the wheel-arch. You now have plenty of room to get at the bottom strut bolt and lift the shock out.

5. Remove the bolt holding the bottom of the strut to the hub using a 21mm wrench.

6. Lift the triangle flap in the foam underneath where the parcel-shelf was to expose the studs to the strut-top mount and remove the three nuts using a 13mm wrench.

7. Wiggle the bottom of the strut free from the hub and the entire strut assembly is now free to be removed. It should be able to be lowered through the remaining suspension parts and to the rear of the car until it is free to be removed.

** IF YOU ARE CHANGING THE SPRING / TOP-MOUNT OR SWAPPING THESE ONTO A NEW STRUT THEN DO THIS NOW** [See this post for guide].

8. Make sure the new strut has the top-mount in line with the old one you removed by lying them next to each other and checking the bottom bolt-eyelet and triangle marking on the top-mount match up. [The triangle marking on the top-mount should face towards the back of the car with the bolt-eyelet facing the centre, or with the triangle marking facing you the bolt-eyelet should be pointing to the right for O/S (right-side) and left for N/S (left-side)].

9. Lift the new strut back up through the suspension and line it up into the strut-turret. [Triangle marking on top-mount facing rear of car] and screw the three 13mm nuts back on a few threads.

10. Lever the hub downwards until it meets the bolt-eyelet at the bottom of the strut meets its recess on the hub and screw the 21mm bolt back in about half-way.

11. Fully tighten the three 13mm nuts on the strut-top mount.

12. Fully tighten the 21mm bolt through the bottom of the strut.

13. Replace the track-strut / wheel as a reversal of steps 3 and 4.

14. If you are doing both sides then repeat steps 3 - 13 for the opposite side.

15. Replace the parcel-shelf, trim and rear seat as a reversal of steps 1 and 2.

Sunday, 29 November 2020

E81 120d M-Sport: New springs and dampers!

Sean at work has a 1er with nearly 200k miles on the clock, through you would never tell as most of the parts have been replaced since he got it for a mere £700. Yes, you can get a zippy M-Sport 120d for this price, but unless you are willing to get your hands dirty I wouldn't recommend it. Of course, you probably are willing to do that or you wouldn't be here in the first place, so go sick there are bargains out there!

This time it's having new rear springs and dampers as one has leaked all of its fluid and is jammed in position. The opposite side was constantly hitting the bump-stop. She rides good now.