Showing posts with label new. Show all posts

Saturday, 30 April 2022

E90 318d: New rear caliper! [Reconditioned exchange part]

Rear O/S calliper was sticking on this 2005 E90. A re-conditioned genuine unit was sourced for just £45 with the old one being returned in exchange.

Not a bad hours work... remember to prime the new calliper with fluid and it hardly needs bleeding.

Sunday, 27 March 2022

F10 530d: New wiper-blades - Bosch Aerotwin

Replacement wiper blades for modern cars are not cheap. Euro Car Parts wanted £45 for a set and that was with a discount, other high-street stockists wanted over £60... for two wiper blades. Ah well, you can't fight progress I suppose, these new fangled blades wipe the screen so much better than the old ones did... don't they??

I found a super-cheap budget set for just £11 on eBay, but these turned out to be for a left-hand drive car and are the exact opposite profile of the ones I need here in UK so would not fit. They were from a UK stockist too, who didn't seem to know the blades were wrong, this was obviously the first set they sold for F10 or maybe mine were a fluke one off LHD pair... we will never know.

In the end I plumped for a set of Bosch Aerotwin from eBay, as they came in at £23, far off the 40+ from ECP so worth waiting for delivery. Have to say, you can see the quality of the Bosch is better than that of the budget blades, so you get what pay for, but I still think £23 is expensive for two wiper blades!

Sunday, 6 February 2022

E30 318i: Replacing Clutch Slave-Cylinder - Quick + dirty guide!

Clutch reservoir suddenly low on fluid? Gearbox housing covered in it? Sounds like a popped slave-cylinder. Not to worry, this has to be one of the easiest to replace ever made!

* This guide covers the M40 engine and 5-speed gearbox, but process is the same for most models. *

1. Lift the left side of the car.

2. Remove the 13mm nut from the outer side of the slave-cylinder. This one is easy to access and can be got with a ring-spanner or socket, but the ratchet is quite snug to the gearbox.

3. Remove the 13mm nut from the inner side of the slave-cylinder. This is quite difficult to get to as it is inhibited by the clutch-hose as well as limited access in the trans.-tunnel. I managed it with a socket and a 4" extension bar to get past the hose/pipe. 

* I have seen someone getting that difficult to reach nut using a longer extension bar and the ratchet further back behind the gearbox, but this was not possible on my E30, so I'm guessing this may be for 4-speed boxes or older M10/M20 engines. If yours cannot be got with the details in step 3, then try this. *

4. Remove the slave-cylinder fr the gearbox and allow to hang down on the hose.
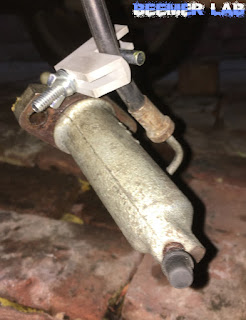
5. Clamp the hose (optional, but saves time when bleeding system later).

6. Remove the hose end from the slave-cylinder using an 11mm wrench so the old unit can be discarded. [It is much easier to grip the slave-cyl. by hand while it is removed from the gearbox and get a turn on the pipe-collar, as well as minimising leaks from the hose.]

7. Prime the new slave-cylinder by removing the bleed-nipple and carefully pouring DOT4 brake/clutch fluid into the hole at the top for the hose/pipe until the air is displaced and the fluid run out of the lower hole. It won't need much. Refit and tighten the bleed-nipple. 

8. Refit the hose-end to the slave-cylinder and remove the hose-clamp if you're using one.

9. Refit the slave-cylinder to the gearbox and tighten the two 13mm nuts.

10. Top up the clutch reservoir with DOT4 brake/clutch fluid and bleed the system of air. [Which bleeding technique you use is up to you, but for all BMW clutches I would recommend using a one-way valve attached to the bleed nipple as detailed in THIS POST, which saves time and headaches.]

Saturday, 23 October 2021

E46 318i Touring: New front drop-link for MOT

The 318i Touring was up for MOT this week and failed only on the O/S front anti roll-bar link. Normally I would replace these as a pair, which would have been more cost effective as you can get a set of two from eBay for under £15. Time was an issue and I wanted to get it back for a re-test so had to buy one from Euro Car Parts for the same price, around £15. Annoyingly, the eBay pair were Lemforder and the single piece from ECP is Starline, but needs must.

The car has only just passed 104k miles, so this could well have been the original anti-roll bar linkage and boy was it seized on. I only got a couple of turns on the top nut before the 5mm Allen-key in the stud stripped and rounded, so had to cut the rubber boot off to get a 17mm spanner on to the flats at the back. Even so, progress was painstakingly slow. Couldn’t even get a grinder in there as things are surprisingly tightly packed on E46. This made an otherwise quick and easy job last a bit longer, but it is nearly 20 years old.

Wednesday, 25 November 2020

F10 530d: 4 new Run Flat tyres (Goodyear Excellence 255/55/17)

 My run-flats that came with the F10 have been run practically, well, flat. They were an advisory on my previous MOT and the last 12 months have not been kind to them with the F seeing a fair bit of use and the two rears are about 1mm from the wear bar, so with the next test looming its time to throw some fresh rubber on.

I went for the same, like-for-like Goodyear Excellence that were fitted when I picked the car up, in 255 / 55 / 17 size. I'm not sure if these are standard fit from BMW, but it's what the police were running on it for high-speed pursuit, so they will do for me and my mainly sedate driving style...

They aren't cheap kit. Even with a discount through work I was quoted £233 for two new tyres and I needed four. This price I would consider prohibitive just for new rubber when I can get four new regular tyres for as little as £100 the lot, but the Goodyear is what I wanted so I went for used tyres. Well, they are hardly used, with the set I bought having 7mm+ of tread left and a 2019 DOT code. Three of them have a puncture repair in the tread, but even so the deal I got was too good to turn down... £250 for all four!


Run Flats or normal tyres??

I've grown used to these Goodyear tyres over the last five years, though they would not be my first choice in normal circumstances. The grip, noise and ride are all pretty good and I've had a decent run out of them given the amount of tread left when I bought the car. They have suffered two punctures during that time and this is where the Run Flats show their worth. The first I repaired straight away, but on the other occasion I ended up driving for four days and covered 75 miles on a tyre with zero PSI, yes that's ZERO air in it and to be honest the tyre still performed perfectly and there car drove as normal. OK I would NEVER recommend anyone doing this, but yes they work and are worth the extra money they cost! The downside of this convenience is the harsh, bumpy ride due to the reinforced side-walls. This may be a big factor on low-profile tyres, for instance I had 18" alloys on my E60 with Run Flats and the ride was pretty harsh, and I would imagine it gets even worse for 19" and 20" with tiny side-walls, but with my current 17 inch rims with a 55 profile side-wall the ride is actually very good, so this argument becomes negligible! 

Friday, 22 May 2020

Bob Marley had a BMW Bavaria New-Six!

Of course he did!


I don't really need to make a wise crack here... Bob clearly knew what he was doing, avoiding the 'Yardie' image with his truly tasteful BMW Bavaria. I wonder if that thing still exists now? Imagine how much it would be worth!

Other celebrity BMWs:
Easy-E 850i
Will Smith E28 5er
Britney Spears E36 M3
Elon Musk E21 320

Wednesday, 27 May 2015

E60 Diesel: Replace Turbo Waste-Gate [Actuator]

This is a pretty easy job and can be done with removing the turbo, exhaust-manifold or rocker cover.
  1. Remove the inlet duct to the air-filter housing. It's held by a T30-Torx screw at the front and just unclips from the housing.
  2. Remove the boost-pipe from the top of the turbo by removing the screw from the left side of where it joins to the turbo using a 10mm wrench, then loosening the right hand screw using a T30-Torx socket and rotating the collar clockwise until it can be pulled out of the turbo.
  3. Remove the other end of the boost-pipe from the left side of the intercooler by reaching from underneath with a flathead screwdriver and sliding the metal clip down. The pipe should pop the intercooler easily and be pulled out from above. [This can be done without fully removing the engine-undertrays].
  4. Gently slide the rubber vacuum-hose off the metal spout on the waste-gate.
  5. Remove the three screws holding the waste-gate to the turbo using a 10mm wrench. [There is just enough room down the left side of the engine to get a ring-spanner on, otherwise a ratchet with a short extension-bar may get them more easily].
  6. Push a cloth or some tissue roll down under the bottom of the waste-gate between the turbo inlet and exhaust wheels to stop the retaining-clip getting lost into the engine and slide the clip off the waste-gate arm using a long flat screwdriver. [There is just enough clearance to get an angle with the screwdriver and just about see the clip. The clip will probably have to be removed with a stick-magnet].
  7. Slide the waste-gate arm off the stud and remove it.
  8. Refit the new waste-gate as a reversal of above, being careful not to lose the retaining-clip during refitting. The clip may need holding in position with a stick-magnet as it is pushed down with a flat screwdriver.

Sunday, 29 March 2015

E60 Diesel: Replacing the Front Turbo Housing/Volute

**The turbo needs to be removed. Reaching the 8mm nuts at the back of the volute is impossible               with it in situ.
  1. Mark a line on the original volute / front-casing where each 8mm screw is located before removing it. It is adjustable and the new one needs to be in the exact same place as the original for correct waste-gate location.
  2. Remove the 3 screws holding the waste-gate bracket to the turbo front-casing / volute using a 10mm wrench.
  3. Remove the 6 screws holding the front-casing / volute to the turbo and wiggle it free.
  4. Hold the new volute up to the original and mark lines in the corresponding places. This is best done with them on a flat surface and holding a straight-edge across both.
  5. Slide the new volute on to the turbo and replace the six 8mm screws, ensuring the lines are correctly located before tightening them up. It is alloy-to-steel, so no high-heat gasket-paste is required.
  6. Press the waste-gate into the right position for the bracket to meet the holes on the volute and replace the three 10mm screws holding it in place.
Why I replaced mine:

With re-con turbos starting at £350, I went for a used one from a crash damaged 7-Series. Mine is an early E60 and has the vacuum-actuated turbo, so it was handy that the 7er did too as they are hard to source - eBay is full of the electronic-actuated type and I couldn't see a vacuum one, but it may be that they are inter-changeable.

The overall condition of the turbo looked worse than the one I was removing, but there is a bit less play in the spindle-shaft so worth a shot at £200 delivered, let's hope the saving pays off. The only drawback is the front-casing was slightly damaged at the point where the pipe to the intercooler fits, but swapping the original one in was not a difficult job.

Saturday, 21 March 2015

E60 Diesel: Remove/Replace Turbocharger

Removing and refitting the turbo itself is not a difficult task, but the mass of other parts that need removing to access it makes this a reasonable amount of effort.

You will first need to remove:

Engine covers. [5mm Allen]
Air inlet ducting and air-filter. [5mm Allen]
Inlet manifold. [10mm + 11mm Hex]
Injector pipes. [17mm open-end wrench]
Injectors. [8mm Hex]
Rocker cover. [10mm deep-Hex]
Turbo to intercooler pipe. [10mm Hex + T30-Torx]
Airbox to turbo pipe. [5mm Allen]
EGR to exh.-manifold pipe. [T45-Torx + 7mm Hex]
Exhaust-manifold. [10mm deep-Hex + 12mm deep-Double-Hex]
Front engine-undertray. [8mm Hex]
Engine reinforcement-plate. [16mm Hex]
Exhaust vibration-damping rods. [13mm Hex]

REMOVAL:
1. Remove the two nuts holding the down-pipe/cat to the back of the turbo using a 17mm wrench and work the down-pipe back off the studs.
2. Remove the banjo-bolt that attaches the turbo oil-feed to the block using a 14mm wrench, remove that end of the oil-feed pipe and loosely screw the banjo-bolt back in a few turns to stop any oil leaking from the block. Put some cloth against the block under the pipe to catch any drips and remove and retain the 2 copper washer-seals as they are easily misplaced.
3. Reach under the turbo, locate where the lower oil-return pipe enters the rubber-hose to the sump and loosen off the upper jubilee-clip using a 6mm-Hex socket or flat screwdriver if you can get access. Let the jubilee-clip slide down the rubber hose.
4. Slide off the rubber-hose that runs to the waste-gate on the turbo.
5. Make sure the turbo's weight is supported, remove the two bolts holding the turbo-bracket to the block using a 13mm wrench and lift the turbo out, carefully sliding the lower oil-return pipe out of the rubber-hose.


FITTING:
6. **Ensure all oil-feed pipes etc. are swapped over to the new turbo**. Lower the new turbo into position, sliding the lower oil-return pipe back into the rubber-hose and loosely refit the two bolts.
7. Tighten the jubilee-clip on the oil-return hose and refit the oil-feed hose back on to the banjo-bolt, making sure the copper-washers are in place either side.
8. Place the exhaust vibration-damping rods back in place to locate the down-pipe and loosely refit the 13mm nuts.
9. Refit the neck of the down-pipe to the back of the turbo and tighten the 17mm nuts.
10. Place the exhaust-manifold over the studs on the cylinder-head and manoeuvre the turbo into a position where the bolts holding it to the manifold can be fitted. It can be trick to do while keeping the gasket aligned. Turn the three manifold-to-turbo bolts using a 12mm deep-Double-Hex (12-sided) socket until the manifold is seated, but do not fully tighten them.
11.  Lift the turbo to take the weight off the manifold and fully tighten the two bolts holding it to the block using a 13mm wrench. They are a pain to get to but it is doable, also a lot easier with someone else lifting the turbo.
12. Replace the twelve copper-nuts that hold the exhaust-manifold to the cyl.-head and tighten them using a 10mm deep 6-sided socket, as the strip easily with 12-sided ones.
13. Tighten the three bolts holding the manifold to the turbo.
14. Re-connect the rubber vacuum-hose to the waste-gate.
15. Refit the other things on the above list.

http://www.instructables.com/id/How-to-replace-Turbocharger-on-BMW-30L-Diesel-E60E/

Sunday, 1 February 2015

E60: Replacing all Brake Discs and Pads.


  1. Jack car, remove wheel. REAR ONLY - ensure handbrake is off.
  2. Remove plastic caps and 7mm Allen-head bolts.
  3. Remove caliper and hang it from the spring.
  4. *On front-N/S and rear-O/S ONLY* - Remove pad wear-sensor by gently working it up out of the slot with a small flat-screwdriver. Part of the green plastic may brake off but it's very unlikely the sensor will stop working, so provided you are careful to retain the metal clip it will fit back on tight enough.
  5. Remove 18mm bolts from caliper bracket and lift out of the way.
  6. Remove the stud holding the disc to the hub using a 5mm Allen-key socket.
  7. Wobble the brake disc off. REAR ONLY - It may need whacking from behind with a hammer as it will bind to the handbrake shoes.
  8. ** If you are replacing the inboard handbrake shoes, then do this now.
  9. Fit the new brake-disc to the hub. The hand-brake may need adjusting for the drum to slide over the shoes as it self-adjusts to stay against the worn drum on the old brake-disc. It will likely need adjusting to the new drum anyway. 
  10. Reverse steps 5 to 1.
Pad wear-sensors are a pain to remove.
I wangled all 4 discs and pads for £140 from LVW who supply where I work. 
Belaco are a budget make, but we fit them to vans at work and they seem OK.
Mintex pads do the job.
Plenty of meat left on the old discs, but the MOT fail showed brake imbalance.
The old pads looked alright too, but no imbalance reported on the retest.

Sunday, 14 September 2014

E60: Cracked lower timing-case - engine finished.

Yeah well that's torn it. Literally, torn it open. After all that effing about with the sump removal, finding the right piston and drilling off those snapped head bolts, I find a whopping great crack in the lower timing-case!


I wonder what caused this? Vibration from the swirl-flap doing its dance? High crankcase pressure from the dodgy piston? Who knows, but we can safely say that's where the oil leak was coming from!

It's a big enough job as it is to replace that single damaged piston, but to swap the lower timing-case as well involves stripping the entire front of the car, getting all the pulleys off and fully removing the crankshaft. Hmm, a lot of work and a lot more cost, this definitely calls for a replacement engine... Watch this space!!

Monday, 20 August 2012

E21 316: Finishing Touch - New Ash-Tray!

With the new radio-fascia installed the ash-tray was looking rather dated and the broken corner was sticking out like a sore-thumb. As luck would have it, a full set of ash-trays removed from a 323i came up on eBay, but were a bit steep at £20, though I managed to wangle free delivery.