Showing posts with label clutch. Show all posts

Sunday, 6 February 2022

E30 318i: Replacing Clutch Slave-Cylinder - Quick + dirty guide!

Clutch reservoir suddenly low on fluid? Gearbox housing covered in it? Sounds like a popped slave-cylinder. Not to worry, this has to be one of the easiest to replace ever made!

* This guide covers the M40 engine and 5-speed gearbox, but process is the same for most models. *

1. Lift the left side of the car.

2. Remove the 13mm nut from the outer side of the slave-cylinder. This one is easy to access and can be got with a ring-spanner or socket, but the ratchet is quite snug to the gearbox.

3. Remove the 13mm nut from the inner side of the slave-cylinder. This is quite difficult to get to as it is inhibited by the clutch-hose as well as limited access in the trans.-tunnel. I managed it with a socket and a 4" extension bar to get past the hose/pipe. 

* I have seen someone getting that difficult to reach nut using a longer extension bar and the ratchet further back behind the gearbox, but this was not possible on my E30, so I'm guessing this may be for 4-speed boxes or older M10/M20 engines. If yours cannot be got with the details in step 3, then try this. *

4. Remove the slave-cylinder fr the gearbox and allow to hang down on the hose.

5. Clamp the hose (optional, but saves time when bleeding system later).

6. Remove the hose end from the slave-cylinder using an 11mm wrench so the old unit can be discarded. [It is much easier to grip the slave-cyl. by hand while it is removed from the gearbox and get a turn on the pipe-collar, as well as minimising leaks from the hose.]

7. Prime the new slave-cylinder by removing the bleed-nipple and carefully pouring DOT4 brake/clutch fluid into the hole at the top for the hose/pipe until the air is displaced and the fluid run out of the lower hole. It won't need much. Refit and tighten the bleed-nipple. 

8. Refit the hose-end to the slave-cylinder and remove the hose-clamp if you're using one.

9. Refit the slave-cylinder to the gearbox and tighten the two 13mm nuts.

10. Top up the clutch reservoir with DOT4 brake/clutch fluid and bleed the system of air. [Which bleeding technique you use is up to you, but for all BMW clutches I would recommend using a one-way valve attached to the bleed nipple as detailed in THIS POST, which saves time and headaches.]

Wednesday, 28 July 2021

E30 318i: Leaking clutch slave-cylinder... fluid low


Now the E30 is running well I took it out for a test run and noticed that all of a sudden the gears were grinding a little bit. Checked the fluid reservoir and the level had dropped to about 10mm, not good. Looked under the car and saw a spot of fluid on the drive right under the slave-cylinder. My guess, and no prizes for guessing right here, it was a leaking slave-cylinder and, hey presto... sure looks like one to me.

Replacement is ordered. I went for a cheap and cheerful one off eBay for just £16.50, though £25-40 seems to be the going rate. Be fitting this when I have chance. Looking forward to the bodywork, but mechanical jobs just keep popping up... that be old BMWs!

Sunday, 20 January 2019

F10: Clutch Bleeding Guide... the whole nightmare! [Manual transmission / gearbox 520d, 530d, F10, F11, G07, E90, E92 3er etc.]

You will need:

  • Short / stubby ... wrench.
  • One-way valve type bleeding-kit.
  • DOT4 regular brake/clutch fluid.

Clutch-bleeding on the F10, F11, G07, E90, E92, G20 and a lot of other contemporary BMWs can be a right pain, but if you are replacing the master-cylinder / slave-cylinder, the pipework or removing your CDV, then it is necessary. If you clamp the clutch-hose by the slave-cylinder and don't allow a lot of air back into the system, then bleeding should be pretty straight forward, but if a fair bit of air does get back into the system or you are removing the master-cylinder then it can't be helped and a full bleed is needed. The trouble with a full bleed is that these systems are notorious for air locks, primarily in the master-cylinder, which can be tricky to dislodge and get fluid into.
The main drawback with a regular bleeding process, where the bleed-nipple is opened as the clutch is pumped, is that the bleed-screw is located half way up the transmission tunnel and very difficult to access with a wrench. This makes it difficult to quickly shut the bleed-valve, which is kind of essential for this process and air can get back in. If you are able to access the bleed-screw without difficulty or have some special tool designed for the job then regular clutch bleeding should work a charm with air locks and, though it may take a while, you will be on your way.
A pressure-bleeder may give the time needed to tighten the fiddly bleed-screw, but does not work to get rid of air locks and seems to bypass the master-cylinder completely, so I would avoid using one of these kits at all if there is a lot of air in the system. Some trapped air at the top of the system seems to want to exit through the reservoir anyway, so it's better not to cap it with a pressure-bleeder as it just does not seem to want to go with the flow. If you clamped the hose and only the slave-cylinder needs bleeding then a pressure-bleeder should do that in no time.
I found that a one-way valve bleed kit was the way forward. It prevents the return of air/fluid while the bleed-screw is left open and gives time to shut it when the process is complete. It leaves the reservoir open to be manually topped up, which shows precisely how much fluid is entering the system. This was the key, for me, to finally shifting the stuck air from the master-cylinder.

I have detailed the various techniques and problems below:


Location of Brake + Clutch Reservoir:

The brake/clutch reservoir is not very apparent in the engine-bay. It is located under the black panel in front of the windscreen on the driver's side of the car. Looking from the front, left-side for RHD cars and right-side for LHD. The opposite panel covers the climate-control entry-ducts.
The panel is held in place by 4 plastic clips, which can be removed by prising up the centre of the clip and then prising the base of the clip out with a panel-popper / trim-tool or a couple of flat-screwdrivers.
The fill-neck for the reservoir is right under the bonnet-hinge and pouring DOT4 in without spilling it can be tricky, so a funnel is a good idea when topping-up. I would recommend putting a towel around the reservoir also, as brake-fluid is not a nice thing to get everywhere and it is easy to over-fill. Special care should be taken when replacing the cap - the large plug that hangs under the cap will surely displace some fluid over the top of the reservoir as the cap is dropped in.

Bleed Nipple + Regular Bleeding:

Unlike BMWs of old, the bleed-nipple on the slave-cylinder is way up in the trans-tunnel and difficult to access with a regular spanner. Getting the spanner onto the bleed-screw is not a problem, but if the spanner has any length to it then no more than a few degrees of turning is possible and the valve cannot open enough. A short spanner, the one I used was about 4.5 inches long, has just about enough room to get the bleed-valve open a half-turn or more, but it is still a fiddly process, particularly with the car on low ramps and quickly shutting the valve can be tricky. This can allow air to get sucked back in before the valve is closed fully, as below.

Air Getting Sucked Back / One-Way Valve:

With only a few seconds to shut the bleed-nipple before air gets back in, I found the best solution to be a one-way valve bleed system. These are basic, widely available kits and just have a valve with a ball-bearing in the end, which sucks back and blocks the tube so no to air or fluid re-enters the bleed-nipple after each clutch stroke. At the least it makes the return of air and fluid very slow and that gives the vital time needed to shut the bleed-screw.
I used the Vizilbleed branded kit, left in the pic, and it worked brilliantly, with a soft rubber hose to fit over the nipple and a plastic collar that slides over it to make a tight seal. It also has a built-in bottle to catch fluid and, though the tube could do with being a bit longer, the kit is a bargain at £7 from Halfords. The kit on the right in the picture is even more basic, just a tube with a one-way valve at the end, but I am sure it works just as well. This Halfords branded kit was dearer at £10, but kits like these can be bought from eBay and Amazon for less.
The clutch takes a lot of pumping to get out air stuck in the master-cylinder next to the pedal and the fluid level in the reservoir needs topping-up constantly to ensure it properly fills. The section of reservoir dedicated to the clutch fills from quite high up in the bottle, so when topping up make sure you fill into the neck of the reservoir.
The one-way valve will prevent air getting back in, so the bleed-nipple can be left open and I found the best technique was to pump the clutch-pedal about 20 times, then top-up the reservoir. The level in the reservoir after the first 20 pumps should drop significantly and continue to draw more fluid after it is first filled, so make sure it is topped right up before pumping again. This should not take more than 2 or 3 goes and I found the amount of fluid that bled out of the slave-cylinder was less than I had poured in, meaning after a couple of failed bleed attempts I had finally got that stuck air out of the system.

Pressure Bleed Kit + Air Locks:

If you have clamped the clutch-hose and don't have a lot of air in the system or any air locks, then a pressure-bleed kit should work as normal. These kits, such as the Gunson Eezi-Bleed, work by pumping fluid in using air-pressure from one of the tyres. Problem is, if you do have air locks, particularly air in the master-cylinder by the pedal, then a pressure-bleed will not work to get rid of them. I found that the kit would just pump neat fluid directly through the system, giving the impression of an air-free system, but still leaving the master-cylinder full of air and no clutch-pedal. Even pumping the clutch while pressure-bleeding did not seem to clear the trapped air, I think because it wants to exit the system from the open reservoir and has been pushing against the incoming fluid pressure.
A 'reverse' pressure-bleed kit that builds up a vacuum and sucks the fluid through bleed-nipple as it is topped-up from the reservoir might be effective in getting rid of air locks, as the reservoir remains open and the fluid/air will be pulled down from the master-cylinder, rather than pumped straight past it, but I did not have chance to test one.

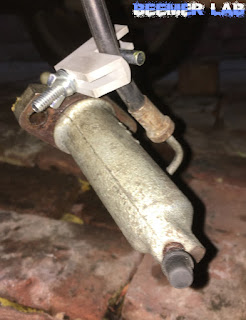
Back Filling + Clutch Delay-Valve (CDV):

I have seen many articles discussing back-filling of the BMW clutches to be the easiest way to clear all air from the system. This works by injecting/pumping fluid in through the bleed-nipple using a syringe or suitable pump and ejecting the air out the top of the reservoir. While this may work great for older models, modern BMWs have a slow-return valve fitted before the slave-cylinder [pictured]. This is known as the 'CDV' or Clutch Delay Valve and works by slowing the return of fluid to the master-cylinder when the clutch is engaged. This makes it impossible to dump the clutch too hard, as it ensures a nice soft engage every time. Flow from the master-cylinder to the slave-cylinder is unaffected, so the clutch releases as quickly as you like, it is just when fluid returns that it is slowed down. This is all wonderful technology, but throws its hand in when trying to back-fill the clutch to bleed it as you are pushing against the CDV.

Friday, 15 September 2017

F10: Clutch Pedal-Pin Repair / Replacement [E60, E90, E92, F01 etc.]

SYMPTOMS:
  • Clutch pedal appears to collapse / become loose / twist to one side suddenly when depressed.
  • Clutch pedal feels loose / collapsed and will not depress properly.
  • Engine will not start and dash displays 'Depress Clutch to Start Engine' message while clutch is depressed.
  • Gears will not engage or only partially engage while clutch pedal is depressed.
CAUSE:
Heavy clutch use / clutch-wear causes undue stress to the pedal-box [2 in diagram] and causes the plastic pedal-pin [8 in diagram] to snap / work its way loose. There are slim plastic clips at the end that stop the pin sliding out, but once these start to break off the constant motion makes the pin slide out very easily. When the pin is loose the clutch-pedal wont depress properly, which means the car cannot be put into gear or even press the clutch-switch to start the engine.


"GET YOU HOME" QUICK FIX:

1. Remove the trim-panel above the driver's footwell by undoing the T-20 Torx screws holding it in place. If you do not have tools to do this the trim can be forced off firmly and gently without breaking the plastic. The screw heads should pop out of the oblong holes in the panel, which can be bent back into place later and refitted.

2. Locate the end of the clutch pedal-pin where it has come out of the pedal-box, just to the right of the metal bar that attaches to the top end of the clutch-pedal.

3. Manoeuvre the clutch pedal back into position by hand, so the metal bar at the top of the clutch-pedal is straight with the eyelet either side of it in the pedal box and slide the pedal-pin to the left until it is fully into the far eyelet.

** This will get the car moving again to drive home, but the pedal-pin will soon slide back out. Reaching under the trim and locating the end of the pedal-pin will mean you can make sure it stays fully in place while stopped at traffic lights, so you technically run the car like this indefinitely. Still this is by no means a long-term solution. **


REPLACEMENT:

** You will need 'Clutch Pedal Pin' BMW Part no. 35306761029. **

1. Remove the trim panel above the driver's footwell that surrounds the pedals using a T-20 Torx socket.

2. Remove the coin-tray / stow-box to the right of the steering-wheel by undoing the two screws in the upper corners with a T-20 Torx socket and lifting it out top edge first.

3. Remove the single screw holding the electronics module to the right of the pedal-box using a T-25 Torx socket, remove the module from its housing and rest it somewhere out of the way.


4. Slide the pedal-pin to the right until it is out of the pedal-box.

5. Remove the push-circlip from the lower side of the clutch return-spring using a small flathead screwdriver [the one at the end of the stud that attaches the spring to the pedal itself], slide off the plastic spring-mount and fully remove both springs. [**DO NOT attempt to replace the plastic pedal-pin with the spring still in place as it will likely damage the plastic pin!**]

6. Grease the new pedal-pin.

7. Manoeuvre the clutch pedal back into position by hand, so the metal bar at the top of the clutch-pedal is straight with the eyelet either side of it in the pedal box and slide the new pedal-pin in from right to left until it is fully clipped into the far eyelet.


8. Hold the spring assembly in position against the upper spring-mount and compress it by hand until the lower mount can be pushed back over the stud on the pedal. Replace the circlip.

9. Reverse steps 1-3.


'DIY' PERMANENT FIX:
If you can't get hold of a new pedal-pin, or if the new one snaps too [which is likely to happen in the end as the pedal-box wears], then a long-term solution can be fettled with a long bolt.

CAUTION: The original pedal-pin is plastic and therefore designed to snap before the pedal-box does. Strengthening it with a metal bolt MAY cause further damage to the pedal-box over time, particularly if the eyelets are worn or the clutch-wear problem is not addressed.

1. Remove the plastic pedal-pin, as above.

2. Find a long M8 or M10 bolt and nyloc-nut. The bolt will need to be about 6 inches long. Any longer and it will foul things under the steering-column, but it needs to be long enough to reach through both sides of the pedal-box and get the nut on at least half a turn into the nylon. A 'shank' bolt [smooth down the shaft and only threaded at the end] is the best type to use. A flat washer on either side is also recommended, thin nylon washers being even better.

3. Take the plastic pedal-pin and drill the hole down the centre out: 8mm for M8 bolt, 10mm for M10.

4. Grease and re-insert the plastic pedal-pin to the pedal-box.

5. Grease the bolt and slide it in from the left side of the pedal-box, so the bolt is entering the far end of the pedal-pin, until the threaded end exits the right side of the pedal-pin.

6. Fit the nyloc-nut, ensuring the thread is into the nylon by at least a half-turn, as the constant pedal motion will work it loose otherwise. DO NOT over-tighten or put stress on the pedal-box!


Saturday, 11 October 2014

E60: New Engine finally running!

Changed the injector seals last Sunday and gave the ports another good clean. The mist has stopped, but it still did not want to fire. There is fuel to the injectors and the timing is spot on, so this could only mean 2 things - something electronic isn't working properly, or the entire DDE module has fallen out of sync with the engine...

I don't even want to know what the latter option entails, so carried on swapping sensors on the new engine for those that worked on my old one. I found the crank-sensor was completely covered in dirty oil, in fact the whole slot was filled with it. Engine sensors are funny things and I can see how the oil could stop it from seeing the notch on the flywheel, but it doesn't explain why the engine would not turn over well using a can of Easy-Start. Either way, with the crank-sensor from my original lump in place it fired up straight away! Result.

[Video is with EGR-pipe disconnected and no air-filter / muffler fitted.]


  • PAS-pump sounds like it's dying - extreme whine / groan when the wheel is turned - and is now the only thing keeping her off the road. Will try bleeding tomorrow and maybe fresh fluid, but failing that the pump could have packed in or, worse, I've damaged some of the piping / rack while lifting the engine in.
  • Rear rubber exhaust-hanger missing. TIS says to remove the screws holding the hanger-bracket, not remove the rubber. I cut mine off to hastily get the exhaust down and will have to buy and annoyingly fit a new one.
  • Front exhaust vibration-damper simply will not fit. When fitted to the exhaust, the eyelets on the two connecting-rods are way off the studs on the gearbox-bracket. The left-right rod is only about 5mm out, but the front-rear rod is miles off. I will have to remove the rear and centre brackets and try to relocate the exhaust a bit.
Other than that, no iDrive messages, no engine-management light, no 'Increased Emissions', no leaks, no mist and no funny noises. The gearbox and clutch are working fine and the car is desperate to be driven. Curse that power-steering fault!

Wednesday, 8 October 2014

E60: Engine Swap Week - Day 7

  • Remove inlet-manifold, rail, injectors and rocker cover.
  • Improve fit of fuel-rail return pipe.
  • Clean injectors.
  • Clean out injector ports in head.
  • Fit original rocker-cover.
  • Adjust injectors to fit collars tightly.
  • Look for fuel in rail and rail-pressure when cranking.
The only thing I didn't do today was swap my crank-sensor over. I figured the automatic models have a different flywheel so would have a different sensor, but the two transmissions share the same sensor [exact same part no.] so the one that's on should work.

The banjo on the fuel-rail return hose needed refitting, as the jubilee-clip was now fouling the inlet-manifold. It was a bugger to find a way to refit it and give enough gap - the manifold is still fouling slightly.

I fitted my original rocker-cover because the new one has a crack round the MAF-sensor housing, obviously where the donor car had it's bump. The injector collars were fitting a bit loosely in the new rocker-cover too and are a bit tighter now. My original cam-sensor is back on too, which I doubt will make a difference, but can't hurt.
  • Re-attempt start!
NO! The engine is turning ok and there is fuel-pressure. Sadly, there is now a lot of diesel-mist shooting up past the injectors, as in the vid below. Ah well, nothing ever goes smoothly.

Saturday, 27 September 2014

E60: Engine Swap Week - Day 6

  • Replace snapped T-piece on injector leak-off pipes.
  • Torque up crank-pulley and HP-pump.
  • Refit drive-belts.
  • Refit radiators / coolers.
  • Refit headlights and crash bar.
  • Refit slam-panel and grilles / ducts.
  • Plumb cooling, A/C and PAS back in at the front.
  • Loosely refit exhaust and heat-shield.
  • Fill with oil and coolant.
  • Refit ECU and plug loom in.
  • Plug in all wire connectors to engine.
  • Refit fuel-rail and pipes.
  • Refit turbo and exhaust-manifold.
  • Refit rocker-cover and injectors.
  • Refit inlet-manifold.
  • Attempt start!
NOTE: Fasten engine-mount top nuts! Neaten up fuel-rail return pipe!

Well, sadly, it didn't fire right up in the first few tried like last time, but the battery has been sitting for a month and died quickly, so I will charge it overnight and have another crack tomorrow.
  • Check for missing wire-connectors. Crank-sensor?
  • Bleed injectors and check for rail pressure.
  • Flywheel position sensor - is it a different flywheel? Swap to original.
  • Check injector-leads for pulses with multimeter.
  • High-pressure pump - does it need bleeding? Is it working?
  • Is 'Service Due' warning affecting immobiliser?
If all these check out and it still won't go then I will have to get a computer on it and get some fault-codes. I'm back in work next week, without a break, so I should be able to bring the Launch home.

It's been a hella lot of work the last 6 days so it would have been nice to have the engine fire up on the third go like it did when I fitted the new cylinder head, but ah well, I'm full of optimism at the close of today.

Plastic T-piece nozzle snapped off in the injector leak-off hose. Luckily I got fuel pipes with the new engine [even though the pump itself was missing] and didn't have to buy a new one.
From an '03, to an '09 and now back to an '04 - this is the third head in the E60.

Friday, 26 September 2014

E60: Engine Swap Week - Day 5


  • Attempt to lift gearbox underneath car.
  • Lift engine back out.
  • Fit gearbox to engine.
  • Remove bonnet / A/C-duct.
  • Lift engine and gearbox in together [mm to spare!].
  • Fit prop-shaft.
  • Fit gearbox mounts.
  • Fit starter-motor.
  • Fit oil filter/cooler.
  • Fit alternator.
  • Fit PAS-pump.
  • Fit A/C compressor.
  • Fit thermostat.
  • Re-attach lower wiring-connectors.
  • Loosely fit crank-pulley.
  • Loosely attach main electric-cables to alt / starter.
  • Loosely fit anti roll-bar.
NOTE: remember sump wire connector + tighten 10mm screw on gearbox!


Gearbox was getting nowhere from below with so little room under the car, so the engine came back out and we lifted the gearbox on very easily.
By removing the plastic air-con duct at the back and popping the bonnet lifters off so it lifts up vertical, it is possible to just about lift the engine and gearbox in together without lowering the subframe / rack.
Just the rads and injectors now and it's pretty much ready to start.

Thursday, 25 September 2014

E60: Engine Swap Week - Day 4

Had a lost day yesterday when the engine didn't arrive. It only turned up at 1.30pm today, so I will have to concentrate on swapping over the high-pressure pump, flywheel and clutch, as well as removing the loom etc. ready to patch mine in. Lifting the engine in will have to wait until tomorrow.
  • Replace steering-rack / subframe bolts entirely.
  • Remove loom and vacuum-hoses from new engine.
  • Swap over high-pressure fuel-pump.
  • Fit flywheel and clutch.
  • Remove oil filter/cooler and rocker-cover for lifting.
  • Match engines entirely.
  • Lift engine in.
Engine arrived at 1.30pm.


And was finally sat in the bay at 7.30pm.

Tuesday, 23 September 2014

E60: Engine Swap Week - Day 3

  • Drop prop-shaft.
  • Remove slave-cyl. / gearshift linkages.
  • Drop gearbox.
  • Lift engine out.
  • Remove parts for new engine.
Once the prop was down it didn't take long at all to get the engine out. The gearbox is huge, but surprisingly light.


Prep for new engine:
  • Remove clutch.
  • Remove flywheel.
Got the clutch off easy enough, but need a T55 Torx socket to remove the flywheel so that will have to wait until I get it from work tomorrow.


NOTE: Missing bolt from exhaust cross-member.

Monday, 22 September 2014

E60: Engine Swap Week - Day 2

  • Remove headlights and front crash-bar.
  • Remove starter motor.
  • Remove oil filter / cooler.
  • Photograph and disconnect vacuum hoses and wiring-connectors.
  • Attempt remove engine.
  • Remove exhaust-system.
  • Remove heat-shield.
  • Remove gearbox mounts.
  • Remove 2 of 3 prop-shaft bolts [coupling to gearbox].
Sadly, the first attempt did not work. The sump still gets stuck on the sub-frame. TIS says to first remove the prop and gearbox, so it looks like this is the only way.

POA for Day 3:
1. Bolt gearbox mount back up.
2. Loosen remaining prop-shaft bolt.
3. Lift car and put axle-stand under jacking point.
4. Support gearbox and remove mounts.
5. Drop prop-shaft.

NOTE: Cut off rubber exhaust-hanger needs new - Part no. 18207578238

Blue nylon rope not the best for lifting engines, but note a lot of weight is removed from the engine - head, ATF-pump, oil filter-cooler, A/C comp etc.