Showing posts with label easy. Show all posts

Sunday, 6 February 2022

E30 318i: Replacing Clutch Slave-Cylinder - Quick + dirty guide!

Clutch reservoir suddenly low on fluid? Gearbox housing covered in it? Sounds like a popped slave-cylinder. Not to worry, this has to be one of the easiest to replace ever made!

* This guide covers the M40 engine and 5-speed gearbox, but process is the same for most models. *

1. Lift the left side of the car.

2. Remove the 13mm nut from the outer side of the slave-cylinder. This one is easy to access and can be got with a ring-spanner or socket, but the ratchet is quite snug to the gearbox.

3. Remove the 13mm nut from the inner side of the slave-cylinder. This is quite difficult to get to as it is inhibited by the clutch-hose as well as limited access in the trans.-tunnel. I managed it with a socket and a 4" extension bar to get past the hose/pipe. 

* I have seen someone getting that difficult to reach nut using a longer extension bar and the ratchet further back behind the gearbox, but this was not possible on my E30, so I'm guessing this may be for 4-speed boxes or older M10/M20 engines. If yours cannot be got with the details in step 3, then try this. *

4. Remove the slave-cylinder fr the gearbox and allow to hang down on the hose.
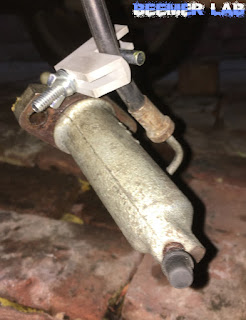
5. Clamp the hose (optional, but saves time when bleeding system later).

6. Remove the hose end from the slave-cylinder using an 11mm wrench so the old unit can be discarded. [It is much easier to grip the slave-cyl. by hand while it is removed from the gearbox and get a turn on the pipe-collar, as well as minimising leaks from the hose.]

7. Prime the new slave-cylinder by removing the bleed-nipple and carefully pouring DOT4 brake/clutch fluid into the hole at the top for the hose/pipe until the air is displaced and the fluid run out of the lower hole. It won't need much. Refit and tighten the bleed-nipple. 

8. Refit the hose-end to the slave-cylinder and remove the hose-clamp if you're using one.

9. Refit the slave-cylinder to the gearbox and tighten the two 13mm nuts.

10. Top up the clutch reservoir with DOT4 brake/clutch fluid and bleed the system of air. [Which bleeding technique you use is up to you, but for all BMW clutches I would recommend using a one-way valve attached to the bleed nipple as detailed in THIS POST, which saves time and headaches.]

Wednesday, 6 May 2020

Easy-E had an 8 Series! Get in!

Of course he did!

"Drivin' down tha street in my 840... checking the error codes... slappin' my forehead!" - as he probably sang a few times in his career! (Actually he had an 850, but it didn't suit the lyric. Let's hope he knew where to check for holes in the fuel-lines and had a loud stereo to cover up the valve-chatter. I jest; his was new when he had it.) R.I.P Easy-E!


Other celebrity BMWs:
Will Smith E28 5er
Elon Musk E21 320
Britney Spears E36 M3
Bob Marley Bavaria New Six

Saturday, 16 March 2019

BMW INPA 5.06 for Fxx Series / ENET Cable / Coding etc. - Great Guide + Download!

http://blog.obdii365.com/2017/02/09/set-up-inpa-for-bmw-f-series-coding/

This guy's blog has a great download for a fully working, easy to install / update INPA 5.06 to work with Fxx Series BMWs and ENET to OBD2 cable, so get it while the links are still active!

DOING A FRESH INSTALL:
The guide covers an 'Easy-Install' tool, so if you are doing a new install from the word go, then follow the instructions on obdii365.com and go from there. I haven't tried to confirm it is indeed easy and works, but evidently other people have.

Updating a current version of INPA:

If you already have an older version of INPA up and running, then updating to 5.06 could not be simpler, but it is not quite explained in the obdii365 guide, so follow as below. This assumes you are switching to an OBD-ENET type cable.

1. Locate your INPA and EDIABAS folders; they are in the same place. (C:\...\INPA) (C:\...\EDIABAS)
2. Copy the folder named INPA_Fxx_v.2 from the download into the same location as your existing INPA folder.
3. Rename your original INPA folder if you wish to keep it or delete the folder.
4. Rename the INPA_Fxx_v.2 folder to INPA.
5. Copy the EDIABAS folder from the download into the same location as your existing EDIABAS folder, selecting 'Yes to All' to overwrite any existing files of the same name.

That's it... your INPA will now work with Fxx Series cars. The EDIABAS.ini configuration file is already set for ENET, so just plug it into your OBD port and wait about 30 seconds for a network address to be assigned. Once you get the 'Limited or No Connectivity' message pop-up you can open INPA as normal and should see the Battery and Ignition dots filled.

USING AN OBD-USB K-CAN CABLE:
An OBD-USB K-CAN cable can be used with Fxx-Series cars, but only to read and erase fault-codes. Coding is not possible without an OBD-ENET cable.
To use the update method above and retain settings for OBD cable, make a copy of your original EDIABAS.ini configuration file and merge it into the new EDIABAS/Bin/ folder. Alternatively, re-adjust the settings for OBD after the update, which is the best option if you can be bothered.

Sunday, 25 February 2018

BMW F10/F11: Clogged/blocked Washer Pump Filter - EASY FIX / FILTER REMOVAL! [E90/E92/F07/F30 etc.]

Windscreen washer jets not working, but the pump can still be heard OK? Then you have a very common case of clogged filter. Due to the supposed inaccessibility of the bottle on later model BMWs I have read stories of high dealer bills, daunting inner-wing removal and even back-feeding the washer-hose with bleach to gradually unblock the gunged up filter... but before you try this read on, as it is an easy fix after all.

GUIDE:

1. Fully turn the steering to the right to give access behind the driver's front wheel to work. [Removing the wheel will give more access but is not necessary.]

2. Remove the 6 screws holding securing the rear half of the felt wheel-arch liner in place using an 8mm socket. This will allow access without removing the arch-liner completely. Four of the screws are located in the wheel well itself and two are located underneath next to the sill.

3. Remove the plastic 'mud-guard' trim on the outside of the wheel-arch that adjoins the felt arch-liner. This is done by pressing the centre-pin of the 3 plastic clips through the clip and then removing the clips with a panel-popper tool. [It may be possible to do the job without removing this trim piece, as the clips are very hard to get out and prone to breaking, but visibility and access are certainly improved].

4. Peel the felt wheel-arch liner out from the rear lip of the wheel-arch and if possible tuck it behind the wheel. The washer-bottle should now be visible to the rear of the front wheel. It sits in a tight gap between the outer and inner wings of the car body itself and access is very limited. [This is unlike E39, E60 etc. where the bottle sits left-to-right across the rear of the wheel-arch and access if much easier!]

5. Remove the windscreen washer hose from where it enters the pump and move it out of the way.


6. Slide a long flat-screwdriver in between the washer-bottle and the outer wing and prize the pump upwards until the spout is clear of the bottle and the pump can wedged up and out of the way.


7. The clogged filter should now be sitting in the washer-bottle where the spout of the pump fits. Use the flat-screwdriver to prize the filter up and out of the bottle. It should now be removable by hand or using long-nose pliers / tweezers.


8. Clean the gauze filter using water and lightly brush it with a sponge-scourer or stiff brush. [I find an old toothbrush works perfectly.] It is likely clogged with a 'gel' like substance that builds up supposedly due to the use of incorrect washer-fluid as well as dirt from the bottom of the tank if the washer has been run without fluid in for a while, but should clean up pretty easily.


9. Carefully slot the filter back into the washer-bottle and press it back into place using long-nose pliers / flat screwdriver or both, making sure it is fully seated.

10. Slide the pump spout back into the filter / washer-bottle, making sure it is fully seated and rotated to the correct position with the spout for the windscreen-hose pointing to the side of the car.

11. Refit the washer-hose, trim, wheel-arch liner and wheel. [Reverse steps 1-5.]


www.e90post.com/forums/showthread.php?t=930107
http://www.bimmerfest.com/forums/showthread.php?t=737416
http://forum.bmw5.co.uk/topic/120732-f10-windscreen-washer-not-working/
http://forum.bmw5.co.uk/topic/124943-f10-washer-problems/

Saturday, 26 July 2014

E60: Engine Rebuild 4 - Replacing Pistons, the easiest way.

EDITED August 2015:

** I never completed this job as I ended up replacing the entire engine, but did get pretty involved in it and thought I'd somewhat finish the guide anyway. **

If you're only replacing one or two pistons then the engine does not need to come out and the crank can stay on, but this is still a hardcore task. Still, I was determined to replace two of mine this way until a crack in the timing-case and other issues made me swap the engine, which was a lot more work and cost. Pistons are about £250 each new, but with 2nd-hand ones and new rings you could probably replace two for about £300, including gaskets and fluids. 

The biggest problem with accessing the bottom-end of the E60 engine is that the sump is an all-cast-alloy design that sits very snugly into the power-steering rack and front subframe. It also bolts completely to the gearbox bell-housing at one end. You will need an engine-crane to lift and support the engine an inch, then a bit of guts to unbolt and lower the subframe with the engine hanging precariously above you, so if this is beyond what you think you can do then it's time to bung the car over to someone with ramps, as you cannot get the sump off without doing it.

This thread on Bimmer-Forums [http://www.bimmerforums.co.uk/forum/f15/2003-e60-530d-whats-secret-getting-sump-off-please-t109192/] puts the process of trying to get the sump off without all the effort, then realising it is essential, quite succinctly and was a huge help for me.

You will need:
  • Ramps
  • Engine crane
  • 1 or 2 Trolley jacks
  • 1 or 2 spare Axle stands

You will need to remove:
  • Cylinder head etc. [See this post].
  • Engine under-trays and metal reinforcer-plate.
  • Prop-shaft at gearbox end.
  • Exhaust from back of turbo.
  • Turbo hosing.
  • Engine-mount top nuts.
  • Front anti roll-bar centre-mounts.

Basic Process:
  • Suspend the engine so the front is raised about one inch.
  • Remove all the screws holding the sump to the block and the gearbox-housing.
  • Unbolt the front subframe, the one the engine mounts sit on. The rear two bolts may not need fully removing.
  • Have someone pry down the subframe and work the sump out from the rear of the engine.
  • Bolt the sub-frame back up.
  • Lower the engine back onto the mounts.
  • Remove the bottom-end guard.
  • Remove the big-end from the affected piston.
  • Use a wooden drift to knock the piston(s) out of the top of the block.
  • Fit the new piston(s) and repeat the process to refit the sump.
** As I say, I did not complete this job. I lifted the engine and lowered the subframe a bit, but could not get the sump out first try. A second try never came before I decided to engine swap, though I'm sure it would have come out. Refer to the thread linked above for far better instruction. **