Monday, 26 September 2011

E39 530d: Drive-Belt Bracket snapped!!

How very unfortunate - the bracket holding the guide-pulley for the auxiliary drive-belt has sheared clean in two and rendered the car undriveable!

As I started the car on Friday afternoon there was a crunch from the engine. It started up OK, but the battery warning-light came on and I lost power-steering. Assuming the drive-belt had snapped I ordered a new one and started to take the broken one out, which turned out to be involved in itself as you need to remove the fan-cowl for access, and the fan with it! Once I got to the belt I noticed it hadn't snapped after all, but it would not sit tight around the pulleys.

That's when I noticed a pulley was missing and sure enough there it was lying in the floorpan with the bolt still through it, attached to a torn piece of metal. Worrying that the chunk was part of the block itself I continued to dismantle the front of the engine until I found the culprit. Luckily its a metal dog-leg bracket that bolts on to the engine-block to hold the pulley in place and it unbolted easily enough. I guess the shock of another cold diesel startup made it give way, or the PAS-pump struggled to right the wheels on the gravel I was parked in and put too much strain on the belt.


Either way, it appears to be a common enough fault that new brackets aren't hard to come by - the cheapest and easiest place in this case is, surprisingly, the BMW dealerships themselves. I rang BMW WIlliams in Liverpool this morning, giving the part number (7 in the below diagram) and they said it would need ordering but will arrive this afternoon so fingers crossed as the car is off the road.

I'll get back with the results and a full How-To guide soon!
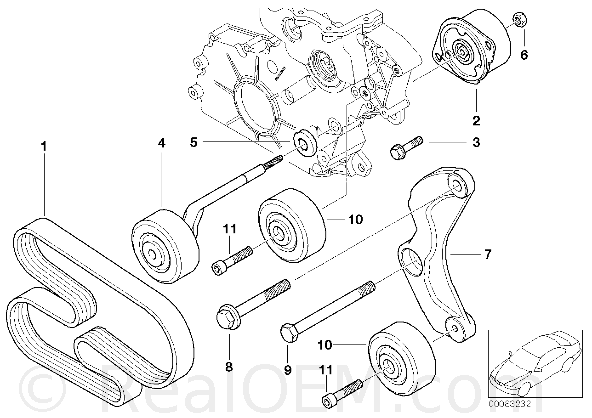


No.DescriptionSupplementQtyFrom Up To Part Number

01RIBBED V-BELT5 PK X 2063111287787369
02Belt tensioner111282354130
03Torx screw with collarM7X38211517789351
04Adjusting pulley with lever111282354131
05sealing111282247187
06Flange nutM6113537801713
07Bracket111282248561
08Hex bolt with washerM10X70 ZNS3107119903817
09Hex boltM10X125107119900630
10Roll pin211282247435
11Fillister-head screwM8X35 ZNS207119901027

Monday, 19 September 2011

E39 530d: Replacing the Camshaft Position Sensor [M57]

About four months after I bought the car it suddenly refused to start after having been turned off for about 20 minutes, even thought it had started fine on the short trip out. The starter motor was turning but the engine wouldn't fire. It started after about 30 minutes so I assumed it was because the car was low on fuel and the problem didn't return for a number of weeks.

When it eventually became regular I noticed that it only seemed to be when the car was left to cool for a while. The car would start fine from cold every morning or soon after being turned off, but left to cool for half an hour and the engine was dead for, at the very least, 4 or 5 hours.

Asking around on forums brought up several possible culprits - a fuel-pump, most likely the pressure-pump under the passenger seat, low fuel-pressure caused by, at the worst, a cracked injector (gulp), or an engine-position sensor on the camshaft or crank.

After a while we took a guess at it being a sensor, as the car would sometimes start after being rolled a little while in gear, which seemed to rearrange the engine and get the sensor going again. Thankfully I eventually got some diagnostics, which confirmed it was indeed the camshaft-sensor.

It was tricky to diagnose, but if you have the same symptoms then this is the first thing to look at. The replacement sensor I got from eBay wasn't too cheap either at £60, but its a brand new part and guaranteed.

Removing and refitting the sensor couldn't be easier:

1. Remove the beige centre-section of the engine cover by first undoing the single bolt to the rear with an M4 allen-key and then pulling it up towards the front until it comes away from the stud at the front.


2. Unplug the camshaft-sensor by pressing the latch of the clip inwards and sliding the wire-connector off the sensor.

3. Remove the single screw securing the sensor in place using a T10 torx-head wrench.


4. Gently twist and pull the sensor clear of its base on the cylinder-head.

5. Insert the new sensor into the cylinder-head, remembering to replace the old rubber O-ring if it doesn't have a new one fitted, and make sure it is well seated before replacing the torx-head screw.

6. Reverse steps 2 and 1.

Saturday, 17 September 2011

E39: Windscreen Washer-Jet System Problems


I've had a couple of minor faults with the windscreen/headlamp washer jet and they look like they could be common to most E39 models.


1. Disconnected/Broken Nozzle Hose:

Fault Finding: One washer-nozzle is not working at all / only emitting a tiny amount of water, while the other remains functional.

The hoses for the windscreen-washer run up the offside bonnet-hinge and along the back of the bonnet to reach the nozzels. Due to the constrictive nature of the plastic crimp-clips used to hold them in place, the hoses can be stressed while the bonnet is repeatedly opened and shut. This will most likely cause the plastic-connector to become unplugged from the nozzle [as with my car] so it's just a case of snapping the two connectors back together. The hoses could also be caused to split, so if the connectors are still in place then operate the system and check for leaks along the hose. You will probably need a replacement hose if it is split, unless it is near enough to the nozzle to chop off the split section and reseat it. If there is no leak then it is likely that the hose has been crimped shut, so check each plastic crimp-clip attaching it to the bodywork and adjust it so there's no restriction.

If you suspect you have this problem then check it over as soon as possible as there will be water/screenwash pouring down the back of the engine every time you use the washer system!!


2. Blocked / Faulty In-Tank Pump:

Fault finding: Both wash-jets are not emitting water, or emitting a small amount of water then stopping. No sound can be heard from the washer-jet pump, or the pump is very loud and appears to be struggling to get water through.

If there is no sound from the washers then, if the fuse hasn't blown, its likely the pump is dead and needs replacing. If the pump appears to be struggling but not pumping water then first unclip the hose at the join located under the bonnet, half way down the lip of the driver's wing and try the washers. If water isn't getting this far then a blocked hose/nozzle can be ruled out and the pump will need removing and replacing to unblock.


Friday, 26 August 2011

West Wal Beemer Posse!

All Beemerist, all Beemerhead!

If you're not on this list then you don't work at West Wal, don't have a Beemer and probably aren't cool!


My 530d SE:

Nick's 318iS Auto-sprint Racecar:


Andy's 330Ci Ragtop:
M-Sport package, Cherry Red leather.

Carmen's Compact 3Ti:

Ian's 120d Coupe:
Full leather + 18" wheel option.

The Twins' 318iS:
142bhp, half-leather sports-seats.

Chris's 330i:
Sport-Auto, M-Sport exhaust + Dolphin Grey leather.

Monday, 6 June 2011

767i V16 - The ultimate flagship limo?

Awesome design exercise by BMW in 1987 to showcase a crazy new V16 they were developing from two bolted-together V8s. The 750iL was the only model big enough to accommodate the giant motor and even then all the boot space had to make way for the twin radiators, which explains the giant NACA-ducts on the rear quarter-panels.

Here's a great bit of BMW literature on the project that someone has generously scanned in:


Sunday, 5 June 2011

E39: Condensation + Water in the Headlights

Water getting into the headlight units seems to be a pretty common problem on most 90s BMWs, with the E39 5 Series clearly being one of the worst affected - I've seen scores of people with this problem online, ranging from patches of condensation like mine to full blown fish tanks in the lower half of the lens and it would appear that no matter how serious the leak it's still a right pain to get shut of. Unless money is no object don't even consider a replacement, they start at £120 currently and go up from there.

I only began to notice condensation in my n/s light until after fitting the angel-eye rings, so assuming I'd not reassembled it correctly I removed the unit, blew away the droplets with a hair-dryer and reset the seal, as have countless others, to no avail. As the condensation spread over the whole face of the lens I began to scour message-boards looking for a successful fix and believe I've found a technique that does indeed work...

*** If your headlight unit has been damaged in a shunt, the lens is cracked, has a stone chip through it or if the rubber-seal has perished enough to no longer fill the gap then I'm afraid there's no pretty way to fix this problem and you'll have to replace the unit or it'll fail an MOT.


Dismantling the Headlamp unit :


1. Remove the 5 wiring-loom sockets from the back of each headlight.

2. Remove the 4 screws holding the light-cluster in place, located on the slam-panel and down the back of the cluster, using an 8mm wrench.

3. Pull the light-cluster forward from the inner side until the lug on the outer corner can be slid out and the cluster removed.


4. Slide off the strip of body-coloured trim and rubber seal from the bottom of the headlight.

Reverse the process to re-fit.


Drying the Lens :

Use pliers to slide off the 2 metals-clips on each of the round glass inner-lenses. The glass discs should then be easily removable [trickier with angel-eye rings glued to them], to get some air flow through to the outer-lens and, if you have any, mop away any moisture on the main area of the lens with a cloth.

The best way to dry the unit is to place the front section of the headlamp in a warm, arid place and just leave it for a day or two. As time is usually of the essence though, the most popular method is the good old hair-dryer. Condensation on the main lens area is easy to blow away from the rear, but the corner-indicator is in a separate pod where little air gets to it, so heat the outside of the corner-lens for a few minutes, then let it [and the hair-dryer] cool for a few minutes and evaporate and repeat the process until the drops are gone.


Refreshing the Seal :

1. Gently prize the rubber-seal from its recess around the rim of the rear section of the headlight.

2. Wash the seal using cold water, dry it completely and coat it entirely with a thin layer of petroleum-jelly [Vaseline].

3. Carefully press the seal back into its recess facing the opposite way it came out. [The original outer-facing edge should still be visible by the slim indent made by the lip on the front-section.] * Avoid stretching or compressing the seal while pushing it into the groove as this makes it difficult to get the right length to fit and you may need to rearrange it quite a bit to reach.


Sealing around the Corner-Indicator lens :

** If refreshing the seal does not work or the condensation is concentrated around the corner-indicator lens then there may be a minor break in the solid-seal here, so the only solution is to get messy with sealant.

I'd recommend a clear-drying, silicone-based multi-purpose sealant, although any old bathroom sealant will work and it's not too visible anyway with the light back in. Apply sealant into the gap of about 3mm that runs around the rim of the corner-indicator lens and press it right down into the seal with a screwdriver, this should give a nice, tight seal and show up any leak areas where blobs of sealant can be seen inside the lens. Apply more sealant on top and smooth round the entire edge with a finger. Be sure to wipe as much wet sealant from the light as possible, as well as rubbing away any leftover sealant from the lens after it has dried.

Thursday, 2 June 2011

E39 530d: Fuel Boost Pump Problems


Symptoms:

The car refuses to start.

There is a loss of power when driving, particularly common while going uphill.

The engine is losing revs and stalling.


No.DescriptionSupplementQtyFrom Up To Part NumberPriceNotes
01Rear fuel pipe105/200116121184768
02Rear fuel pipe105/200116121184768
03FRONT FUEL RETURN LINEI105/200116121184777
04FRONT FUEL FEED LINE105/200116121184774
05FRONT FUEL RETURN LINEII105/200116121184780
06DISTRIBUTION PIECE105/200116121184632
07Fuel hose8X13MM?05/200113537563456$44.77
Rape methyl ester capability (RME)
08Hose clampL12-15?05/200107129952104$1.18
09Diesel pump105/200116126756157$363.20
For vehicles with
Rape methyl ester version (RME)

S201A=Yes
09Diesel pump105/200116126756157$363.20
10BRACKET FUEL STRAINERD=55MM105/200113321702583$16.33
11Fillister head with washerM6X25-Z1105/200107119920161$0.38
12Vent pipe105/200116111183301$20.23
13Fuel pipe105/200116111183297$19.50
14Universal socket housing uncoded2 POL.161138373332$2.70
only in conjunction with
--Socket contact ELO-Power 2,8x0,630,5-1,0 MM²261138364832$0.35


Items pictured but not listed are not installed on your vehicle.Notes

  • Items pictured without a number are listed on another diagram.