Showing posts with label fit. Show all posts

Sunday, 27 March 2022

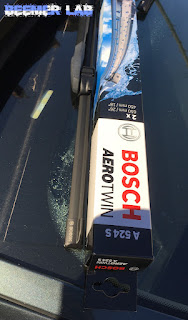
F10 530d: New wiper-blades - Bosch Aerotwin

Replacement wiper blades for modern cars are not cheap. Euro Car Parts wanted £45 for a set and that was with a discount, other high-street stockists wanted over £60... for two wiper blades. Ah well, you can't fight progress I suppose, these new fangled blades wipe the screen so much better than the old ones did... don't they??

I found a super-cheap budget set for just £11 on eBay, but these turned out to be for a left-hand drive car and are the exact opposite profile of the ones I need here in UK so would not fit. They were from a UK stockist too, who didn't seem to know the blades were wrong, this was obviously the first set they sold for F10 or maybe mine were a fluke one off LHD pair... we will never know.

In the end I plumped for a set of Bosch Aerotwin from eBay, as they came in at £23, far off the 40+ from ECP so worth waiting for delivery. Have to say, you can see the quality of the Bosch is better than that of the budget blades, so you get what pay for, but I still think £23 is expensive for two wiper blades!

Saturday, 7 May 2016

F10 530d: Black leather rear-seats and door cards WIN - front-seats FAIL!

Lovely front seats do not fit.
Thought I would treat the F10 to a nice leather interior, replacing the tired and fluffy cloth front seats and scratched / dirty door cards, after spotting a complete set from a 2014 car on eBay. I managed to get £100 knocked off the price and drove down to Stourbridge to grab them with a distinct feeling that it was too good to be true. I had to climb nearly 20 feet up a ladder to retrieve them, but they were seriously mint - honestly, not even a mark on any bit of leather - so I parted with the measly £300 and brought them home.

My gut feeling turned out to be right. While the rear seats and door-cards are a perfect fit, the front seats are not. From mid-2013 onwards the F10 floor-pan was updated, along with the mounting-points for the front seats and this means that the runners on my new seats are a couple of inches narrower than on my original 2010-13 seats, which are clearly wider at the base. There is no way to swap the runners, the seats are just too different in design and I will write a more detailed guide on this soon. Annoyingly, the electric plug fits and the motors operate, though they throw up too airbag warnings.

Door cards are straight swap.
Modifying the seats or floorpan to fit is just too much work and will not look very nice, so the only way to go is wait until a pair of front seats for a 2010-13 car come up and try to part-ex mine or at least sell them later. Either way, this could end up costing me more. Regular SE seats are quite thin on the ground for the earlier cars and M-Sports are upwards of £400.

Rear seats fit great.


** Correct seats now acquired here: https://beemerlab.blogspot.com/2016/08/f10-530d-correct-front-seats-acquired.html **

Wednesday, 24 September 2014

E36 Compact: E46 Driver's Arm-Rest Retrofit

Just as on E46, the two bolts holding the handbrake down hold the right side of the arm-rest bracket. The third threaded-hole is covered by putty a bit further down the left side of the trans-tunnel.
The three existing holes fit the E46 arm-rest bracket, longer 13mm bolts and shims perfectly.
The rear roll-down ash-tray trim screws to the rear of the arm-rest bracket.
The centre-console trim took a bit of getting in under the gearstick trim panel, but fits the rear and arm-rest pretty well.
As does the handbrake handle and leather gaiter. Just deciding now whether to retrofit the gearstick trim panel and window-switches from the E46, or cut the centre-console trim to fit the E36 better. Hmm.

Saturday, 24 May 2014

E60: Fitting M-Sport Front Bumper


1. Bumper Removal:

1.1 Remove the bolt holding either corner of the bumper, just inside the wheel-arch, using a 10mm wrench. The edges of the bumper inside the wing should be free to pull out of join.


1.2 Remove the screws holding the wheel-arch liner to the front bumper using an 8mm socket. *If you are replacing your arch-liners then remove them entirely.

1.3 Remove the two screws from the lower centre of the bumper, using a T25-Torx socket, located just under the lip below each corner of the licence-plate.


1.4 Remove the two screws from the lower centre of the bumper using a T25-Torx socket, located inside each spotlight-grille recess.


1.5 Remove the five screws holding the upper-centre of the bumper along the top edge of the grille/slam panel using a T30-Torx socket.


1.6 The bumper should be free to move, so wiggle it forward and gently rest the front-centre on the ground.

1.7 Unplug the wiring to the spotlights and four parking-sensors (PDC).

1.8 Unfasten the wiring from the hooks along the inside edge of the bumper.

2. Preparing M-Sport Bumper:

2.1 Swap over the spotlight bulb-holders. They are removed by rotating a quarter-turn anti-clockwise.

2.2 Swap over the four parking-sensors (PDC). Remove them by pulling them out from the back while gently pressing from the outer side. They should fit the lugs on all E60 bumpers, regardless of year.

2.3 Ensure the grilles, headlight-washer hinges and springs are fitted to the bumper as they cannot be fitted once it is on.

2.4 On the car, remove the wiring from the foam-polystyrene blocks and remove the blocks from the car.


2.5 Fit the 'M-Paket' foam-polystyrene blocks to the car and re-insert the wiring to them, or if you do not have compatible foam blocks and are leaving them off, find a suitable route for the wiring over the top of the grille / air-ducts.

2.6 If you do not have 'M-Paket' brake-air-ducts on your bumper, then swap the existing ones left to right and flip them upside down to clear the M-Sport grille-recesses. 

3. Fitting M-Sport Bumper:

3.1 Place the M-Sport bumper in front of the car and reinsert the PDC/spotlight wiring to the hooks along the inside edge of the bumper.


3.2 Reconnect the wiring-plugs to each parking-sensor (PDC) and spotlight.

3.3 Lift the bumper up to the car, so the front-undertray slides above the deeper M-Sport lip and put one screw loosely into the centre hole on the top of the grille.

3.4 Hook each corner of the bumper round into the slot in the wheel-arch and replace the 10mm screws, but not tighten fully.

3.5 Find a suitable placement for the bumper, where the shut lines at either side of the headlight are as equal as possible. Do this one side at a time and fully tighten the 10mm screws.

3.6 *If you have the adapter-brackets on your bumper then fasten these to the two centre screw-holes from step 1.3.

3.7 Loosely replace the remaining four screws along the top of the grille / slam-panel, find a suitable placement for the grille panel where it does not disturb the shut-lines at the headlight corners and fully tighten the top screws using a T30-Torx socket.

3.8 Fit the M-Paket wheel-arch liners and fasten them to the bumper using the 8mm screws, or if you are keeping the SE ones, measure where the outer edge of the liner fouls the M-Sport bumper and cut a sliver off. One of the 8mm screw holes should still line up and hold the cut liner in place.

3.9 Replace the weather-strip trim to the top grille-panel.

3.10 Check the headlight-washers are clearing their apertures and refit the cover-caps.

Sunday, 18 May 2014

E60 M-Sport Bumper Retrofit: '08 LCI to '04 SE

I have mentioned hankering after an M-Sport or M5 style front-bumper for my 530d, but they are expensive. A new spurious one will cost about £230, the same price as a damaged genuine one and either of these require painting. A mint one already painted in Titansilver, complete with grilles, parking-sensors and trim will run £400. I've been looking for a few months and this week spotted an undamaged '08 front bumper for £250 with new spot-lamps and grilles, but no sensors or trim. Best of all it was in Wrexham, less than 30 miles away, so when I emailed the seller offering £200 cash on collection and he accepted, I realised that I was now bound to the idea. I got the bumper on in 2 hours, but a lot of bits had to be removed to do it and before I start modifying them to fit I'm sat on a fence between bothering at all, or just going back to stock - I can still get £200 for this M-bumper all day long.


Before you consider doing the retrofit to an SE, I must mention that even if the M-Sport bumper is fully-loaded with trim and bits, you will still need to buy a heap of extra parts to make it fit properly. If you don't, stock parts that get in the way will either have to be binned or modified to fit...

Things that DO fit:
  • Wing and top-grille mounting points.
  • Spot-lamp bulb-holders.
  • Parking-sensors (PDC).
  • Grille-top weather-strip.
Things that do NOT fit:
  • Headlight-washer caps.
  • Headlight-washer cap hinges.
  • Tow-eye cover cap.
  • All 4 lower-grille mounting points.
  • Left + right brake air-duct.
  • Under-tray left + right corners.
  • Front wheel-arch liners.
  • Bumper shock-absorbers (foam-polystyrene blocks).
Assuming your bumper comes bare, you will need these essentials:

H/Light Washer Hinge (Lever) Left [51117896601] (22 in below pic)
H/Light Washer Hinge (Lever) Right [51117896602]
H/Light Washer Cap Left [51117897211] (21 in below pic)
H/Light Washer Cap Right [51117897212]
Tow-eye Cover Cap [51117897210] (9 in below pic)

You can get away with leaving the bumper unbolted in the lower-centre, or easily fab-up some custom brackets, but if you want to buy them then you will need:

Holding Strap [51111973721] (10 in below pic)
2x Adapter Bracket [51117896611] (33 in below pic)

The foam-polystyrene bumper 'shock-absorbers' can be cut to fit or just left off, but if you want them they are:

Shock-absorber Left [51117896589]
Shock-absorber Right [51117896590]

The plastic wheel-arch liners only need a sliver cutting off to make them fit, but if you really want to replace them:

Front Wheel-arch Liner/Cover Left [51717896605]
Front Wheel-arch Liner/Cover Right [51717896606]


The diagram above with all parts can be seen on this page of RealOEM.com.

Monday, 14 February 2011

E39: Fitted Subs/Amp and kept BMW Head-Unit...

* The Full How-To Guide is on this page: Audio: Wiring Amp/Subs into Standard Head-Unit

The standard BMW Business stereo is a masterpiece and takes up half the dash, but sadly it lacks the RCA-output and remote-signal that are essential when fitting an amp. A fascia-converter is about £10 and a wiring-adaptor about £7, so it's not expensive to throw in any after-market head-unit, but if I do that then I lose my CD-changer, tape-deck and the excellent steering-wheel remote. The cheapest remote-adaptor for Pioneer I can find is £85! and there's no way of knowing if it'll fit my dinosaur model. Worst of all the new fascia would ruin the teutonic look of the dash.

I started checking the forums and found a few people who managed to splice an RCA-cable from the rear-speaker wires, so I thought I'd give it a go. It turned out to be one hell of an involved process. The back seats / parcel shelf have to come out, the speaker-wiring is perplexing and I eventually found a way to get a remote 'on' signal for the amp from a parking-sensor relay. The remote-input on the amp will take any signal up to 12v, so you could just wire it from the battery and have a manual off switch, but at least the fiddlier way means it goes off with the ignition - no flat batteries in the morning. The battery is in the boot too, so there's no need to touch anything up front or run cables under carpets.


The system works brilliantly, there's a LOT of bass there, which I'm quite surprised about with the RCA audio-signal coming off from the rear-speakers, but they are still working fine too. As you can see above, I've also set the subs facing inwards this time so I can make use of the magnificent boot - I'm sure the bass is being stifled a bit this way, the back seats are vibrating like crazy, but it's plenty loud enough either way. The only downside is no separate controls for the subs, so they pump out at the master volume, can't be turned off and receive a completely un-filtered audio-signal - there's some nasty higher frequencies creeping in. My 1000w Alpine V12 amp is a solid mono-block and has no controls either, which is a disaster really because it's the matching unit to my 12" Alpine R subs, but it'll have to make way for a lesser 1k watt Toxic Audio one soon that came with my old Subaru. It's not a pretty amp, but it's got a volume-knob, lo-pass filter to single out the bass and 2 channels, so I can give each sub its own terminal instead of twisting the two wires together. Everything I need basically, but I'll miss that blue-glow screen...

This is where I'd normally put the 'How-To Guide', but the process is too intricate to throw on the wall, so I've given it a page of its own, split into five sections, linked below: