Showing posts with label front. Show all posts

Sunday, 18 February 2024

BMW Fxx Series Seat Wiring Harness Diagram + Pin Layout

If you're swapping seats round or retrofitting, then you will want to keep electric movement functions and may even want to retain the heated-seat feature or even safety restraints. Here's a guide to wire colours and the pin-outs on the multi-block plug. 

Pin:

5+6 - CAN data wires to CAS [ Green + Orange/Green]

7 - 12v Power Wire [Red, Red/Blue or Red/Brown, 3mm thickness] 

8 - Main Ground Wire [Brown, 3mm thickness]

Seat Cushion Heating Power+ [Green/Violet or Blue/Violet]

Seat Cushion Heating Ground- [Brown or Brown/Orange, 1.5mm thickness]

Seat Cushion Temp. Sensor [Grey]

Seat Back Heating Power+ [Violet or Green/Violet]

Seat Back Heating Ground- [Brown, 1mm thickness]

Friday, 3 June 2022

BMW M20 Engine: Front Timing Marks [Front Timing Cover]

Here is a great diagram someone (not me) has made to show the front timing marks for the M20 engine series. Handy. 


M40 engine timing marks HERE.

Saturday, 23 October 2021

E46 318i Touring: New front drop-link for MOT

The 318i Touring was up for MOT this week and failed only on the O/S front anti roll-bar link. Normally I would replace these as a pair, which would have been more cost effective as you can get a set of two from eBay for under £15. Time was an issue and I wanted to get it back for a re-test so had to buy one from Euro Car Parts for the same price, around £15. Annoyingly, the eBay pair were Lemforder and the single piece from ECP is Starline, but needs must.

The car has only just passed 104k miles, so this could well have been the original anti-roll bar linkage and boy was it seized on. I only got a couple of turns on the top nut before the 5mm Allen-key in the stud stripped and rounded, so had to cut the rubber boot off to get a 17mm spanner on to the flats at the back. Even so, progress was painstakingly slow. Couldn’t even get a grinder in there as things are surprisingly tightly packed on E46. This made an otherwise quick and easy job last a bit longer, but it is nearly 20 years old.

Monday, 23 November 2020

F10/F11/G07: Front Fog-Lamp / Spot-Lamp Fault fix... the bulb or not the bulb?

 If you get 'Front Foglight Failure' coming up then it's likely a bulb has blown, but I believe it is a common problem on the F10 showing this error but both front fog lamps are still working, or a light not working but the bulb is not blown. It should be an easy fix.

REPLACING THE BULB / CHECKING FAULT:

1. Using an 8mm hex-socket remove four of the screws holding the front side of the corresponding wheel-arch liner - two from the bottom edge and the other two that run up the outer edge of the wheel-arch. This should be enough to peel the arch-liner back and see the back of the fog-light.

2. Remove the wiring-connector by pressing the clip and sliding it upwards.

3. Remove the bulb-holder in the back of the fog-lamp by giving it a quarter-turn anti-clockwise and it should pull out easily.


If the bulb is blown then it can be removed from the plastic holder and replaced.


IF IT'S NOT THE BULB:

The worst case scenario is a fault with the lighting module or wiring to it, see this post - https://www.beemerlab.org/2019/04/f10-halogen-headlight-module-issues.html, but it is far more likely to just be a loose wiring-connector behind the bumper.

Firstly, the wiring-connector to the fog-lamp itself connects from above, so it is possible moisture can fid its way in and corrode the terminals, which can be easily cleaned up with some emery-cloth and a small screwdriver/awl. It is also feasible that road dirt / debris can drop into the plug as it is removed, making it not seat correctly when it is replaced, so rule these out first.

Secondly, there is another wiring connector higher up in the front bumper behind the bottom of the headlight unit. It is hard to spot, as wires seem to run to the fog-lamps from both sides of the car and also link to the headlights, so it will appear as if the wiring to the fogs are intact, when this plug becoming loose or not properly connected will stop the fog-lamp working and throw the error, but not affect the headlights. This can be caused when a headlight has been removed for bulb-replacement or work on the front of the car, so if this work has been done to the car recently then be sure to check this plug. 

Monday, 24 February 2020

BMW Front Outline / Silhouette Gallery - All Models

Another great chart of BMW front-end outlines detailing almost every model, or at least every major model release, right from the word go... which one is yours??


1936 3281952 5011955 ISETTA 2501956 507 ROADSTER
1962 15001965 3200CS1968 2002 Tii1973 3.0CSL E9
1975 316 E211978 M1 E261978 M535i E121986 M3 E30
1988 M5 E281989 8 SERIES E311992 M3 E361996 Z2 E36/7
1998 M5 E391999 Z8 ROADSTER2000 M3 E462002 Z4
2004 6 SERIES E63/642007 M3 E902007 X5 E702011 1 SERIES M COUPE
2011 M5 F102014 i32014 M4 COUPE F822015 i8

Monday, 30 September 2019

E46 318i: Front-of-cat o2 / Lambda sensor replacement [Fault Code 271D, 271A, 271B] [Rear-of-cat 271C, 271F]

E46 failed its MOT on the O/S rear tyre and O2 emissions too high. I duly replaced both rear tyres with a new pair sourced through work for just £23 each and they are V-rated so should be ok for the Touring. As for the O2 level being too high, I was told this was a fault with an O2 / Lambda sensor so I plugged in a Snap On Modis scanner to see if this was right.


The code I got back was 271D, as in pic above, which is the up-stream or 'front-of-cat' sensor heating. Codes 271A and 271B show fault at the same sensor, but are labelled directly 'front-ofcat-sensor' with no heating suffix. This sensor is located slightly forward of the catalytic-convert mounted about halfway down the car's underside, as in the diagram below. The one shown to the rear of the cat is the down-stream or 'rear-of-cat' sensor. Code 271C applies to this rear sensor, along with 271E for Rear O2 sensor-heating. The two sensors, though essentially the same, are different parts and part numbers due to the rear sensor having a longer wire. [List of emission based fault-codes here.]


I got hold of a used sensor taken from another E46 318i from www.marobmwspares.co.uk for £18. I prefer used OWM BMW parts that come with a warranty / guarantee over cheap spurious items. The least expensive spurious items start at about £20 for a sensor that can be used for either front or rear of cat, having a long wire than can be cut to length with two bare wire or universal wire-terminal ends that require the original plug to be soldered on from the broken sensor. On the other end of the spurious price range was Euro Car Parts, who offer an OEM-quality sensor for £68, which is pricey but comes with the correct wire-length and plug fitted.


My old sensor proved very tricky to remove with the car on fixed-ramps and I would not like to attempt it with jack and axle-stands. I was unable to crack the sensor off and unscrew it even with the use of special Lambda-sensor sockets and it began to round so I ended up booking ramp-time in the workshop of the company where I work and lifted the E46 Touring on a 2-post ramp to give loads of access underneath. To avoid the risk of breaking the Lambda-sockets or further rounding the sensor itself, I decided to cut about half of the sensor off using a 3.5" cutting-disc and used a 22mm deep impact-socket with a long breaker-bar to finally crack the sensor off. It was pretty seized on, but once cracked just unscrewed by hand. The replacement sensor screwed straight in and swapping / mounting the plug was easy to make for a 5-10-minute job once the car was positioned on the ramp legs.


RESULTS:
The emission test result went from 2.2, with a maximum of 2.0 allowed, down to just 1.0 with the faulty sensor replaced. There is also a significant drop in neat-petrol smell emitting from the rear of the car when it is started from cold, so I'm glad this problem showed itself and got fixed.

Saturday, 20 April 2019

F10 / F11: Front Bumper Removal Guide

** If you are removing / replacing only one side headlight, then it is possible to loosen the bumper on the corresponding side and peel it back to access the headlight screws, rather than removing the entire bumper. **

1. Under the bonnet/hood remove the front end of the rubber seal located just inside the front wings either side.

2. Remove the two plastic push-pin type fasteners on each top corner of the bumper skin. (Or just the ones on the side you are removing the headlight on.)

3. Remove the 4 screws holding the top edge of the bumper using a T30 Torx socket.


4. Under the car, remove the 8 screws under the bottom lip of the bumper using an 8mm socket.


5. There are 3 screws located at the forward side of each front wheel-arch that need removing using an 8mm socket, locations pictured. (If you are working on one side/headlight then these screws only need removing on the corresponding side, as with steps 6 and 7.)


6. Peel the plastic wheel-arch liner back from the corner of the bumper and wedge it against the tyre.


7. Remove the 2 screws located on the inside of the bumper on each side that can now be accessed with the arch-liner out of the way, as pictured. The near one needs a 10mm socket, the one further in is another 8mm. A 1/4" drive wrench is good here with not much room.

8. Gently pull the bumper outwards from its bracket until it separates from the front wing and pull that side of the bumper forward. It should peel away from the car quite easily. Repeat for the other side and the bumper is off, unless you are only working on one side as the headlight and other parts inside / behind the bumper are accessible with one side pulled away from the car.

9. If you are completely removing the front bumper, remember to unplug the front fog-lamps, parking-sensors etc. before moving the bumper away from the car. There is plenty of room to do this with the O/S (right-side) bumper peeled off.


Many thanks to Isturbointeg on F10post.com for some of his superb pictures I made use of. His original guide on F10post forum is here - https://f10.5post.com/forums/showthread.php?t=1187122

Monday, 11 September 2017

F10 530d: Front Shock Strut / Spring / Top-mount Replacement [GUIDE]


My front shocks were certainly past their prime up front and over the last few months have really started to bottom out on certain speed bumps. I was also told one of the front top-mounts was starting to go on the last MOT and would probably be an issue next time round, so it was time to give the F10 a mini front-suspension overhaul.

I got hold of a pair of complete front struts taken from a 45k-mile car (I am told, but they are very clean) for just £240. All the parts new and spurious (including my through-work discount) would have been nigh on £400 and lots more from BMW. The used items are of course genuine, so quite a lot of money saved and the struts have turned out to be pretty good so it was a chance worth taking.


The guide I used is by hamanncheese on 5post.com and is pretty spot on, so props to him - I will reference his photos and try to elaborate a little on his instructions. [Original guide here: http://f10.5post.com/forums/showthread.php?t=628336].


REMOVE / REPLACE STRUT:

1. Lift the car and remove the corresponding wheel.

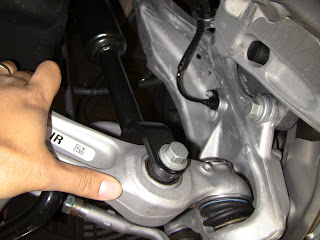
2. Remove the nut holding the top of the anti-roll bar link to the shock-strut using an 18mm wrench. [The nut should come off without twisting the ball-joint, but you may need to insert a T40-Torx socket into the end of the stop it turning with the nut.] [If the stud is difficult to remove from the shock-strut, then using a second jack to lift the hub and prying the anti-roll bar downwards will certainly help.]

Pic courtesy: hamanncheese
3. Remove the lower strut bolt using an 18mm (bolt-head) and 21mm (nut) wrench.

Pic courtesy: hamanncheese
4. Remove the 3 bolts holding the top-mount to the shock-turret using a 13mm wrench.

Pic courtesy: hamanncheese
5. Push the hub down and lift the shock-strut until it clears the bottom-arm and can be removed. [Lift it over the bottom-arm towards the rear of the car. There is plenty of room to manoeuvre it out of the wheel well.] [As hamanncheese says, this step is easier with a helping hand, but can be done solo without much difficulty.]

6. Insert the new strut using the same technique as Step 5.

7. Refit the lower strut bolt first and screw the nut on a few turns. [A screwdriver or other long tool may be necessary to align the strut to the lower-arm.]

8. Refit the 3 top-mount bolts and tighten.

9. Fully tighten the lower strut-bolt.

10. Refit the anti-roll bar link to the strut.


ALIGN TOP MOUNTS:

If the top-mount holes do not line up with the shock-turret, [i.e. if they have been removed / replaced and not fitted in the correct alignment], then they will need rotating to the correct position. Spring-compressors are required.

1. Place the strut on its side with the ring-bracket resting on the floor [as in pic]. This is so it can be lined up against the one it is replacing.


2. Compress the spring on both sides, being careful to mount the spring-compressors so they do not foul the strut resting on the ring-bracket [as in below pic].


3. Loosen off the top mount nut using a deep 18mm socket, leaving it on a few threads.

4. Rotate the lower spring-pan by tapping it round using the notches [in pic]. A hammer and blunt chisel or large flat-head screwdriver will do nicely.


5. Re-tighten the top mount nut and de-compress the spring.


REPLACE SPRING / TOP-MOUNT:

1. Compress the spring on both sides using spring-compressors.

2. Remove the top-mount nut using a deep 18mm socket. [Stand to the side when the nut is fully removed as, even with the springs compressed, the top-mount may still come off with some force.]

*If you are only replacing the top-mount then skip Step 3.*

3. If you are replacing the spring, remove the old one from the strut and remove the spring compressors. Compress the new spring, place it over the strut and seat it in the lower spring-pan.

4. Fit the new top-mount, ensuring the spring is located in the upper spring-pan, replace the 18mm top-nut and fully tighten.

5. Remove the spring-compressors.


Saturday, 27 August 2016

F10 530d: Correct front seats acquired!

Managed to find the right pre-2013 front seats on eBay to replace the incorrect fit ones [https://beemerlab.blogspot.com/2017/05/f10-530d-black-leather-rear-seats-and.html]. They were for sale on their own, the owner having swapped his front seats for M-sports and was willing to let the old ones go for just £140. They were from a 2011 car with 80k miles and in very good nick, only snag was they were in Northampton, so I removed the passenger / rear seats and did the 6 hour round-trip to collect them. They bolt straight in and bring up no air-bag warnings, so that's problem solved  all round.

The post-2013 front seats I was selling on eBay had attracted quite a bit of attention and a few offers, but eventually someone paid the asking price of £180. This was mainly to convince me to leave them with someone to meet a private-courier organised by the buyer, which was a bit of an inconvenience, but they sold regardless. This leaves me £40 in profit after all thanks to the error, save the fuel money travelling to Northampton.


Sunday, 7 February 2016

E60: New front bonnet-badge... cheap eBay replica.

With all but one job complete on the 5 Series I decided to treat the car to a new bonnet badge, since the last one has become severely de-lacquered, as they do.

A genuine BMW one will set you back about £25. Cheap fakes can be bought off eBay for as little as a fiver, but these don't look promising, with visibly low-cost manufacturing and the quality of plastic used in festive tree decorations.

In the end I couldn't justify the cost of the real deal and plumped for a middle of the range one - a 'replica' OEM badge. It was £10 delivered and is complete in every detail - the BMW roundel on the back, authentic looking packaging and even the right BMW part number.


Despite the 'realistic looking' markings on the back, which were nothing like on my original one, the quality of the plastic was not great and the overall depth about half of the original, which meant fit isn't great either. The locating pins were far too long, tapering to a point from manufacture and needed cutting down for the badge to sit flush, which it does barely - there is still a tiny bit of movement if the badge is rocked back and forth. Ok, this may be a pretty critical review of a fake badge still costing less than half that of a real one, but wouldn't the money spent on packaging and fancy insignia been better spent creating a more quality badge?


At the end of the day it looks fine on the car and you would have to be an expert to spot it was a fake, but then again, most BMW fans are and, most importantly, I know it is. In future would I spend the full £25 on a genuine badge? Yes, I think so.


Sunday, 31 May 2015

5 Series wing repaired!

With all the mechanical work on the E60 of late I would normally have relished a bit of body work to change the pace but, as the damage occurred at work and my company has several body shops at their disposal, I figured it was best to accept a free professional repair.


Not a bad job I must say. J Howarth's in Pensby, Wirral did the work. They are now officially part of Wallasey Fleet Hire and have recently renamed as such, but here they are on Yell - http://www.yell.com/biz/j-howarth-and-son-ltd-wirral-1163983/. I would have to second the comments in the Yell review. This is where our more specialist jobs are sent to at work and I trust the guys will do a clean, thorough repair and look after my car, so I waited a couple of weeks to get it done there and it was worth it. The E60 turned out to be quite an involved fix, as ever. The wings are alloy, not steel, so the car had to be taken somewhere after prep to have a blob of TIG weld put in the split [below] before being ground, filled, primed, painted and lacquered. Never the less, the car was ready for me by the following afternoon. Due to the extra work required they couldn't stretch to sorting the scuff on the back bumper after all, so I will have to break out the T-cut, but I am no position to complain - the wing is indeed like new.

Thursday, 2 April 2015

Argh... Simo hit my wing!

Oh dear, some more bodywork already. Simo at work is not the world's most careful drive and yesterday he decided to park his Transit van next to the 5er and in doing so scraped down the M-sport bumper and dented the wing! Nightmare, but at least work are paying for the damage. It will be going into Howarth'a body shop in Pensby (Wirral) next week and they will be sorting the scuff that my mate did to the back bumper with his Volvo, so I guess that's the silver lining...


Monday, 30 March 2015

E46 Clubsport: Nay's new wing! Paint, polishing... fail.

It's good to get the purple 330ci Clubsport on the pages of BeemerLab and a bit of bodywork, no less. The driver's side wing was a bit bubbly when he got the car and has worsened somewhat over winter - front wings are the classic rusting spot on E36 / E46 after all and no matter how well you patch it up, it always comes back before long, so Nathan went the whole hog and bought a new patterned wing for just under £100. Despite offers to have it sprayed professionally for next to nothing, he opted to do the work himself with a rattle can of Holt's Colour-Match, mixed at Halfords.

He started with U-Pol Hi-build filler primer to deal with imperfections in the etch-primer, moved on to a single can of Holt's 'BMW 576 Velvet Blue Metallic' and finished off with 2.5 cans of Halford's own clear-lacquer. A spray guy at work gave us a tip - apply the first coat of lacquer and wait a couple of minutes for it to go tacky but not start to dry, then apply a good thick second coat. This enables you to get a proper coat on that can then be layered on without causing crazing in the base lacquer. Nay tried this out and, after 4 more coats, some flatting back with 1800 Wet/Dry and a bit of machine-polishing, the finish is glass-like and the colour-depth superb. What a shame that, after a week spent carefully spraying one wing, the colour-match is terrible. I guess this is a lesson not to have complex paint codes mixed up at Halfords. A local painting firm is on the case, watch this space...


Only 330 M Clubsport models were built in the original three colours. Only about 40 were made in Velvet Blue. This is one of the 40 and it has seen better days. 

Sunday, 29 March 2015

E60 Diesel: Replacing the Front Turbo Housing/Volute

**The turbo needs to be removed. Reaching the 8mm nuts at the back of the volute is impossible               with it in situ.
  1. Mark a line on the original volute / front-casing where each 8mm screw is located before removing it. It is adjustable and the new one needs to be in the exact same place as the original for correct waste-gate location.
  2. Remove the 3 screws holding the waste-gate bracket to the turbo front-casing / volute using a 10mm wrench.
  3. Remove the 6 screws holding the front-casing / volute to the turbo and wiggle it free.
  4. Hold the new volute up to the original and mark lines in the corresponding places. This is best done with them on a flat surface and holding a straight-edge across both.
  5. Slide the new volute on to the turbo and replace the six 8mm screws, ensuring the lines are correctly located before tightening them up. It is alloy-to-steel, so no high-heat gasket-paste is required.
  6. Press the waste-gate into the right position for the bracket to meet the holes on the volute and replace the three 10mm screws holding it in place.
Why I replaced mine:

With re-con turbos starting at £350, I went for a used one from a crash damaged 7-Series. Mine is an early E60 and has the vacuum-actuated turbo, so it was handy that the 7er did too as they are hard to source - eBay is full of the electronic-actuated type and I couldn't see a vacuum one, but it may be that they are inter-changeable.

The overall condition of the turbo looked worse than the one I was removing, but there is a bit less play in the spindle-shaft so worth a shot at £200 delivered, let's hope the saving pays off. The only drawback is the front-casing was slightly damaged at the point where the pipe to the intercooler fits, but swapping the original one in was not a difficult job.

Monday, 26 May 2014

E60: Replacing headlight-washer caps / hinges!

Despite how it looks, you can't replace them with the bumper on. This is best done while the whole front bumper is off the car, but thesis the quick and dirty method, of course.

1. Lift each cap out of the bumper on the hinge and remove them by depressing the clips at the back and sliding the lugs out of the hinge.

2. Remove the screw holding each corner of the bumper to the wing using a 10mm wrench.

3. Pop the corner out of the wing and bend it out enough to reach behind the headlight-washer cap.

4. Remove the hinge / lever by bending one side out and unhooking it from the outer lugs, the other side should then come away easily.

5. Remove the spring by squeezing the coils towards each other and unhooking them from the inner lugs.

6. Fit the new spring as a reverse of removal.

7. Lift the spring up forwards and fit the new hinge / lever as a reverse of removal, then release the spring ensuring it is tight against the flat-bar on the hinge.

8. Refit each corner of the bumper.

9. Lift the hinges / levers out of the bumper and fit the caps.


Sunday, 25 May 2014

New trim pieces for M-Sport bumper + painting!

As my bumper didn't come with the cover-caps or hinges, I had to source them separately. I got the headlight-washer hinges directly from BMW Parts [Williams, Liverpool] and they were only £2.70 each inc. VAT. BMW are good for clips and random bits, but trim pieces are a bit more expensive, especially if you have them painted in your colour-code.

I turned to eBay, but was surprised to find used pieces are thin on the ground and no silver ones coming up. New, the headlight-washer caps start at £16 each and go up, plus delivery, so a pair of genuine ones for £30 delivered actually seemed reasonable. These came from MM Autos [eBay ID: adrian5882745], the same place in Wrexham I got the bumper, but I checked and the silver caps from mine are long sold! The tow-hook caps start at £25 for a new one and again no used ones in silver, so I recommend buying from a seller on eBay Germany called bmdoubleyou24. A new genuine one in primer is £18 delivered and only took 5 days to arrive so was worth the saving.

£70 worth of plastic. Headlight-washer caps, hinges and tow-hook cap, only the essentials.

Finally, I bought a can of Titansilver (or Titanium Silver, same paint-code) spray from Halfords, along with a fresh can of clear-lacquer, £6.49 each. After giving the caps about six coats of both, I gave them a good rub with T-cut so they look OE, though I have a feeling they will look a lot shinier than the bumper. I will have to get polishing and sort those scratches...

M-Sport Bumper Total Cost:
Bumper - £200
Hinges - £5.40
Washer-caps - £30
Tow-hook Cap - £18.11
Paint/lacquer - £12.98
TOTAL - £266.49

Pre-primed ABS-plastic is a piece of cake to paint and was going great...
...until it rained and spotted the lacquer...
...so needed a bit of flatting back...
...and repainting, followed by a quick blast with rubbing-compound.
New 'M-Paket' hinges do indeed need the corner of the bumper pulling out to fit, they can't be done from outside.

Saturday, 24 May 2014

E60: Fitting M-Sport Front Bumper


1. Bumper Removal:

1.1 Remove the bolt holding either corner of the bumper, just inside the wheel-arch, using a 10mm wrench. The edges of the bumper inside the wing should be free to pull out of join.


1.2 Remove the screws holding the wheel-arch liner to the front bumper using an 8mm socket. *If you are replacing your arch-liners then remove them entirely.

1.3 Remove the two screws from the lower centre of the bumper, using a T25-Torx socket, located just under the lip below each corner of the licence-plate.


1.4 Remove the two screws from the lower centre of the bumper using a T25-Torx socket, located inside each spotlight-grille recess.


1.5 Remove the five screws holding the upper-centre of the bumper along the top edge of the grille/slam panel using a T30-Torx socket.


1.6 The bumper should be free to move, so wiggle it forward and gently rest the front-centre on the ground.

1.7 Unplug the wiring to the spotlights and four parking-sensors (PDC).

1.8 Unfasten the wiring from the hooks along the inside edge of the bumper.

2. Preparing M-Sport Bumper:

2.1 Swap over the spotlight bulb-holders. They are removed by rotating a quarter-turn anti-clockwise.

2.2 Swap over the four parking-sensors (PDC). Remove them by pulling them out from the back while gently pressing from the outer side. They should fit the lugs on all E60 bumpers, regardless of year.

2.3 Ensure the grilles, headlight-washer hinges and springs are fitted to the bumper as they cannot be fitted once it is on.

2.4 On the car, remove the wiring from the foam-polystyrene blocks and remove the blocks from the car.


2.5 Fit the 'M-Paket' foam-polystyrene blocks to the car and re-insert the wiring to them, or if you do not have compatible foam blocks and are leaving them off, find a suitable route for the wiring over the top of the grille / air-ducts.

2.6 If you do not have 'M-Paket' brake-air-ducts on your bumper, then swap the existing ones left to right and flip them upside down to clear the M-Sport grille-recesses. 

3. Fitting M-Sport Bumper:

3.1 Place the M-Sport bumper in front of the car and reinsert the PDC/spotlight wiring to the hooks along the inside edge of the bumper.


3.2 Reconnect the wiring-plugs to each parking-sensor (PDC) and spotlight.

3.3 Lift the bumper up to the car, so the front-undertray slides above the deeper M-Sport lip and put one screw loosely into the centre hole on the top of the grille.

3.4 Hook each corner of the bumper round into the slot in the wheel-arch and replace the 10mm screws, but not tighten fully.

3.5 Find a suitable placement for the bumper, where the shut lines at either side of the headlight are as equal as possible. Do this one side at a time and fully tighten the 10mm screws.

3.6 *If you have the adapter-brackets on your bumper then fasten these to the two centre screw-holes from step 1.3.

3.7 Loosely replace the remaining four screws along the top of the grille / slam-panel, find a suitable placement for the grille panel where it does not disturb the shut-lines at the headlight corners and fully tighten the top screws using a T30-Torx socket.

3.8 Fit the M-Paket wheel-arch liners and fasten them to the bumper using the 8mm screws, or if you are keeping the SE ones, measure where the outer edge of the liner fouls the M-Sport bumper and cut a sliver off. One of the 8mm screw holes should still line up and hold the cut liner in place.

3.9 Replace the weather-strip trim to the top grille-panel.

3.10 Check the headlight-washers are clearing their apertures and refit the cover-caps.