Tuesday, 22 November 2011

E39 530d: Fuel Leak?! .... Quickly Sorted. [M57]

Okay, today lets talk about fuel pipes. This little spell of working on the car continues as we found a small oily patch on the drive after completing work on the prop-shaft donut, smelling a little like brake fluid and with no apparent origin. I spent the few weeks since then checking fluid levels and being cautious with the brakes, though everything with the car seemed fine. About a dozen small oily dots had appeared though in the meantime on the road where I park, so after systematically blaming every one of my mates old clunkers that could have parked there during that time, a large patch that turned up on Saturday suggested it had to be the E39.

On Sunday I drove her onto ramps for the second time this month, whipped off some of the plastic under-tray and had a good look around. Naturally I feared the worst and assumed that, while jacking up the gearbox to get at the prop, I'd ruptured a seal somewhere and was dropping engine-oil, meaning the engine would have to come out for the warped part/gasket to be found and replaced. With this in mind it was actually greatly relieving to discover the the leak was 'only' a corroded fuel pipe.

Turns out the fuel lines run externally, which is something I haven't seen before, and the metal sections are not covered by under-tray and are exposed to the elements, allowing them to corrode, although I don't know if them leaking is common. Seems a bit of a design flaw to do it this way, I mean it'd be a bit dangerous on a petrol car surely, but I guess BMW have done this to keep the noisy fuel pressure-pump [under the passenger seat] outside of the cabin on the diesel models. Mine had begun to corrode quite badly around the front pipe-bracket, obviously where it's been rubbing, but its been holding up and I guess whatever knock or shove I gave it while fixing the prop-shaft opened up a pinhole. I should be more careful when working under the car, but once you've spent two days squirming around in a tiny gap between soggy concrete and filthy metal, there's a tendency to become complacent...

It's not worth trying to repair the pipe, replacements are very cheap. I'm sure they can be found for even less, but I ordered mine from BMW Parts themselves [Part No. ] and it was only £18.00 inc. VAT anyway.


PROCESS:

Replacing the pipe is very easy. It's right behind the passenger sill, so you only need to jack the car up a little to access it, but the job is messy and diesel is nasty stuff so make sure you've got a plastic sheet down and plenty of tubs to catch it.

Tuesday, 25 October 2011

E39: Replacing the Propshaft Coupling (Donut)

This isn't too easy a job, but it's doable and with the part alone costing £119 from BMW, the savings on labour are worthwhile. Getting to the propshaft is the most involved part of the task as it's right up above the exhaust, which needs be taken off too, so if you're working at home make sure you've got ramps with at least 10" of clearance, axle-stands just won't cut it - there's a lot of work under there.

The old one, left, doesn't look too bad, but the metal rings have all separated from the rubber and have a lot of play in them.

PROCESS:

Lift the front of the car on ramps.

Removing the Exhaust:

1. Unscrew the four bolts on the two joint-brackets, located just behind the steel-braided flexible sections beneath the driver's seat, using a 13mm wrench. [Mine seized after a few turns, but I was able to get a hacksaw blade into the gap and had to cut them off and find new ones.]

2. Gently slide the flexible section of each front-pipe back about an inch until they are clear of the exhaust.

3. On the exhaust centre-bracket, remove the 2 nuts from the inner-centre of the plate using a 13mm wrench.


4. Remove the 4 bolts from the corners of the centre-bracket plate using a 13mm wrench and gently work it down until it is free of the studs on the exhaust-hangers.

5. Remove the 2 nuts from the front exhaust-bracket [with the round rubber-bushes] using a 10mm wrench, then tilt the exhaust until both the upward and downward facing studs are free of their brackets and gently lower the exhaust so it is resting on the rear hangers.


6. Lift the rear-silencer up into its recess and remove the two rubber exhaust-hangers from their hooks. [The benefit to removing these last is that the exhaust can be manipulated best to loosen the rubber-hangers, as they are mighty tough to get off.]

7. Lower the complete exhaust to the ground and gently slide it out from the rear of the car.


Removing the Heat-Shielding:

8. Remove the 2 screws holding the o/s of the large centre heat-shield and 1 nut on the n/s, using a 10mm wrench. The heat-shield should drop down easily.


9. There is a smaller heat-shield [in the pic below] to the o/s front of the transmission-tunnel that also needs removing, as it partially covers the bolts for the gearbox-suspension. There is a small 10mm nut at the rear-edge and another hidden where the shield curves down at the front. The third, larger nut at the front is connected through a solid bracket, which is a lot of work to remove and unnecessary - it's best to just bend the heat-shield out of the way or force it from underneath the bracket and make a gap in the ring so it slides back under easily.


Lowering the Propshaft and Removing the Donut:

TIS or the Workshop Manual say to remove the complete propshaft to get at the donut, but this is not necessary - the propshaft can be lowered with the diff end still attached enough to get the donut off without causing any damage so don't worry, there's no need to remove the rear UV-joint or mark any positions.


10. Remove the cross-member bracket, just to the rear of the gearbox-suspension, by unscrewing the 4 bolts with a 13mm wrench.

11. Unscrew the two large counterweight nuts from the gearbox-suspension using a 13mm wrench. The heavy cylindrical one is n/s, the shaped one o/s.

12. Support the gearbox on a jack and lift it slightly so weight is off the dampers.

13. Remove the 4 bolts from the gearbox-suspension mount using a 13mm wrench and work it free of the two studs on the rubber-dampers.

14. Remove the bracket holding the dampers by undoing the 2 nuts on the upper side of the bracket using a 13mm wrench. The nuts only need undoing a few turns and the bracket should slide off its mounts on the gearbox.


15. Remove the 6 nuts and bolts from the front end of the propshaft that connect it to the gearbox, using an 18mm wrench and spanner. [There is a chuck on the end of the propshaft that extends through the donut so there's no need to leave one bolt in to hold it up.]


16. Support the weight of the propshaft and remove the two nuts holding the centre-bearing bracket in place using a 13mm wrench and gently lower the centre of the propshaft, sliding the front end clear of the gearbox as you do so. Once the front end is free, lower the front of the propshaft to the ground so only the rear UV-joint is attached, or suspend the prop from some metal-wire if you're using full-height ramps.

17. Work the rubber-donut off from it's 3 mounting collars on the propshaft using a flathead screwdriver.


Fitting the new Donut:

18. It doesn't matter which way the donut faces, but 3 of the 6 bolt-holes on either side have extended metal collars, which fit into corresponding recesses on the propshaft and gearbox bosses, so these need lining up correctly when replacing the bolts.

19. The tightening torque for the 6 bolts is coming here, but we couldn't get an angle on our torque-wrench in the gap under the car, so we just gave them a good graunch and haven't had any vibrations.

20. Reverse steps 16 to 1.

Thursday, 20 October 2011

BMW Workshop Manuals and TIS System

A neighbor of mine who's owned an R-reg 523i since new has recently been lured into an Audi A5 and called round to give me some manuals had. They're the official BMW workshop manuals and are a good 4" thick. They only cover the 525 - 540 petrol engine models as you can see, but most equipment on the car is universal. I'll post the contents page soon, so shout me if you would like any section scanning in and sending over!


This week I've also managed to get hold of a copy of the complete BMW TIS 2007 software, used by most garages and containing extremely detailed information on just about every repair job, so if you need any screenshots let me know!


I have a much older laptop lying around which should run TIS and also has an old 8-pin serial port so it can interface with Carsoft diagnostic gear. I have a copy of Carsoft to hand, but no hardware and 22-pin connector, so if I can get hold of those then I'll be making a dedicated workshop computer.


Friday, 7 October 2011

E39: Replacing / Unclogging the Washer-Jet Pump

If you think your pump is faulty then check this post first - Windscreen Washer-Jet System Problem.

-----------------------------------------

Removing the pump is easy, but getting to it is quite involved due to the amount of under-car panelling the E39 has.

PROCESS:

1. Jack up the o/s front of the car and detach the plastic mud-guard by removing the 3 hex-head screws that hold it to the wheel-arch. using a 7mm wrench.

2. Lift off the plastic under-tray that sits to the rear of the wheel-arch by removing the 5 plastic-studs around its edge. If you lack a took for pulling out this kind of stud then lever the head of the centre-pin out a few mm with a flathead screwdriver and then slide it clear with pliers. The body of the stud should now slide out easily.

* The car may need lowering to remove the under-tray and re-lifting, as the jacking-point lies in the centre of it.

3. Remove the 7 hex-head screws around the inside of the wheel-arch. as well as two at the leading edge of the under-tray, unseat the inner wheel-arch from around the lip of the wheel-arch itself and pull the plastic inner-arch down out of the way.


* The water-tank for the windscreen and headlight washer-system is located just behind the wheel-arch, below the front of the driver's door. Not the Intensive cleaning-system, which has both the tank and pump under the bonnet.

4. Unplug the wire-connector from the pump in centre of the tank**, by sliding a flat screwdriver into the clip and lifting it upwards.

5. Pull the slim hose-connector clear of the central pump** and allow the tank to drain.

This is a good point to test the washer system one last time to make sure it isn't a blocked hose and the pump is getting no water.

6. Gently twist and pull the pump upwards about an inch out of its mount, then remove the black rubber-bush it sits in.

7. Flush the tank several times by pouring water into the filler-nozzle under the bonnet and allowing it to drain through and clean around the lip of the pump-mount. Check the pump for clogging.

8. Replace the rubber-bush to the tank and, using the new pump if necessary, reverse the procedure.


** The pump in the centre of the tank with the slim hose is for the windscreen washers. The left-hand pump with the larger hose is for the headlight washers.


*** The black connector on the inner corner of the tank is the level-indicator probe. This is also a push fit and the best place to drain from, after removing the wire-connector as above.

Monday, 26 September 2011

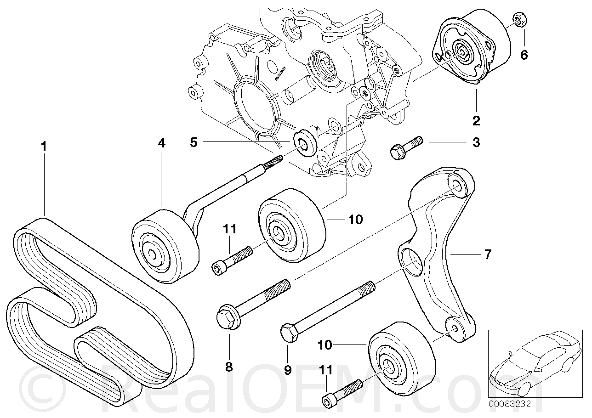
E39 530d: Drive-Belt Bracket snapped!!

How very unfortunate - the bracket holding the guide-pulley for the auxiliary drive-belt has sheared clean in two and rendered the car undriveable!

As I started the car on Friday afternoon there was a crunch from the engine. It started up OK, but the battery warning-light came on and I lost power-steering. Assuming the drive-belt had snapped I ordered a new one and started to take the broken one out, which turned out to be involved in itself as you need to remove the fan-cowl for access, and the fan with it! Once I got to the belt I noticed it hadn't snapped after all, but it would not sit tight around the pulleys.

That's when I noticed a pulley was missing and sure enough there it was lying in the floorpan with the bolt still through it, attached to a torn piece of metal. Worrying that the chunk was part of the block itself I continued to dismantle the front of the engine until I found the culprit. Luckily its a metal dog-leg bracket that bolts on to the engine-block to hold the pulley in place and it unbolted easily enough. I guess the shock of another cold diesel startup made it give way, or the PAS-pump struggled to right the wheels on the gravel I was parked in and put too much strain on the belt.


Either way, it appears to be a common enough fault that new brackets aren't hard to come by - the cheapest and easiest place in this case is, surprisingly, the BMW dealerships themselves. I rang BMW WIlliams in Liverpool this morning, giving the part number (7 in the below diagram) and they said it would need ordering but will arrive this afternoon so fingers crossed as the car is off the road.

I'll get back with the results and a full How-To guide soon!


No.DescriptionSupplementQtyFrom Up To Part Number

01RIBBED V-BELT5 PK X 2063111287787369
02Belt tensioner111282354130
03Torx screw with collarM7X38211517789351
04Adjusting pulley with lever111282354131
05sealing111282247187
06Flange nutM6113537801713
07Bracket111282248561
08Hex bolt with washerM10X70 ZNS3107119903817
09Hex boltM10X125107119900630
10Roll pin211282247435
11Fillister-head screwM8X35 ZNS207119901027

Monday, 19 September 2011

E39 530d: Replacing the Camshaft Position Sensor [M57]

About four months after I bought the car it suddenly refused to start after having been turned off for about 20 minutes, even thought it had started fine on the short trip out. The starter motor was turning but the engine wouldn't fire. It started after about 30 minutes so I assumed it was because the car was low on fuel and the problem didn't return for a number of weeks.

When it eventually became regular I noticed that it only seemed to be when the car was left to cool for a while. The car would start fine from cold every morning or soon after being turned off, but left to cool for half an hour and the engine was dead for, at the very least, 4 or 5 hours.

Asking around on forums brought up several possible culprits - a fuel-pump, most likely the pressure-pump under the passenger seat, low fuel-pressure caused by, at the worst, a cracked injector (gulp), or an engine-position sensor on the camshaft or crank.

After a while we took a guess at it being a sensor, as the car would sometimes start after being rolled a little while in gear, which seemed to rearrange the engine and get the sensor going again. Thankfully I eventually got some diagnostics, which confirmed it was indeed the camshaft-sensor.

It was tricky to diagnose, but if you have the same symptoms then this is the first thing to look at. The replacement sensor I got from eBay wasn't too cheap either at £60, but its a brand new part and guaranteed.

Removing and refitting the sensor couldn't be easier:

1. Remove the beige centre-section of the engine cover by first undoing the single bolt to the rear with an M4 allen-key and then pulling it up towards the front until it comes away from the stud at the front.


2. Unplug the camshaft-sensor by pressing the latch of the clip inwards and sliding the wire-connector off the sensor.

3. Remove the single screw securing the sensor in place using a T10 torx-head wrench.


4. Gently twist and pull the sensor clear of its base on the cylinder-head.

5. Insert the new sensor into the cylinder-head, remembering to replace the old rubber O-ring if it doesn't have a new one fitted, and make sure it is well seated before replacing the torx-head screw.

6. Reverse steps 2 and 1.

Saturday, 17 September 2011

E39: Windscreen Washer-Jet System Problems


I've had a couple of minor faults with the windscreen/headlamp washer jet and they look like they could be common to most E39 models.


1. Disconnected/Broken Nozzle Hose:

Fault Finding: One washer-nozzle is not working at all / only emitting a tiny amount of water, while the other remains functional.

The hoses for the windscreen-washer run up the offside bonnet-hinge and along the back of the bonnet to reach the nozzels. Due to the constrictive nature of the plastic crimp-clips used to hold them in place, the hoses can be stressed while the bonnet is repeatedly opened and shut. This will most likely cause the plastic-connector to become unplugged from the nozzle [as with my car] so it's just a case of snapping the two connectors back together. The hoses could also be caused to split, so if the connectors are still in place then operate the system and check for leaks along the hose. You will probably need a replacement hose if it is split, unless it is near enough to the nozzle to chop off the split section and reseat it. If there is no leak then it is likely that the hose has been crimped shut, so check each plastic crimp-clip attaching it to the bodywork and adjust it so there's no restriction.

If you suspect you have this problem then check it over as soon as possible as there will be water/screenwash pouring down the back of the engine every time you use the washer system!!


2. Blocked / Faulty In-Tank Pump:

Fault finding: Both wash-jets are not emitting water, or emitting a small amount of water then stopping. No sound can be heard from the washer-jet pump, or the pump is very loud and appears to be struggling to get water through.

If there is no sound from the washers then, if the fuse hasn't blown, its likely the pump is dead and needs replacing. If the pump appears to be struggling but not pumping water then first unclip the hose at the join located under the bonnet, half way down the lip of the driver's wing and try the washers. If water isn't getting this far then a blocked hose/nozzle can be ruled out and the pump will need removing and replacing to unblock.