Showing posts with label pump. Show all posts

Monday, 31 May 2021

E30 318i M40: Bosch injectors and tips - checking condition

Next on the agenda to find the culprit of the rough running and stalling idle was to examine the injector condition and the plastic tips. The injector bodies are quite rusty and corroded so they could well be the original set, but on closer inspection the tips are fine and they look to be in pretty good condition, so onwards.

To inspect the injectors the lower inlet manifold will need to be removed, which involves de-plumbing the fuel lines and some of the water hoses. 


Wednesday, 20 May 2020

E46 318i Touring: Oil leak fixed! Rubber rocker-cover gasket was the culprit!

It's about time I got back to wrenching on some Beemers after a busy hiatus, so where better to start than with the massive oil-leak on my E46 318i Touring. The car hasn't seen much use over the winter months, but as I start to need it again for its cavernous load-lugging functions, I figured it was time to spend a bit more time getting it right.

I was going through about a cupful of oil every 100 miles or so (I think that is a pretty favourable estimate to be honest, more like half a litre!) and worse than the cost of all the topping-up, smoke continued to billow from not only the sides of the bonnet (hood) while stopped at traffic-lights, but also straight into the cabin with the blowers turned on. This meant for the last 12 months I have had the climate-control set to full recirculation mode and on low, making de-misting the windscreen a nightmare on colder days.


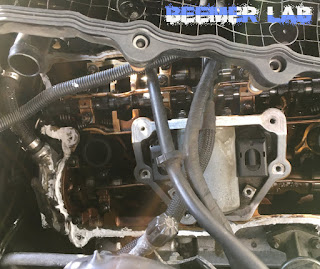
I could see the oil-leak was coming from the rear left side of the engine, as it so often the case with N42 engines and assumed it to be the vacuum-pump (like with my E46 318ci in this this post), but after removing the rocker-cover (cam-cover) I found it was actually the rubber gasket itself. The thick rubber gaskets tend to harden and go brittle over time and almost completely down the left side of the cam-cover there was noticeable leakage, primarily at the back corner, next to the vac-pump of course. The gap at the rear-left corner was so pronounced I feel you could have slipped a credit-card through with a little force and touched the back of the cam-shaft! This was allowing a constant drip of oil out onto the heat-shield and down onto the exhaust-manifold, as shown by the arrows in the picture and causing most, if not all of the smoke.

Luckily, I suppose, I have been working through the Covid epidemic, so I am classed as a 'key worker' and had a day off, so I managed to blag Euro Car Parts that it was essential work and instantly collect the new Elring gasket (£22, but eBay alternatives are as cheap as £9.50 if you can wait!) and some Corteco White instant gasket-sealant (£7), though they still had me waiting for an hour outside!


Knowing how prone the top-end seals of the N42 are to leaks and not wanting to take any chances of removing the rocker-cover again anytime soon, I slapped on a liberal bead of the Corteco sealant over the vacuum-pump ring and along the entire left-side (lower) surface of the cylinder-head top edge along with the new rubber-gasket. The job does not take long at all (I will post a guide soon), with removal and refitting of the cam-cover only taking around 30 minutes each and that's taking your time...

Needless to say, this has stopped the major part of my oil-leak in this area! Not only has the oily steam stopped from the sides of the bonnet while stationary, the smell/smoke from the climate vents has now ceased and the car is no longer consuming oil at a silly rate, so I would say job done! There is still a tiny weep of fresh oil coming from around this area, but nowhere near like before and, after a run where the engine is warm, there is no dripping pool on the under-tray! For the money I spent, the difference in convenience is worth vastly more! I would have spent the ~£30 I did in oil in a couple of weeks using the car daily, so if you have this problem, it's safe to say this is the culprit and get it sorted!

Friday, 18 October 2019

BMW Common Engine/Vanos Error Codes / Fault Codes List 27A0-27FF [E46, E39 etc.]

2711-273F, 2740-2772, 2773-279F, 27A0-27FF, 280A-29FF, 2A01-2CFF, 2D00-2FB7, CD87-CDAC,

27A0 Controll E-box fan
27A1 failure within secondary air system 2
27A2 Temp.sensor engine LR
27A3 CAN timeout HDEV2 SG
27A4 EWS3.3 Schnittstelle EWS-DME
27A6 Ansteuerung Einspritzventil 1
27A7 Ansteuerung Einspritzventil 3
27A8 Ansteuerung Einspritzventil 4
27A9 Ansteuerung Einspritzventil 2
27AA Ansteuerung Einspritzventil
27AB Ansteuerung Einspritzventil
27AC Ansteuerung Einspritzventil
27AD Ansteuerung Einspritzventil
27AE Ansteuerung Einspritzventil
27AF Ansteuerung Einspritzventil
27B0 Ansteuerung Einspritzventil
27B1 Ansteuerung Einspritzventil
27B3 Diagnose DK/HFM adjustment
27B4 Ambient-pressure sensor
27B5 Control inlet-VANOS
27B6 Control inlet-VANOS bank2
27B7 Controll gas pump relay
27B8 Plausibility diff. pressure sensor
27B9 BLS/BTS Plausibility
27BA Output AC-kompr. enable from AC-SG
27BB Camshaft control outlet-VANOS
27BC Camshaft control outlet-VANOS bank2
27BD Control outlet-VANOS
27BE Output outlet-VANOS bank2
27BF Camshaft sensor inlet bank2
27C0 Camshaft sensor outlet bank2
27C1 Master camshaft sensor
27C2 Controll AC-compressor relay
27C3 Signal oil level sensor (TOENS)
27C6 LDP Diagnose 0.5mm leak
27C7 LDP Diagnose 1.0mm leak
27C8 LDP system
27C9 Leak diag. module
27CA Ansteuerung DM-TL Pumpenmotor
27CB DM-TL 0.5mm leak MIL off
27CC DM-TL 1mm & 0.5mm leak
27CD DM-TL module
27CE Load sensor monitoring
27CF Ignition time Cyl.1
27D0 Ignition time Cyl.3
27D1 Ignition time Cyl.4
27D2 Ignition time Cyl.2
27D5 failure within the idle-speed control
27D6 Output idle-speed controller OFF
27D7 Output idle-speed controller ON
27D8 Failure depressure pump
27D9 Output DM-TL heater
27DA generator failure
27DC EWS3.3 Random-code storing
27E1 monitoring pedal-travel sensor
27E2 Knock sensor 1
27E3 knock sensor2 bank1
27E4 Knock sensor 3
27E5 Knock sensor 4
27E6 Knock sensor zero test
27E7 Knock sensor offset
27E8 Knock regulation Test impulse
27E9 Knock sensor zero test bank2
27EA CAN-Timeout HDEV
27EB CAN-Timeout TCU
27EC CAN-Timeout EGS
27ED CAN-Timeout ASC/DSC
27EE CAN-Timeout Instrumentenkombination
27EF CAN ACC-Signalfehler
27F0 Plausibility MSR-control
27F1 Plausibility ACC-control
27F2 Plausibility gas level
27F3 CAN-Timeout VVT-Control unit
27F4 CAN-Timeout VVT-Control-unit bank2
27F5 CAN-Timeout DME-Control unit
27F6 Pedal-travel
27F7 Pedal-travel Poti1
27F8 Pedal-travel Poti2
27F9 Start automatic control
27FA Input starter automatic
27FB Output controlled airflow
27FD Starter automatic
27FE Knock control offset bank2
27FF Knock control test signal bank2

Sunday, 25 February 2018

BMW F10/F11: Clogged/blocked Washer Pump Filter - EASY FIX / FILTER REMOVAL! [E90/E92/F07/F30 etc.]

Windscreen washer jets not working, but the pump can still be heard OK? Then you have a very common case of clogged filter. Due to the supposed inaccessibility of the bottle on later model BMWs I have read stories of high dealer bills, daunting inner-wing removal and even back-feeding the washer-hose with bleach to gradually unblock the gunged up filter... but before you try this read on, as it is an easy fix after all.

GUIDE:

1. Fully turn the steering to the right to give access behind the driver's front wheel to work. [Removing the wheel will give more access but is not necessary.]

2. Remove the 6 screws holding securing the rear half of the felt wheel-arch liner in place using an 8mm socket. This will allow access without removing the arch-liner completely. Four of the screws are located in the wheel well itself and two are located underneath next to the sill.

3. Remove the plastic 'mud-guard' trim on the outside of the wheel-arch that adjoins the felt arch-liner. This is done by pressing the centre-pin of the 3 plastic clips through the clip and then removing the clips with a panel-popper tool. [It may be possible to do the job without removing this trim piece, as the clips are very hard to get out and prone to breaking, but visibility and access are certainly improved].

4. Peel the felt wheel-arch liner out from the rear lip of the wheel-arch and if possible tuck it behind the wheel. The washer-bottle should now be visible to the rear of the front wheel. It sits in a tight gap between the outer and inner wings of the car body itself and access is very limited. [This is unlike E39, E60 etc. where the bottle sits left-to-right across the rear of the wheel-arch and access if much easier!]

5. Remove the windscreen washer hose from where it enters the pump and move it out of the way.


6. Slide a long flat-screwdriver in between the washer-bottle and the outer wing and prize the pump upwards until the spout is clear of the bottle and the pump can wedged up and out of the way.


7. The clogged filter should now be sitting in the washer-bottle where the spout of the pump fits. Use the flat-screwdriver to prize the filter up and out of the bottle. It should now be removable by hand or using long-nose pliers / tweezers.


8. Clean the gauze filter using water and lightly brush it with a sponge-scourer or stiff brush. [I find an old toothbrush works perfectly.] It is likely clogged with a 'gel' like substance that builds up supposedly due to the use of incorrect washer-fluid as well as dirt from the bottom of the tank if the washer has been run without fluid in for a while, but should clean up pretty easily.


9. Carefully slot the filter back into the washer-bottle and press it back into place using long-nose pliers / flat screwdriver or both, making sure it is fully seated.

10. Slide the pump spout back into the filter / washer-bottle, making sure it is fully seated and rotated to the correct position with the spout for the windscreen-hose pointing to the side of the car.

11. Refit the washer-hose, trim, wheel-arch liner and wheel. [Reverse steps 1-5.]


www.e90post.com/forums/showthread.php?t=930107
http://www.bimmerfest.com/forums/showthread.php?t=737416
http://forum.bmw5.co.uk/topic/120732-f10-windscreen-washer-not-working/
http://forum.bmw5.co.uk/topic/124943-f10-washer-problems/

Sunday, 23 August 2015

E60: Blocked Washer-Pump - Quick Fix.

No water from windscreen washer-jets? Chances are it's a blockage in the pump filter. This is not a difficult job, rather a very easy one, so avoid unnecessary cost and fix it quickly yourself.

Check Fuse: 
Fuse 18 is the corresponding fuse. If the washer pump is dead and making no noise then this is the first thing to check. If it is still making a whining noise, then you have a blocked pump-filter.

** The headlamp washer system only functions when the headlights / sidelights are turned on. **

FIX:

Windscreen Washer System:

** The washer bottle is located just in front of the N/S (passenger) wheel-arch liner. The filler-neck is just behind the N/S headlamp and you can see the hose go down into the bodywork and rise up to where the tank is. The tank CANNOT be accessed from above, even when the headlamp is removed. It is much easier to peel the arch-liner back and work from inside the wheel-arch. **

** Obviously water will spill out of the washer bottle so just allow it to drain. **

1. Remove the 3 screws from the N/S/F plastic wheel-arch liner circled in the photo so that it can be peeled back out of the arch rim, one on the near edge, one along the bottom and one by the brake air-duct. It helps to turn the wheel full-lock one way or the other to give more room.

2. Gently pull the washer-jet hose connector off the spout on the side of the windscreen washer-pump. [It's the smaller grey one, furthest away in photo].

3. Reach in and grip the windscreen washer-pump, then gently turn it from side to side while lifting it upwards until the spout on the pump is free of the tank [it may need tilting towards the wheel to get out].

4. Unplug the wire-connector from the pump by depressing the clip on either side and sliding it upwards. The pump can now be removed from inspection if necessary. [Alternatively, leave the wiring connected and place the pump somewhere out of the way].

5. Gently prise the rubber base the pump sits in upwards out of it's collar in the tank, being careful not to detach the plastic-filter from below it and have it drop into the tank.

6. Remove the white plastic filter from the rubber piece and give it a good clean. [It's usually congealed screen-wash clogging it as in the photo, rather than detritus].

7. Refit the plastic filter to the bottom of the rubber base and carefully lower it vertically back into the tank.

8. Refit the pump as a reversal of steps 4 to 1.

Sticky residue wrapped right around the filter-gauze
had stopped flow into the pump completely.


Headlamp Washer System:
The process is the same for the larger headlamp washer pump, though the hose-connector at the bottom in the second photo is sturdier and needs the clip pushing up from undernath to slide the hose off.

Headlamp washer has a much bigger filter, I guess to get more
water into the bigger pump and higher pressure spray.

Monday, 13 October 2014

E60: PAS-Pump + Exhaust Vibration-Damper.

With everything else apparently working, the 530d was still of the road due to the niggling problem of an un-bleedable PAS-system and rattling exhaust.
  • Bleed PAS-system with cap off reservoir and engine off, by turning the wheel lock to lock about 30 times and adding fluid until no more bubbles were coming out.
  • Remove front-bumper and drive back onto ramps.
  • Locate exhaust onto connecting-rods of vibration-damper.
  • Modify connecting-rods to fit new exhaust position.
  • Refit exhaust and reinforcement-plate.
  • Refit engine centre-undertray.
  • Drive off ramps, refit bumper and test drive!
PAS-Pump Bleed:
This is the hardest to bleed PAS-system I have ever come across, though the pipes / pump have been off the car for 3 weeks and could have allowed the system to drain and fill with air more than before. The pump was whining on tickover and making an almighty groan when turned in either direction. The fluid in the reservoir was also frothy white. To fully bleed it required the engine and reservoir cap to be off and the wheel turned full lock left to right about 30 times. To do this I raised the front of the car on axle-stands so the wheels were still touching, but with hardly any weight on them. The first turns lock to lock gulped the remaining fluid right into the system and so much air was coming out I kept re-checking the pipes for a leak. Eventually, the reservoir had swallowed the last of my bottle of fluid and is just about sitting up to the minimum mark, but still bubbles were popping up as the wheel was turned. The lock to lock business continued with me and my dad taking turns for quite some time until there were finally hardly any tiny bubbles rising to the surface. This whole thing was a job in itself, but the pump is very quiet now and the steering assistance is back.

Exhaust Vibration-Damper:
During the first tests there was an almighty rattle from the exhaust from tickover up to about 2k rpm. I assumed this to be because I had left off the exhaust 'vibration-dampers' that brace the bottom of the cat to the gearbox and stop it shaking. I discarded replacing it at first as, if you don't remember exactly the way it all fits together and start bolting your gearbox and exhaust back on willy nilly, then it's impossible to figure out. The long bracket with 3 holes fits around the edge of the gearbox bell-housing, held in by one of the large E14 and two of the smaller E10 Torx-bolts that hold the box to the engine. The connecting-rods then run from the foremost stud on the cat to the N/S stud on the bracket; and from the rearmost stud on the cat to the O/S stud on the bracket, as shown in the picture from TIS. Only trouble was, neither of the rods went anywhere near the brackets. I'm not sure if the entire engine and gearbox is in a slightly different position from before, or it's just the exhaust out of line, or both, but the eyelets on the left-right rod were about 5mm too long for the studs; and the front-rear ones were almost an inch too short. After 2 frustrating hours spent removing mounts and trying to relocate the gearbox / bracket to meet the exhaust I gave up and decided to modify the connecting-rods to fit the new gap lengths. The only remaining way to adjust exhaust position would be to loosen the two nuts holding the cat to the back of the turbo, only to do this requires the rocker-cover / injectors to come back off and I'm not doing that, for now at least.
The modified connecting-rods are below and, due to lack of time, are rather crudely done. I bent the left-right rod down about 3/4" at a steep angle to take 5mm length out of it and help bring it down to the bracket at a flush angle and works rather well. The front-rear was a bit less neatly done and makes use of a piece of 1mm sheet-steel, cut roughly to an inch square and bolted to the rod. It's not the best workaround in the world, but it gets the job done.
After all that, the 'vibration-damper' did not get rid of the rattle! Instead, I traced the annoying noise to the front rubber-mount a bit further down the pipe. The exhaust was banging right into the side of the metal bracket on the gearbox-mount and a bit of fiddling with the adjustable eyelet managed to separate them and killed the rattle dead, so there you go.


Saturday, 27 September 2014

E60: Engine Swap Week - Day 6

  • Replace snapped T-piece on injector leak-off pipes.
  • Torque up crank-pulley and HP-pump.
  • Refit drive-belts.
  • Refit radiators / coolers.
  • Refit headlights and crash bar.
  • Refit slam-panel and grilles / ducts.
  • Plumb cooling, A/C and PAS back in at the front.
  • Loosely refit exhaust and heat-shield.
  • Fill with oil and coolant.
  • Refit ECU and plug loom in.
  • Plug in all wire connectors to engine.
  • Refit fuel-rail and pipes.
  • Refit turbo and exhaust-manifold.
  • Refit rocker-cover and injectors.
  • Refit inlet-manifold.
  • Attempt start!
NOTE: Fasten engine-mount top nuts! Neaten up fuel-rail return pipe!

Well, sadly, it didn't fire right up in the first few tried like last time, but the battery has been sitting for a month and died quickly, so I will charge it overnight and have another crack tomorrow.
  • Check for missing wire-connectors. Crank-sensor?
  • Bleed injectors and check for rail pressure.
  • Flywheel position sensor - is it a different flywheel? Swap to original.
  • Check injector-leads for pulses with multimeter.
  • High-pressure pump - does it need bleeding? Is it working?
  • Is 'Service Due' warning affecting immobiliser?
If all these check out and it still won't go then I will have to get a computer on it and get some fault-codes. I'm back in work next week, without a break, so I should be able to bring the Launch home.

It's been a hella lot of work the last 6 days so it would have been nice to have the engine fire up on the third go like it did when I fitted the new cylinder head, but ah well, I'm full of optimism at the close of today.

Plastic T-piece nozzle snapped off in the injector leak-off hose. Luckily I got fuel pipes with the new engine [even though the pump itself was missing] and didn't have to buy a new one.
From an '03, to an '09 and now back to an '04 - this is the third head in the E60.

Tuesday, 16 September 2014

E46: New secondary air-pump - one last bash...

Thought I would have one ultimate stab at the E46 as it is such a nice car to drive and only let down by shabby bodywork, which I can do something about, and the super low idling problem, which apparently I can't.

I refitted the Vanos-actuator and checked for anything I'd disturbed under the inlet manifold, finding a loose wire connector which I clicked back in, though the CCV was all plumbed up fine. A replacement secondary air-pump and its hose / filter was £30 and the only thing now missing from the inlet arrangement. It took no time to fit, just two 13mm bolts holding it on and swapping the hoses over, but has still, alas, made no difference.


I've spent nearly £300 on parts to cure this engine of its fault, but nothing has done the trick so I guess I will have to call it a day and scrap her after all. Again a shame, as it has 9 months MOT and 4 months tax left on it. The running gear is sound, I sorted the brakes and the engine runs fine when underway, pulling well in all gears over 1500rpm. Handling is as sweet as any E46. The interior and exterior are in terrible nick, but thats nothing that couldn't be sorted with a day or two spent on it. That's only worth doing if the car is useable however, and it sadly isn't.

On top of the impossible low-idling, the handbrake-shoes have collapsed in some way and stick on completely in reverse with the handbrake off. This is probably from being used so much to stop the car while my right foot was still keeping the revs up, but is extra work regardless. A large M12 bolt holding one of the front shock-absorber struts broke while I was attempting to fit the coilovers months ago. I've been driving on it and the strut hasn't moved at all, but it too will need replacing at some point and removing the stud will be interesting. Inside the car, the fan for the heater/blower doesn't work and the driver's door card is missing, meaning no speaker or door handle. Exiting the car with dignity can only be done by lowering the window and reaching out for the other handle, but all these foibles I rather liked. Using it every day was a nightmare though and, with the 5-Series engine swap underway I just won't have the time and money to restore it, so I'm hoping I can get the £200 I paid for it back from a breaker. That means I'm down about £300 on the whole deal. I could make the £500 back and probably more by breaking the car, but I could really do with it out of the way quickly now so a loss it may have to be.

Sunday, 20 July 2014

E46: Brakes + oil leak sorted - still running rough!

Wednesday 16/7/14:

Replaced vacuum-pump.
Replaced both camshaft-sensors.
Replaced MAF sensor.

Well, I'm certainly glad to report that the oil gushing onto the exhaust / cat has stopped with the replacement of the blown up vac-pump and I now have good pedal feel and stoppage. Sadly, even the return of some vacuum isn't enough to cure the low-idle and rough running. I replaced the obvious things, both cam sensors and the mass-airflow meter, but this hasn't sorted it either. I'm guessing there is either a severe vacuum / vent problem, or it's going to be to g related... Oh joy!

The diagnosis will go as follows:

Remove and fully check out inlet manifold.
Thoroughly check all CCV lines and the valve.
Clean and check all electrical connections.
Test for compression.
Move on to timing.

Other jobs:

Adjust handbrake and refit discs.
Fibreglass fill n/s/r wheel arch.
Check squeaky ABS sensor.

Monday, 14 July 2014

E46: Vacuum-pump severe failure...

With a new servo and master-cylinder, but still no brake assistance, I decided the vacuum-pump must be leaking air. I whipped it off, only 3 bolts and no need to remove rocker-cover etc., and opened it up. This is what I found...

This chamber should be full of air, not oil. The pump bolts on to the back end of one camshaft, which turns a spinning-boss. A plastic-bar slides up and down in the spinning-boss and creates a constant vacuum into the servo to help 'suck' the brake-pedal down when you brake. My plastic bar is missing. Where is it? Well, it's smashed into pieces lying in the oil.
After a clean up it was a decent pump-body and would work fine with a new O-ring and plastic-bar. They sell O-ring kits for the N42 vac-pump separately, but plastic-bars they do not, so I bought the pump from the same donor car as the servo + M/C. All pieces seem to have sheared off with a clean break, the bar was literally blown apart, except for one of the round end-caps (the tiny piece in the middle of the pile in the photo). That had been spread into thin strips as it broke off, so it looks like that end contacted the side of the case, spread into fronds and jammed the plastic-bar, which promptly blew up. How though? Did the timing slip unbalance the camshaft enough to wreck the pump? Or did the plastic-bar break apart and jam the pump, causing the camshaft to stop briefly and the timing to slip in the first place? Hmm...
Another side effect of the vac-pump failing was a terrific oil leak. The O-ring seal had gone completely and the spinning-boss was acting like a mini oil-pump, sending a constant stream down the back of the head onto the hot exhaust [bottom of the pic]. The pressure also made the vacuum-hose connector, normally only filled with air, to leak at the jubilee clip and pour oil onto the gearbox-housing [middle of pic]. After removing the pump a huge third pool of oil arrived. This was what had run out of the vacuum-hose to the brake-servo after disconnecting.

Friday, 7 October 2011

E39: Replacing / Unclogging the Washer-Jet Pump

If you think your pump is faulty then check this post first - Windscreen Washer-Jet System Problem.

-----------------------------------------

Removing the pump is easy, but getting to it is quite involved due to the amount of under-car panelling the E39 has.

PROCESS:

1. Jack up the o/s front of the car and detach the plastic mud-guard by removing the 3 hex-head screws that hold it to the wheel-arch. using a 7mm wrench.

2. Lift off the plastic under-tray that sits to the rear of the wheel-arch by removing the 5 plastic-studs around its edge. If you lack a took for pulling out this kind of stud then lever the head of the centre-pin out a few mm with a flathead screwdriver and then slide it clear with pliers. The body of the stud should now slide out easily.

* The car may need lowering to remove the under-tray and re-lifting, as the jacking-point lies in the centre of it.

3. Remove the 7 hex-head screws around the inside of the wheel-arch. as well as two at the leading edge of the under-tray, unseat the inner wheel-arch from around the lip of the wheel-arch itself and pull the plastic inner-arch down out of the way.


* The water-tank for the windscreen and headlight washer-system is located just behind the wheel-arch, below the front of the driver's door. Not the Intensive cleaning-system, which has both the tank and pump under the bonnet.

4. Unplug the wire-connector from the pump in centre of the tank**, by sliding a flat screwdriver into the clip and lifting it upwards.

5. Pull the slim hose-connector clear of the central pump** and allow the tank to drain.

This is a good point to test the washer system one last time to make sure it isn't a blocked hose and the pump is getting no water.

6. Gently twist and pull the pump upwards about an inch out of its mount, then remove the black rubber-bush it sits in.

7. Flush the tank several times by pouring water into the filler-nozzle under the bonnet and allowing it to drain through and clean around the lip of the pump-mount. Check the pump for clogging.

8. Replace the rubber-bush to the tank and, using the new pump if necessary, reverse the procedure.


** The pump in the centre of the tank with the slim hose is for the windscreen washers. The left-hand pump with the larger hose is for the headlight washers.


*** The black connector on the inner corner of the tank is the level-indicator probe. This is also a push fit and the best place to drain from, after removing the wire-connector as above.

Thursday, 2 June 2011

E39 530d: Fuel Boost Pump Problems


Symptoms:

The car refuses to start.

There is a loss of power when driving, particularly common while going uphill.

The engine is losing revs and stalling.


No.DescriptionSupplementQtyFrom Up To Part NumberPriceNotes
01Rear fuel pipe105/200116121184768
02Rear fuel pipe105/200116121184768
03FRONT FUEL RETURN LINEI105/200116121184777
04FRONT FUEL FEED LINE105/200116121184774
05FRONT FUEL RETURN LINEII105/200116121184780
06DISTRIBUTION PIECE105/200116121184632
07Fuel hose8X13MM?05/200113537563456$44.77
Rape methyl ester capability (RME)
08Hose clampL12-15?05/200107129952104$1.18
09Diesel pump105/200116126756157$363.20
For vehicles with
Rape methyl ester version (RME)

S201A=Yes
09Diesel pump105/200116126756157$363.20
10BRACKET FUEL STRAINERD=55MM105/200113321702583$16.33
11Fillister head with washerM6X25-Z1105/200107119920161$0.38
12Vent pipe105/200116111183301$20.23
13Fuel pipe105/200116111183297$19.50
14Universal socket housing uncoded2 POL.161138373332$2.70
only in conjunction with
--Socket contact ELO-Power 2,8x0,630,5-1,0 MM²261138364832$0.35


Items pictured but not listed are not installed on your vehicle.Notes

  • Items pictured without a number are listed on another diagram.