http://blog.obdii365.com/2017/02/09/set-up-inpa-for-bmw-f-series-coding/
This guy's blog has a great download for a fully working, easy to install / update INPA 5.06 to work with Fxx Series BMWs and ENET to OBD2 cable, so get it while the links are still active!
DOING A FRESH INSTALL:
The guide covers an 'Easy-Install' tool, so if you are doing a new install from the word go, then follow the instructions on obdii365.com and go from there. I haven't tried to confirm it is indeed easy and works, but evidently other people have.
Updating a current version of INPA:
If you already have an older version of INPA up and running, then updating to 5.06 could not be simpler, but it is not quite explained in the obdii365 guide, so follow as below. This assumes you are switching to an OBD-ENET type cable.
1. Locate your INPA and EDIABAS folders; they are in the same place. (C:\...\INPA) (C:\...\EDIABAS)
2. Copy the folder named INPA_Fxx_v.2 from the download into the same location as your existing INPA folder.
3. Rename your original INPA folder if you wish to keep it or delete the folder.
4. Rename the INPA_Fxx_v.2 folder to INPA.
5. Copy the EDIABAS folder from the download into the same location as your existing EDIABAS folder, selecting 'Yes to All' to overwrite any existing files of the same name.
That's it... your INPA will now work with Fxx Series cars. The EDIABAS.ini configuration file is already set for ENET, so just plug it into your OBD port and wait about 30 seconds for a network address to be assigned. Once you get the 'Limited or No Connectivity' message pop-up you can open INPA as normal and should see the Battery and Ignition dots filled.
USING AN OBD-USB K-CAN CABLE:
An OBD-USB K-CAN cable can be used with Fxx-Series cars, but only to read and erase fault-codes. Coding is not possible without an OBD-ENET cable.
To use the update method above and retain settings for OBD cable, make a copy of your original EDIABAS.ini configuration file and merge it into the new EDIABAS/Bin/ folder. Alternatively, re-adjust the settings for OBD after the update, which is the best option if you can be bothered.
|
|
Showing posts with label install. Show all posts
Showing posts with label install. Show all posts
Saturday, 16 March 2019
Sunday, 4 November 2018
DIS v57 + INPA / EDIABAS 6.4.3 Installation + Guide
Download Links [MediaFire]:
BMW INPA / EDIABAS 6.4.3 + Install Files etc. [1.1GB]
BMW DIS v57 / SSS v32 Installer Files [6.7GB]
**You will need BOTH parts to fully install DIS v57**
You will need a laptop with USB running Windows XP or Windows 7.
You will need a USB-OBD cable optimised for post-2005 BMWs. An older cable can be modified by removing the solder-bridge between OBD pins 7 and 8 - a guide is here.
GUIDE:
Unpacking Files:
- Unpack the 2 .rar files into a new folder.
- Where the contained instruction file mentions unpacking files from CD1 and CD2, all the .rar files for both CDs are contained in the one 6.7GB download.
Installation:
- If upgrading from DIS v44, install the files into the same folder and overwrite existing files.
- The instructions cover Windows XP, but files for Windows 7 and 64-bit, along with instructions for that are provided in a folder marked OTHER.
Further installation and troubleshooting instructions [getting the virtual machine / network bridge / ports etc. working] can be found in my prior DIS v44 guide: HERE.


Saturday, 25 July 2015
Working DIS v44 Installation Simple Guide + Downloads
Here is a new post with a download and brief guide for DIS v57 / SSS v32 to work with BMW models up to 2010 and a newer version of INPA working with model up to 2013 - http://www.beemerlab.org/2018/11/dis-v57-inpa-ediabas-643-installation.html.
*EDIT 7 May 2018:
OK, thank you everyone who left a comment, I am glad so many people have found this guide helpful. Due to the high volume of traffic and unreliability of the DropBox links, I have finally added the files to MediaFire and Google Drive.
NEW USERS:
This is a guide on how to install DIS using the instructions that come in the .zip files, not a detailed guide. The complete procedure to install DIS is quite complicated and has so many variations that will end up with it not working or need the whole thing installing again to change, so follow through them as per the guide below and you should get it going, as many others have.
Read the troubleshooting section at the bottom, particularly the first part. The Windows install on some laptops simply will not work with the virtual networking needed to set DIS up and/or routing of the COM ports, yet another laptop running the same Windows version will work fine. If you find yourself unable to complete the installation or connect the hardware as shown below after a few tries, switch to another laptop or do a fresh install of Windows.

GUIDE:
You will need:
 To run DIS / test connection:
 Troubleshooting:
Download Links [Dropbox]:
- INPA, Ediabas, NCS Expert, EA80X, etc. 619.45MB
- easyDIS, DIS Programs, Diag Head Emulator, VM Ware, etc. 1.48GB
*NEW* Download Links [MediaFire]:
- INPA, Ediabas, NCS Expert, EA80X, etc. MediaFire 619.45MB
- easyDIS, DIS Programs, Diag Head Emulator, VM Ware, etc. MediaFire 1.48GB
*EDIT 7 May 2018:
OK, thank you everyone who left a comment, I am glad so many people have found this guide helpful. Due to the high volume of traffic and unreliability of the DropBox links, I have finally added the files to MediaFire and Google Drive.
NEW USERS:
This is a guide on how to install DIS using the instructions that come in the .zip files, not a detailed guide. The complete procedure to install DIS is quite complicated and has so many variations that will end up with it not working or need the whole thing installing again to change, so follow through them as per the guide below and you should get it going, as many others have.
Read the troubleshooting section at the bottom, particularly the first part. The Windows install on some laptops simply will not work with the virtual networking needed to set DIS up and/or routing of the COM ports, yet another laptop running the same Windows version will work fine. If you find yourself unable to complete the installation or connect the hardware as shown below after a few tries, switch to another laptop or do a fresh install of Windows.

GUIDE:
You will need:
- A laptop running Windows, preferably XP SP2.
- A USB-OBD cable (or a serial-OBD cable if your laptop has a serial port).
- INPA / EDIABAS.
- VM Ware version 5.5 or later.
- EasyDIS.iso and DIS_v44_programs.iso.
- Diag Head Emulator.
Installation procedure that worked for me: [Obviously refer to the installation guides / videos for detailed instructions.]
- Disable Windows Firewall and Anti Virus.
- Install drivers for your USB-OBD cable and USB-serial adapter, making sure it is set as port COM1.
- Install / update INPA / EDIABAS, using ADS interface, not OBD.
- Change environment path in Windows to c:/ediabas/bin.
- Install ADS Setup.
- Install OBD setup.
- Edit ediabas.ini, change remote-host and port.
- Install VM Ware [version 5.5 or higher].
- Edit VM Ware network bridge in network editor.
- Set up the new virtual machine with ethernet set to the network bridge.
- Install Diag Head Emulator.
- Install easy_DIS and the DIS programs.
- Load DIS, open/run Diag Head and open IFHsrv32.exe.
- In DIS, enter Administration > Calibrating Touch Shield, change the processes to off and make sure it passes the API test.
- Enter Administration > Diagnostic Head, click on the IP-address / computer-name and click the OK button.
- Enter Administration > Connection Setup, click on the IP-address / computer-name and click Connecting. Once connected the IP-address should appear in the bottom right and both sets of lights are lit up.
- Go back into Administration > Calibrating Touch Shield, set the vm process back to off and change translator to Fister.
- Edit ediabas.ini again, changing the interface to STD:OBD instead of ADS.

- Connect cable to OBD socket on car and turn ignition to phase-2.
- Load up INPA (.ipo), check the Battery and Ignition dots are black.
- Close INPA, but leave EDIABAS Server running in task-bar.
- Start DIS and wait for it to fully load.
- Load up Diag Head and click run.
- Load up IFHsrv32.exe.
- Enter Administration > Calibrating Touch Shield in DIS.
- Perform API-test, check it passes, exit back to DIS.
- Click on Diagnosis and DIS should now identify your car / carry out the short-test.

- If you have access to more than one laptop, try installing DIS again on one of them, rather than wasting days on a problematic install. Some just don't want to work with virtual networking, but will probably work first time on another, similar laptop. [Reformatting the HDD and doing a fresh install of Windows XP SP2 may also fix the problem on a machine that will just not play ball.]
- If API-test fails - Check ediabas.ini has the right remote-host and port set / check VM network settings / try out this fix by changing addresses in Unix itself [] / ensure firewall is off and re-install DIS.
- If API-test passes, but DIS does not communicate - Check INPA is communicating and reboot DIS / check ediabas.ini has interface set to STD:OBD / check USB-serial port is set as COM1.
- DIS ERROR 200.19 - Battery is below 12v, connect a float-charger / check IP address is right for Diagnostic Head in DIS, Admin / check API-test passes.
- INPA ERROR IFS-0009 - Ensure USB-serial port is set as COM1 / check ediabas.ini has interface set to STD:OBD / make sure cable is working and fuse 25 has not blown.
Saturday, 19 July 2014
E60 530d: Swirl-Flap Blanking Plates
If you have a BMW with swirl-flaps, get them out ASAP. We all hear horror stories about swirl-flap failure and just how bad they are, but I had no idea they can wreck your engine so quickly and overlooked the advice. This I have lived to regret, as have a thousand others. Just one flap breaking loose, as in my case, and being sucked into the engine does all that damage. Do yourself a favour if you have 100k on the clock and fit blanking plates. Some say the engine won't run properly without the flaps, but I am assured it will and for a lot longer. All the swirl-flap is designed to do is to dump air into the engine when the inlet-pressure is reduced and soot would normally be dominant. In other words, it reduces the little puffs of black smoke on harsh gear changes. The car will still pass MOT and won't use any extra fuel.
I got some aluminium ones off eBay, they were £20.99 delivered for a set of 6, sets of 4 are even less.
My late-2003 M57N 530d has the earlier 22mm swirl-flaps and so should most 4 and 6 cylinder diesels up to about 2006. Revised M57N should have the beefier 33mm flaps, but after 2010 the swirl-flaps are removed from the inlet and redesigned entirely. Hmm, I'm amazed it took them so long. The actual specific size of swirl-flaps in BMW diesels from 2003-2010 varies wildly it would seem, so the only way to know for sure which ones you have before buying is to remove the inlet-manifold and measure them.
SIZE refers to the diameter of the hole that the swirl-flap fits into, not the length of the flap in the inlet port!
FITMENT:
1. Remove inlet-manifold.
2. Remove the two screws holding the swirl-flap diaphragm on the underside of the manifold using a T20 Torx socket.
3. Slide the metal-rod clear of the swirl-flap levers and remove it with the diaphragm.
4. Remove the two screws holding each swirl-flap in place using a T20 Torx socket.
5. Remove the swirl-flaps by prising either side evenly with a flat-screwdriver until it pops from the seal and can be lifted out.
6. Fit the swirl flap blanks into the holes and pop them down into the seal - they should self-align.
7. Replace the twelve T20 Torx screws to the blanking-plates.
8. Unfasten the extended part of the lever-arm that joins the swirl-flap diaphragm to the metal rod and remove it along with the rod.
9. Refit the diaphragm to the inlet-manifold with the two T20 Torx screws.
10. Replace inlet-manifold.
Sunday, 13 April 2014
E60: Unbearable rattle with new Alpine install + shonky fix.
No sooner have I got the Alpine install sounding heavy in the E60, it shakes some trim loose and begins to cause the world's most annoying rattle. At first it was barely audible and only at high volume. Now it's all the time and louder than ever, all music and even low volume.
It turned about to be the plastic trim-panel behind the centre arm-rest. I've stuck some foam-sponge into the gaps around it for now and hopefully this will help, but it will need something more like Dynamat at some point.
The low-end rumble produced by the E60s stock-subs, amplified again through the Alpines is shaking panels loose on a very well built car. There is a 22mm thick carpeted MDF panel behind the rear-seats that forms the back of the boot and the front-facing subs are driving straight into it, which already muffles the bass considerably and gives vibration in the cabin. I have read posts where large holes are cut into the MDF in front of each sub to get the bass through, but I can't see that helping vibration and and am reluctant to cut the panel yet. Turning the subs to face away from the rear-seats might help the vibration but I doubt it'll make the bass sound any cleaner and am loathe to expose the sub-cones to loose luggage and lose space by bringing the amp / x-over out onto the boot floor. Again, some sort of sound-matting such as Dynamat will need fitting around the boot and between the rear-seats and parcel-shelf to iron out the remaining hum. As for getting more bass through, the best quick advice would be to open or remove the 'ski-hatch' if your E60 has one, sadly mine does not.
The optimal settings I've got so far since taking RCA-feed from the stock-subs is to have the iDrive bass set to +3 or 4 and the X-over on less than a quarter gain, as the low-end frequencies are just so loud on the Alpines. The low-mid frequencies don't really get to the subs at all though and this where the stock-system needs to take over, but turning the bass over halfway on the iDrive is over-driving the subs and there's no choice but to keep turning down the x-over gain. Hopefully I can turn the x-over back up a bit again now the rattle is sorted.
Saturday, 15 March 2014
E60 Audio: Getting a Bass RCA (Audio) feed from the Stock-Subs.
If you want an aftermarket amp + subs in the boot then you need an RCA-feed and tapping into the rear speaker-wires does not work on the E60 and other iDrive BMWs as it does on the E39, E46 etc. All US E60s and others with factory-upgraded sound-systems have two subs under the front seats run by a stock-amp in the boot, on the left-hand suspension turret behind the panel. If you have this see this guide on //// to tap into the wires on the stock-amp.
Most non-US cars don't have a built-in amplifier in the boot, but they still have subwoofers under the front seats. These are driven by the head-unit and the EQ sends a different set of frequencies to each set of speakers. [See: http://musicarnw.com/bmw-factory-audio-explained/]. The rear speakers are only 4" so they don't get much low-end at all. To get proper bass it's worth going the extra mile and running cables all the way to the stock-subs, which get the real low-range frequencies.
** NB: This is to fit subwoofers on a bass-only channel. If you are fitting component speakers or 6x9s then you will need a broader range of frequencies and are better to tap the rear speaker-wires, covered in THIS POST, which is a lot easier. **
PROCESS:
 Getting to the sub-wires is quite involved, but not difficult if you have the right tools. There is a + and - wire to each sub, so two new speaker-wires will need running either side. I used one length of twin-core 1.5mm wire on each sub, about 6 feet of wire is plenty.
1. Slide the seat all the way back and remove the plastic caps from the front of the runners.
2. Remove the two bolts from the front of the runners using a T50 Torx-head wrench.
3. Slide the seat all the way forward and remove the two bolts holding the rear of the runners using a T50 Torx-head wrench.
4. Lift the seat up. tilt it back out of the way and prop it up.
5. Remove the four crosshead screws from the plastic-grille above the sub and lift it off.
6. Move the carpet on the door-sill out of the way and cut the fabric-tape binding the wires going to the sub together so they can be pulled apart.
7. Splice your new speaker-wires into the wires going to the sub as pictured below. O/S - Red/Blue for [+] and White/Brown for [-]. N/S - Red/White [+] and Brown/Yellow [-]. [Soldering would be the best way, but I just went for the quick and easy Scotch-lock way again].


 8. Run the new speaker-wires out from under the carpet and
along underneath the door-sill trim, up the side of the back seat and along the top of the back seat to the middle.
9. Lower the centre arm-rest and remove the plastic-trim panel from behind it by pulling out the two push-clips from the lower edge and working it off.
10. Thread the new speaker-wires down behind the back-seat at the centre. Be sure to thread the wires just behind the seat-back, but not down against the parcel-shelf, which ends at an annoying ledge. If you see the wire passing down behind the small round hole near the top of the seat-back behind the arm-rest then your on the right route.
11. Inside the boot the new speaker-wires should be seen poking down into the boot, or if it isn't you should be able to reach under the lip at the back of the boot and pull it down.
12. Install the four wires to your amplifier either directly by adding red/white RCA-type connectors to them, or via a crossover-box, which is the better method. Fitting a crossover is covered in THIS POST.
Most non-US cars don't have a built-in amplifier in the boot, but they still have subwoofers under the front seats. These are driven by the head-unit and the EQ sends a different set of frequencies to each set of speakers. [See: http://musicarnw.com/bmw-factory-audio-explained/]. The rear speakers are only 4" so they don't get much low-end at all. To get proper bass it's worth going the extra mile and running cables all the way to the stock-subs, which get the real low-range frequencies.
** NB: This is to fit subwoofers on a bass-only channel. If you are fitting component speakers or 6x9s then you will need a broader range of frequencies and are better to tap the rear speaker-wires, covered in THIS POST, which is a lot easier. **
PROCESS:
1. Slide the seat all the way back and remove the plastic caps from the front of the runners.
2. Remove the two bolts from the front of the runners using a T50 Torx-head wrench.
3. Slide the seat all the way forward and remove the two bolts holding the rear of the runners using a T50 Torx-head wrench.
4. Lift the seat up. tilt it back out of the way and prop it up.
5. Remove the four crosshead screws from the plastic-grille above the sub and lift it off.
6. Move the carpet on the door-sill out of the way and cut the fabric-tape binding the wires going to the sub together so they can be pulled apart.
7. Splice your new speaker-wires into the wires going to the sub as pictured below. O/S - Red/Blue for [+] and White/Brown for [-]. N/S - Red/White [+] and Brown/Yellow [-]. [Soldering would be the best way, but I just went for the quick and easy Scotch-lock way again].
8. Run the new speaker-wires out from under the carpet and along underneath the door-sill trim, up the side of the back seat and along the top of the back seat to the middle.
9. Lower the centre arm-rest and remove the plastic-trim panel from behind it by pulling out the two push-clips from the lower edge and working it off.
10. Thread the new speaker-wires down behind the back-seat at the centre. Be sure to thread the wires just behind the seat-back, but not down against the parcel-shelf, which ends at an annoying ledge. If you see the wire passing down behind the small round hole near the top of the seat-back behind the arm-rest then your on the right route.
11. Inside the boot the new speaker-wires should be seen poking down into the boot, or if it isn't you should be able to reach under the lip at the back of the boot and pull it down.
12. Install the four wires to your amplifier either directly by adding red/white RCA-type connectors to them, or via a crossover-box, which is the better method. Fitting a crossover is covered in THIS POST.
Friday, 14 March 2014
E60 Audio: RCA Feed from Rear Speakers - quick n dirty guide.
**Caution: This guide is for fitting extra component/coaxial speakers and is NOT suitable for fitting subs as the rear-speakers receive no low-end frequencies. If you are fitting subs then see THIS GUIDE on getting bass-RCA from the stock-subs.
This guide covers a very quick and easy way to get an RCA-feed into the boot on your BMW E60 and other iDrive models. This method is only suitable if you are fitting extra component or coaxial speakers [inc. 6x9s etc.] where the range of frequencies handled by the rear speaker-EQ are required.
PROCESS:
** If you are fitting extra component/coaxial speakers then adding a crossover-box to the RCA-feed before the amp should not be necessary. If you intend to use a crossover, substitute the 4 wires of the Red/White RCA-cable in this guide for 4 lengths of normal wire and see THIS GUIDE on how to install it.
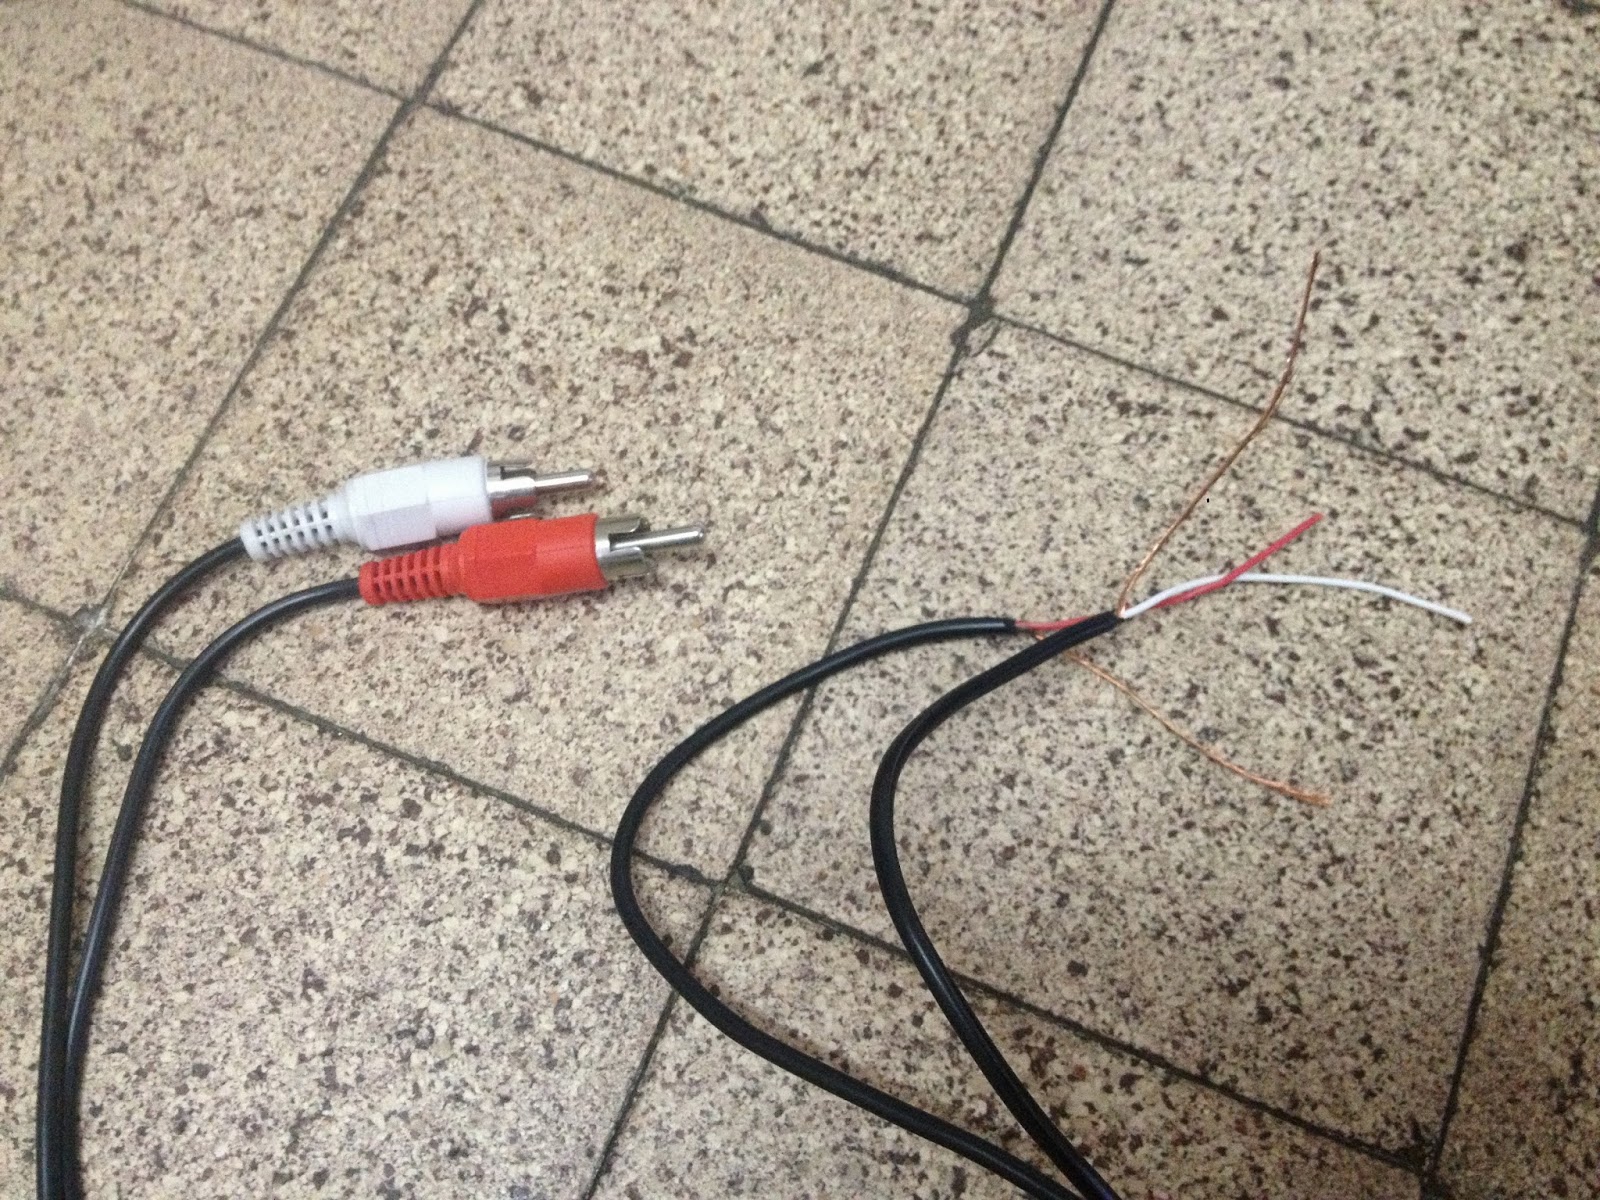
1. Take a normal Red/White stereo RCA-cable, cut both plugs off from one end and separate the two wires down most of its length. An RCA-cable of about 4 feet should be plenty to reach up to both rear-speakers.
2. Carefully unwind the earth-wire from around each coated-wire and twist them off, so each of the coaxial RCA-wires is now split into two, as shown.

4. Gently prise off each rear-speaker grille using a flathead screwdriver, starting at the front edge.
5. Remove the 3 screws holding each rear-speaker using a T20 Torx-head wrench/driver, then lift out and unplug both speakers.
6. From inside the boot, light can be seen coming in through the empty speaker-recesses. Route one cut end of the RCA-cable up into each speaker-recess. They should easily be reached now from the parcel-shelf.
7. Splice the coated live-wire of the RCA-cable to the + speaker-wire on each side and the bare earth-wire to the - speaker-wires. The colours are as follows:
O/S - Yellow/Black +, Yellow/Brown -.
N/S - Black/Red +, Black/Purple -.


8. Push the wires down into the parcel-shelf and replace the speakers/grilles.
Done in 5 minutes!

PROCESS:
** If you are fitting extra component/coaxial speakers then adding a crossover-box to the RCA-feed before the amp should not be necessary. If you intend to use a crossover, substitute the 4 wires of the Red/White RCA-cable in this guide for 4 lengths of normal wire and see THIS GUIDE on how to install it.
1. Take a normal Red/White stereo RCA-cable, cut both plugs off from one end and separate the two wires down most of its length. An RCA-cable of about 4 feet should be plenty to reach up to both rear-speakers.
2. Carefully unwind the earth-wire from around each coated-wire and twist them off, so each of the coaxial RCA-wires is now split into two, as shown.
3. Bend each of the four wires over about 5mm from the end and completely sheathe the two bare earth-wires up to here, so they are well separated from the red/white live wires, as shown.
4. Gently prise off each rear-speaker grille using a flathead screwdriver, starting at the front edge.
5. Remove the 3 screws holding each rear-speaker using a T20 Torx-head wrench/driver, then lift out and unplug both speakers.
6. From inside the boot, light can be seen coming in through the empty speaker-recesses. Route one cut end of the RCA-cable up into each speaker-recess. They should easily be reached now from the parcel-shelf.
7. Splice the coated live-wire of the RCA-cable to the + speaker-wire on each side and the bare earth-wire to the - speaker-wires. The colours are as follows:
O/S - Yellow/Black +, Yellow/Brown -.
N/S - Black/Red +, Black/Purple -.
8. Push the wires down into the parcel-shelf and replace the speakers/grilles.
Done in 5 minutes!
Sunday, 9 March 2014
Another subs/amp issue - not enough low-end getting through.
The plot thickens with my aftermarket subs and amp install. Following the addition of a crossover between the rear-speakers and amp RCA-input I'm definitely getting cleaner bass, but the really low-end frequencies don't seem to be present at all. I doubt the crossover can't handle the frequencies and I know the amp can, so this leads to me think the frequencies are being cut out before getting to the rear-speakers.
One US forum says low-end frequencies are cut from all but the stock amp in the boot and subs under the front-seats. Today I got 2 screws out of the plastic-grille under the passenger seat and bent it back to see a flat type subwoofer under it with the magnet facing upwards. Still, there is no stock amp present at either side of my boot. To get a definitive answer I started a thread on BMW-Land - http://www.bmwland.co.uk/forums/viewtopic.php?f=5&t=159000.
Turns out all E60s do have the stock subs under the front-seats, but if you don't have the amp they are controlled from the head-unit as well. Patching into the wiring to these could be the solution to getting the proper bass I'm after, but it will involve undoing the rear speaker splice and running the wires through to under the front-seat, so will have to wait for the time being.
http://musicarnw.com/bmw-factory-audio-explained/ - yep, seems to be the case, rear-speakers are EQ'd to high and mid frequencies only.
http://forums.5series.net/diy-do-yourself-14/add-subwoofer-e60-models-without-amp-trunk-121323/ - here is a good guide on how to tap into the sub-woofer wires, but it involved removing the front seats.
E60 Audio: TSK TD-22 Speaker Level Converter (X-Over) - How to fit.
If you're running an external amp using the audio feed from your rear speakers then you will be getting the full range of frequencies through your subs. An after-market head-unit with an RCA output, or some amps, will have a x-over built in that can be set to only allow bass frequencies through. If your amp doesn't have one and you don't want the subs to sound awful with your BMW's stock system, an external x-over block is what you need.


In my case, the Alpine V12 1kW amp I'm now using has no Gain (volume) control either, so the addition of a x-over means I can turn down the booming subs without affecting bass going to the stock speakers. The cheaper Toxic 1kW amp I was using in the E39 had both gain control and a built-in x-over, so I could run the subs in balance with my system. Sadly, the 4-chan Toxic amp was never loud enough and any attempt to turn it up would cause the car's whole sound system to trip-out, which I cover in this post, and this really doesn't work in an E60 so it's high time I got around to sorting the matched Alpine amp.
X-over blocks used to be large, expensive things used only by pro's and had more controls than the head-unit itself. Now however, there are loads of smaller blocks available, many designed just to convert a speaker-feed into low-freq RCA. I went for the most popular unit amongst the BMW forum guys, a T.S.K TD-22. Not sure if they're all made by one supplier, but these same looking kits can be bought almost anywhere - I got mine off eBay of course, a snip at £5.95 delivered.
The instructions are a little vague to say the least and mainly in Chinese and broken English, I have written them out in THIS POST on Panabloga, but here is a better version:
Red: 12v Switched - The x-over needs its own power that turns off with the ignition.
Blue: Remote on/off - Tells the x-over to turn on only when the amp is powered up.
Black: Ground - Connect to earth.
Grey: Right speaker + wire.
Grey / Black: Right speaker - wire.
White: Left speaker + wire.
White / Black: Left speaker - wire.
I joined the red and blue wires together and crimped them both into the amp remote wire coming from the cigar lighter, which is 12v anyway. I cover fitting that in THIS POST. I extended the Ground wire and earthed it to the same place on the body as the amp, rather than into the GND socket on the amp itself as suggested. The speaker wires are pretty short and the only place a +/- audio-feed can be drawn from is where the wires go to the speakers themselves at either side of the parcel-shelf, so I extended both of these into the boot and mounted the x-over block next to the amp on the sub-box.


Saturday, 8 March 2014
E60 Audio: Fitting an On/Off Switch for the Amp/Subs.
Even though my amp and subs turn off with the ignition I like to have a separate switch somewhere so they can be turned off manually when I don't want them on.
I fitted it at the back of the coin-tray in the centre of the dash so it's invisible and causes the least damage to the fascia, plus I plan to fit an aux. in there at some point too. This also keeps the extra-wiring needed to a minimum - I just snipped the remote-wire coming from the cigar-lighter and connected it to the back of the switch with two female-spade crimp-connectors.
I did this while the trim and fascia were removed during the remote-wire fitting in THIS POST.
E60 Audio: Getting A Remote On/Off Signal from the 12v adapter.
The amp and subs need a remote-signal to tell them to switch off with the ignition. BMWs fitted with iDrive have a 16-minute shutdown sequence on most of the car's electrical equipment. This means that a 5-12v remote-signal cannot be taken from any of the wires at the rear of the car, such as the parking-sensors on the E39 or E46. With iDrive they will keep the amp turned on and draining the battery for quarter of an hour every time you turn the key.
The only viable option and the most popular online is to take the remote-signal from the 12v adapter / cigar-lighter in the dash, which shuts down straight away. It's a fiddly setup with a spring, so to avoid wrecking the sliding ash-tray mechanism it's best to remove the whole centre-console as one piece and quite a bit of dash and trim has to be removed to do this. With the battery and audio-feed already in the boot, this is the longest and most involved part of the whole job, but a lot less difficult than I imagined.
You will need a good length of wire to reach from the cigar-lighter, over the dash, under the sills and into the boot. The blue remote-wire that comes with
1. Removing the Trim to get to the Cigar-lighter wires:
1.1 Pull forward the trim-strip that holds the passenger and centre air-vents on the dash, starting at the passenger side edge [door-open], working it gently up with a flat screwdriver and moving along to the centre.
1.2 From behind the trim-strip, press out the hazard-light and lock switch-panel out of the trim-strip and unplug the wiring-connector. The trim-strip can now be removed.
1.3 Remove the 2 crosshead screws from the top corners of the radio/climate-control fascia and pull that forward top first.

1.4 Unplug the 2 wiring-connectors from the climate-control fascia and pull it further forward.
1.5 Unplug the 3 or 4 wiring-connectors from the bottom of the fascia [ASC/PDC/heated-seats etc.] and completely remove it.
1.6 Gently prise up the gear-stick gaiter and lift it up out of the way.
1.7 Remove the iDrive knob by pulling it vertically upwards.
1.8 Remove the 2 screws under the gearstick-gaiter holding the centre-console trim panel using a T20 Torx-head driver.
1.9 Use a flat-screwdriver to gently prise up the centre-console trim panel, being careful of the 2 push-studs at the rear, unplug the 'Menu' button wiring-connector and remove the panel.
1.10 Remove the 4 screws holding the ash-tray using a T20 Torx-head driver and lift the ash-try out. It is not necessary to unplug the wiring-connector as it should reach out enough to splice the wire.

2. Splicing / Running the Remote Wire:
2.1 Pull down the plastic trim-panel directly under the steering-column. It has a push clip at either side.

2.2 Run the remote-wire in through the open trim-panel and round to the bottom of the dashboard and under the ash-tray surround so it comes out with the cigar-lighter wiring.
2.3 Splice the remote-wire into the Red live-wire for the cigar-lighter. Solder/heat-shrink is best, but I went with the quick and easy Scotch-lock method.

2.3 Re-fit the centre-console and dash/fascia trim, or if you wish to add a switch so the subs/amp can also be turned off manually then follow THIS POST first.
2.4 Remove the coin-tray from under the steering-column by undoing the 2 crosshead-screws.
2.5 Pull back the door-seal from the lower front-corner of the driver's door.
2.6 Run the other end of the remote-wire through the opposite side of the open trim-panel under the steering-column [towards the driver's door] to where it can be reached from the coin-tray aperture.
2.7 Reach into the coin-tray aperture with the end of the remote-wire and feed it through the edge of the dashboard until it can be seen in the gap behind the door-seal.
2.8 Pull the rest of the remote-wire out of the door-seal and re-fit the trim-panel / coin-tray.
2.9 Feed the remote-wire down behind the trim-panel at the low front corner of the driver's door and lift up the door-sill trim until the wire can be reached and pulled through from below into the footwell.

2.10 Re-fit the door-seal.
2.11 Remove the rear seat-squab by pulling it up sharply at the either side.
2.12 Run the remote-wire through into the rear footwell and up the side of the rear seat, tucking it under the door-sill and B-pillar trim as you do so.

2.13 Locate a gap along the top of the seat-back / parcel-shelf for the remote-wire to run through into the boot, the easiest place is the driver's side about halfway to the centre, and feed the wire down about 6 inches. From side the boot the wire should be coming through at the far edge of the parcel-shelf, so pull a good length through to avoid it getting yanked back up.
2.14 Run the remote-wire under the trim at the side of the seat-squab, tuck it up behind the side of the seat-back and along the parcel-shelf, then pull the remaining wire through into the boot.

2.15 Re-fit the rear seat-squab.
1. Removing the Trim to get to the Cigar-lighter wires:
1.1 Pull forward the trim-strip that holds the passenger and centre air-vents on the dash, starting at the passenger side edge [door-open], working it gently up with a flat screwdriver and moving along to the centre.
1.2 From behind the trim-strip, press out the hazard-light and lock switch-panel out of the trim-strip and unplug the wiring-connector. The trim-strip can now be removed.
1.3 Remove the 2 crosshead screws from the top corners of the radio/climate-control fascia and pull that forward top first.

1.4 Unplug the 2 wiring-connectors from the climate-control fascia and pull it further forward.
1.5 Unplug the 3 or 4 wiring-connectors from the bottom of the fascia [ASC/PDC/heated-seats etc.] and completely remove it.
1.6 Gently prise up the gear-stick gaiter and lift it up out of the way.
1.7 Remove the iDrive knob by pulling it vertically upwards.
1.8 Remove the 2 screws under the gearstick-gaiter holding the centre-console trim panel using a T20 Torx-head driver.
1.9 Use a flat-screwdriver to gently prise up the centre-console trim panel, being careful of the 2 push-studs at the rear, unplug the 'Menu' button wiring-connector and remove the panel.
1.10 Remove the 4 screws holding the ash-tray using a T20 Torx-head driver and lift the ash-try out. It is not necessary to unplug the wiring-connector as it should reach out enough to splice the wire.

2. Splicing / Running the Remote Wire:
2.1 Pull down the plastic trim-panel directly under the steering-column. It has a push clip at either side.
2.2 Run the remote-wire in through the open trim-panel and round to the bottom of the dashboard and under the ash-tray surround so it comes out with the cigar-lighter wiring.
2.3 Splice the remote-wire into the Red live-wire for the cigar-lighter. Solder/heat-shrink is best, but I went with the quick and easy Scotch-lock method.
2.3 Re-fit the centre-console and dash/fascia trim, or if you wish to add a switch so the subs/amp can also be turned off manually then follow THIS POST first.
2.4 Remove the coin-tray from under the steering-column by undoing the 2 crosshead-screws.
2.5 Pull back the door-seal from the lower front-corner of the driver's door.
2.6 Run the other end of the remote-wire through the opposite side of the open trim-panel under the steering-column [towards the driver's door] to where it can be reached from the coin-tray aperture.
2.7 Reach into the coin-tray aperture with the end of the remote-wire and feed it through the edge of the dashboard until it can be seen in the gap behind the door-seal.
2.8 Pull the rest of the remote-wire out of the door-seal and re-fit the trim-panel / coin-tray.
2.9 Feed the remote-wire down behind the trim-panel at the low front corner of the driver's door and lift up the door-sill trim until the wire can be reached and pulled through from below into the footwell.
2.10 Re-fit the door-seal.
2.11 Remove the rear seat-squab by pulling it up sharply at the either side.
2.12 Run the remote-wire through into the rear footwell and up the side of the rear seat, tucking it under the door-sill and B-pillar trim as you do so.
2.13 Locate a gap along the top of the seat-back / parcel-shelf for the remote-wire to run through into the boot, the easiest place is the driver's side about halfway to the centre, and feed the wire down about 6 inches. From side the boot the wire should be coming through at the far edge of the parcel-shelf, so pull a good length through to avoid it getting yanked back up.
2.14 Run the remote-wire under the trim at the side of the seat-squab, tuck it up behind the side of the seat-back and along the parcel-shelf, then pull the remaining wire through into the boot.
2.15 Re-fit the rear seat-squab.
Sunday, 2 March 2014
E60 Audio: New Amp sound cut-off issues.
This is common with BMW stock sound-systems. Something to do with taking an audio-feed from the rear speakers causes the entire sound-system to stop audio altogether. This happens in E39 and E46 models, but they can be reset straightaway with the ignition. The E60 and other iDrive models need a 16-minute cool down before audio can be restarted and this just won't do.
The problem did not occur in my E39 using an Alpine V12 1kW amp, only with a cheaper 'Toxic Audio' 1kW amp I was given at some point. This has its own volume control and the Alpine is just too loud, but with the long cut-out in the E60 I may simply have to revert back to it and turn bass all the way down on the head-unit. Having said that, there's no guarantee the Alpine will not still cut out audio and I have now found similar cases from people who have bought brand-new, good quality amps, so it looks like that rules out a fault with the Toxic. Worse still, my stereo suffered the audio cut out this week while the amp was plugged in to the speakers but not even turned on [no remote-signal], so this would back up my original fears that the cut-out is to do with too much current being drawn through the rear speaker cables, causing the head-unit to shut down all audio until the system is reset [fully powered-off and back on].
Here is a thread about it on bmw5.co.uk , I cannot say if the power of the amp versus the subs has anything to do with it though - http://forum.bmw5.co.uk/topic/83362-new-sub-woofer-issues-with-audio-cutting-out/
** UPDATE:
After fitting the Alpine V12 amp I have not had any sound cut off issues, just as it was in the E39, but it is still way too loud and overpowering the system, even with bass turned all the way down on the head-unit / iDrive.
To finally get this Alpine amp in balance with the stock system I've bought a crossover-box off eBay, which is a slight extra power-drain, but at least it has a Gain control for each channel so I can turn the subs down and the bass on the stock speakers back to normal. It also cuts out the high frequencies and lets only the low ones through for the subs, though I'm not sure if this will do a great deal for sound quality. I cover fitting that in THIS POST.
Subscribe to:
Posts (Atom)